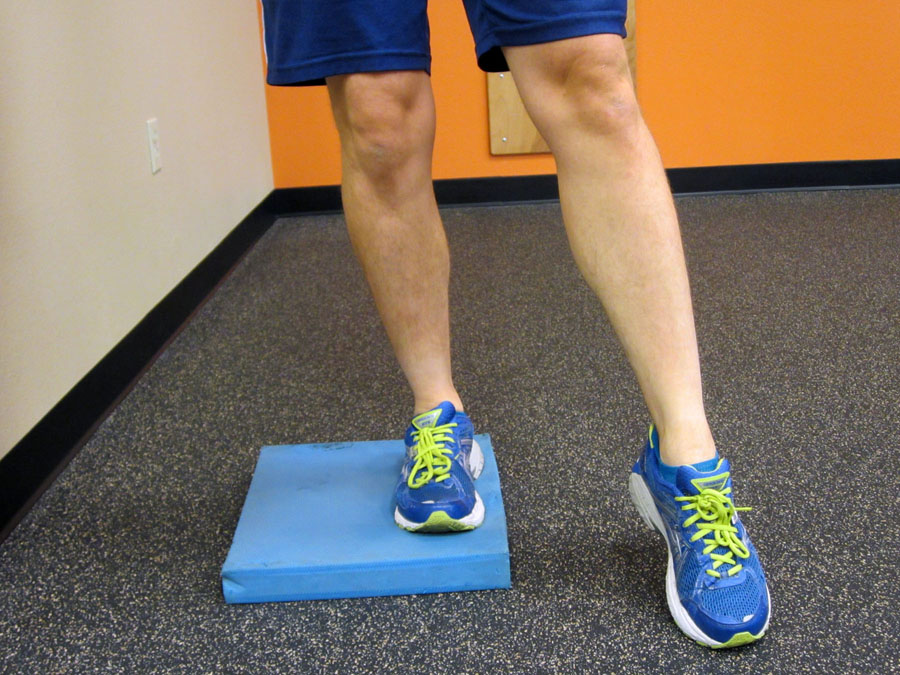
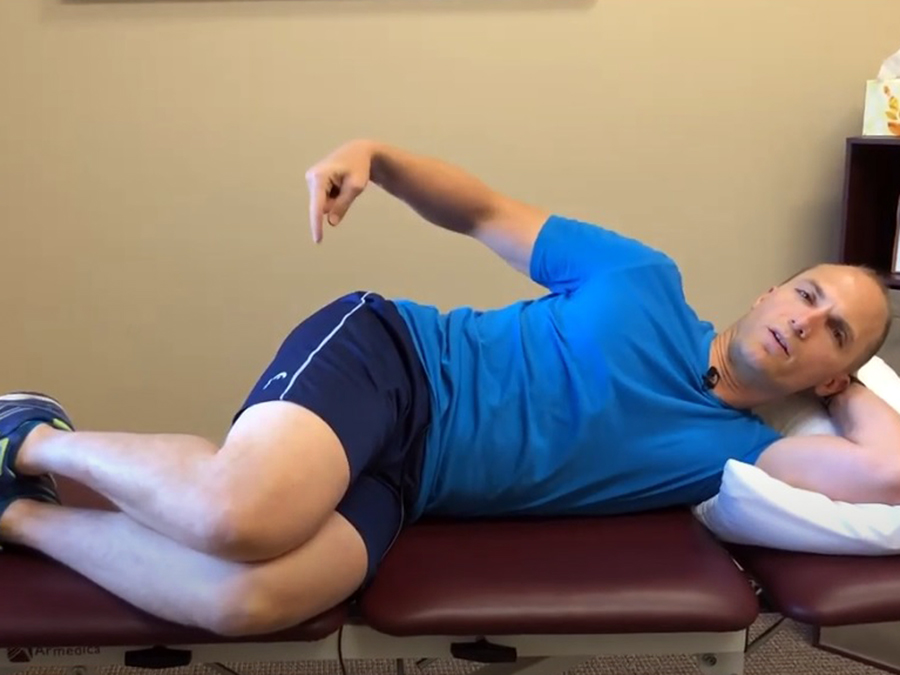
Weakness in the deep external rotation muscles and poor lower extremity single leg balance are commonly associated with many lower extremity overuse injuries. A simple and effective exercise to improve strength, balance, and general stability of the deep hip external rotator muscles is the clock exercise (also called the star drill).
The important points to remember in this exercise are to keep the stance knee unlocked (the leg you are standing on) with the patella (knee cap) slightly externally rotated (usually pointing towards the 3rd or 4th toe). The rotation must come from the hip, NOT the ankle. The stability of the hip and activation of the deep hip external rotators needs to be the primary focus.
Slowly touch the ground very gently with the opposite leg. The amount of pressure touching the ground should be so slight that if there were a package of crackers taped to the bottom of the foot the crackers would not break. Performing the drill on a balance pad will significantly increase the difficulty level of the exercise.
In the following video, I demonstrate how to use a balance pad to perform the clock exercise, a key lower leg stability exercise for treating knee pain, hip pain, and foot and ankle related issues as well as balance.
For prevention strategies and to learn more about on how to self-treat the most common lower extremity overuse injuries, be sure to check out the Resilient Runner Program, which is designed to help YOU meet YOUR training goals by insuring you have the tools to avoid injury, recover quickly, and train at a peak level.
Have you performed the clock exercise before? If so, what was your experience like?Please leave your comments below.
Hip pain, knee pain, and even foot pain (such as plantar fasciitis or posterior tibialis syndrome) can have an associated hip external rotation weakness. An important yet often overlooked component to proper lower extremity stability is how the deep hip external rotator muscles need to work along with other hip external rotators and hip abductors, such as the gluteus medius, to insure proper lower extremity positioning when the leg is in full weight bearing. Particularly, in a single leg stance position during walking, running, skipping or landing from a jump as the leg accepts full weight bearing while the opposite leg is in swing phase.
The deep hip rotators, also known as the short external hip rotators, are a group of muscles consisting of the superior and inferior gemelli, obturator internus, quadratus femoris, and the piriformis. This group of muscles is extremely important for stability of the body, pelvis, and leg as the leg/foot initiates full ground contact.
Weakness in these muscles is often associated with many of the more common lower extremity overuse injuries:
Hip related issues: Piriformis Syndrome, Hip Bursitis, Hip Impingement
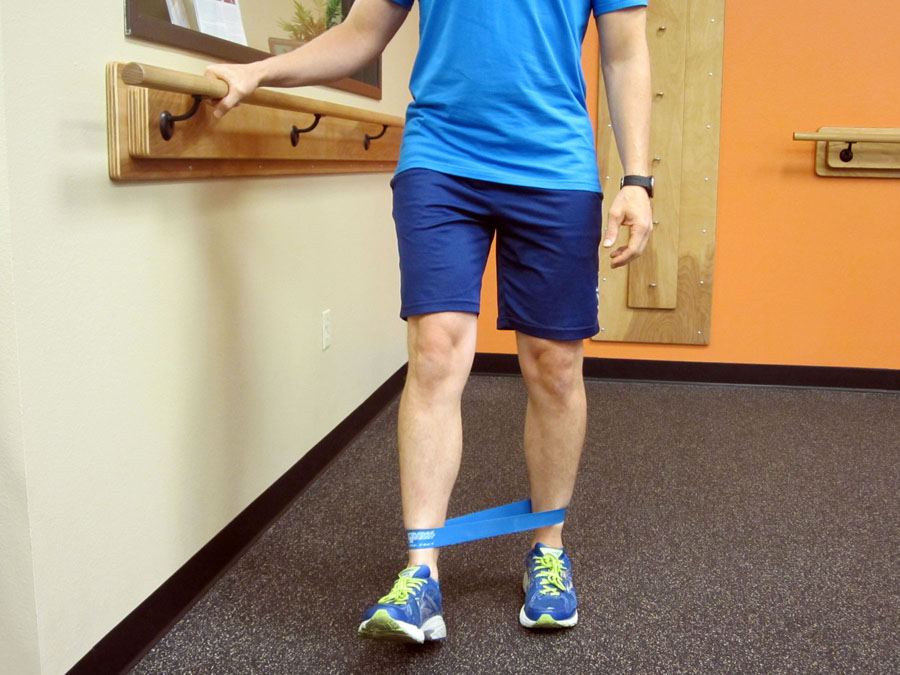
A simple and effective exercise to improve strength of these muscles is the standing hip 3-way exercise. The important points to remember in this exercise are to keep the stance knee unlocked and in a “soft” stance with the patella (knee cap) slightly externally (laterally) rotated (usually pointing toward the 3rd or 4th toe). The rotation must come from the hip, NOT the ankle. The stability of the hip and activation of the deep hip external rotators should be the primary focus.
In the following video, I demonstrate how to use an exercise band to perform the standing hip 3-way exercise, a key hip stability exercise for treating hip pain, knee pain, and foot and ankle related injuries.
For prevention strategies and to learn more about on how to self-treat the most common lower extremity overuse injuries, be sure to check out the Resilient Runner Program, which is designed to help YOU meet YOUR training goals by insuring you have the tools to avoid injury, recover quickly, and train at a peak level.
Do you suffer from hip, knee or foot pain? If so, hip external rotation weakness may be part of the reason for the ongoing pain as you overload and overuse other structures trying to gain extra lower leg support.Additional discussion can help others to manage this condition more effectively. Please leave your comments below.
Balance is so important–particularly as we age. We are concerned about balance because we are concerned about falling (and we should be). Falling is the number one cause of hip fracture. Nearly 20% of all hip fractures in the elderly will result in death within the first year, and 50% of people will never regain their prior level of function.
Poor balance and the fear of falling are the primary reasons for declining mobility and can ultimately affect how well you age. Lack of mobility leads to further decline including: worsening balance; worsening arthritis and pain; and negative effects on diabetes, heart disease, and osteoporosis. It generally leads to a declining quality of life. Mobility is an important element of life. The worse one’s balance becomes, the more difficult it is to be mobile.
Understanding Balance
Balance is primarily affected by five different body systems working in combination with each other:
Muscle Strength and Boney Stability – In general, we have to have the strength and bone structure to actually hold ourselves upright. If we don’t have this, the other aspects of balance don’t mean much. Consider a baby or someone with paralysis. Without adequate strength or if you have a severe fracture, you are unable to balance.
Somatosensory – This is the integration of the neurological system (including the brain and nerves throughout the body) with the musculoskeletal system. This includes all the touch and movement nerve receptors in the muscles, tendons, and joints. This also includes our ability to distinguish between hot and cold. One term you may be familiar with is proprioception. It’s a fancy word describing our brain’s ability to know where we are located in space. For example, if we close our eyes and lift our arms overhead, we know where our arms are located. A common problem affecting the somatosensory system is neuropathy. One very common form of neuropathy is from diabetes. Neuropathy is when the nerve cells (typically in the extremities like hands and feet) will die. This may be due to poor blood supply, trauma, infection, disease or even side effects from medication. The death of the nerve is the “neuropathy” which presents initially when a person may feel cramping, shooting or burning pain. Ultimately, it affects the one’s ability to feel sensations which causes numbness. Having numb feet makes it very difficult to balance!
Eyesight – Humans are very eyesight dependent when it comes to balance. We rely heavily on our eyesight for mobility and to know where we are located in our environment. Have you ever tried closing your eyes when standing or been in a room that was so dark it was hard to tell which direction was up? Now imagine you have an eye condition such as glaucoma, cataracts or you wear bifocals. This affects your ability to see and your depth perception—ultimately, affecting your balance. Your eyesight is not just about the acuity at which you see, but is also important when you think of how you see. Gaze stabilization is how well you can stabilize a target in your field of vision. For example, can you stay focused on a moving object or can you move and keep the object in focus? Your eyes must be able to hold an object in focus or quickly move from one object to the next. Your eyesight is also interconnected with your vestibular system.
Vestibular System – Our vestibular system is our inner ears. It provides us with information on head acceleration and gravity. It also works closely with our brains to process information on the head’s position in its environment. It helps us produce reflexes which affect our sense of equilibrium and our eyes’ ability to hold a gaze on a desired target. If you have ever experienced vertigo, then you understand how bad it feels when your vestibular system is malfunctioning. Like a child on the merry-go-round, this system may be fun to stimulate. The vestibular system is one of the more adaptable systems, and with practice, it can be improved.
Central Nervous System – The brain is responsible for coordinating all of the information gathered by the body’s other systems. If the brain is damaged through trauma such as concussions, motor vehicle accidents, and war, then its ability to process information relating to balance could be affected. Another factor could be infections from virus, bacteria, fungal or a disease process such as Alzheimer’s or Parkinson’s disease. Strokes or aneurisms can also affect balance. If you have been affected by any of these, treatment should be sought from a qualified medical practitioner.
The key to helping you improve balance is to understand why your balance is worsening in the first place. Balance is affected by any one or a combination of the body systems listed above.
In my video, Prevent Falls, Improve Balance, and Age Well, I address the five body systems that are responsible for helping us maintain balance in more detail and what can we do to improve them.
Now that we understand some of the basic components to balance, it’s easy to understand why balance is so complicated, yet so important, and why it must be an area of focus. To effectively treat balance disorders, we have to determine what system or systems are leading to the deficits. That is usually the most difficult part. If a person spends time evaluating why his/her balance has worsened, then an effective treatment program can be designed to address the issue.
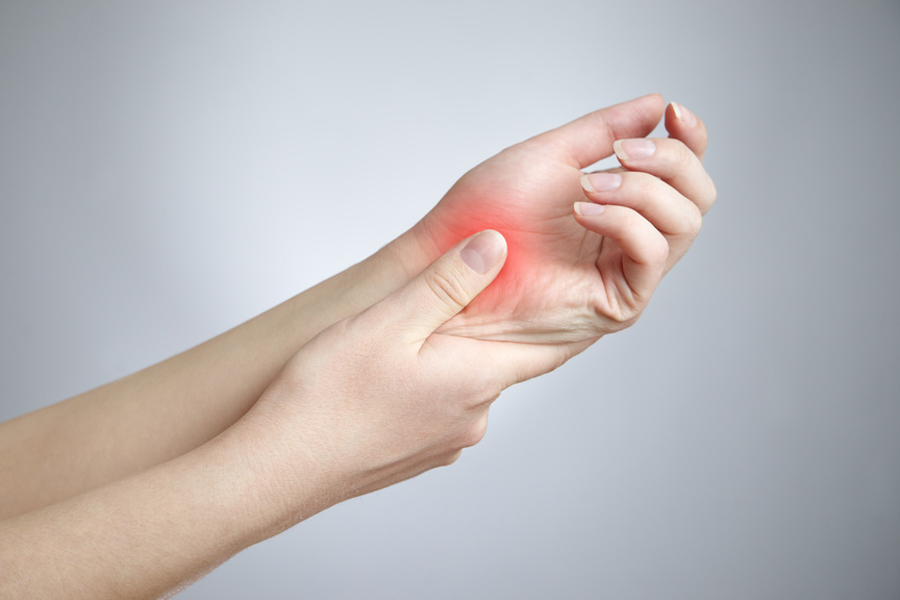
Hand, wrist, and elbow pain is all too common (particularly, with computer, tablet, and phone use). Pain in any one of these locations affects all of us from time to time. The two most likely reasons for developing hand, wrist, and elbow pain are from overuse and poor posture.
Poor wrist, shoulder or thoracic mobility is also commonly related to hand, wrist and/or elbow pain. If the wrist cannot flex or extend properly, it not only causes wrist pain, but excessive stretching of the forearm muscles and strain on the elbow (possibly leading to pain). Poor shoulder or thoracic spine mobility can also cause excessive strain on the elbow, wrist and/or hand.
In this video post, I describe three easy exercises to help you quickly eliminate pain in your hand, wrist, and elbow. I demonstrate two simple stretches with an easy variation to improve their efficacy and teach you how to easily improve your hand and wrist strength using a simple rubber band.
Posture plays a critical role in the positioning of your extremities with movement and even when sitting (including office and/or computer work). Improper posture combined with poor ergonomics is a top reason to develop not only elbow pain, but also neck, upper back, shoulder, and wrist pain. Regardless if the activity is weightlifting or typing, your posture matters!
For additional ways to easily improve your posture and reduce pain in the arm/hand as well as the neck and shoulder, be sure to subscribe to my e-mail list to gain immediate access to My Top 8 Stretches to Eliminate Neck, Upper Back, and Shoulder Pain for step-by-step exercise instructions and photos.
Hand, wrist, and/or elbow pain can be debilitating and limit your ability to exercise, work on the computer or even use your phone. Be proactive in your care and management. If the pain persists, seek additional help. Don’t let the pain linger. The longer it’s left untreated, the more potential for harm and damage which potentially could lead to a longer recovery. The American Physical Therapy Association (APTA) is an excellent resource for learning more about physical therapy as well as locating a physical therapist in your area.
Do you have any other favorite exercises or stretches to reduce hand, wrist or elbow pain? Please leave your comments below.
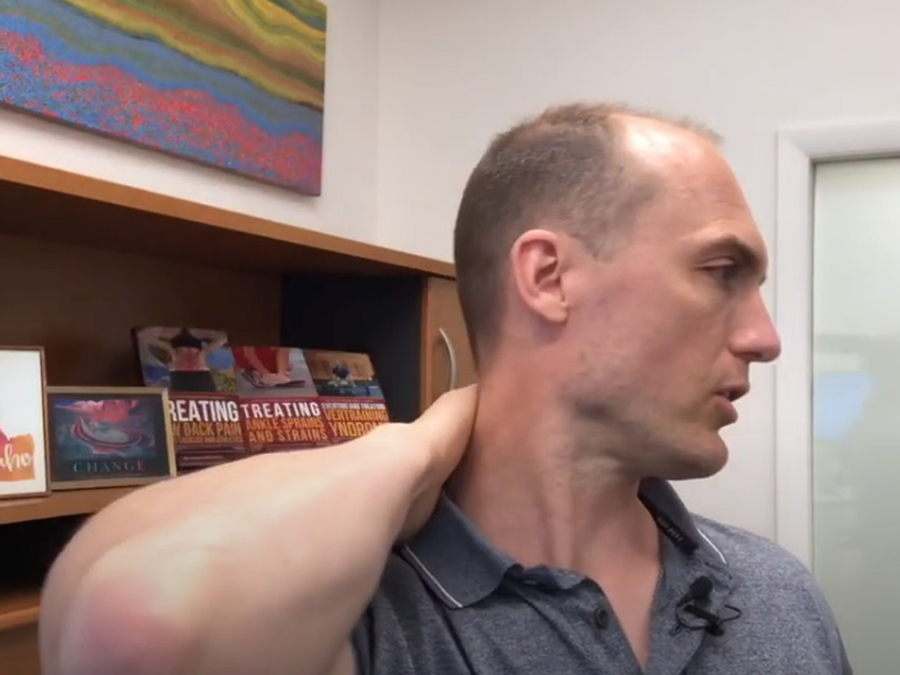
Have you ever woke up from a good night of sleep with a kink in your neck? How about not being able to move your head without pain? Yeah, me, too. How about a sore neck or a stiff neck after exercising or doing an activity like painting? Yep, I have had that, too.
So often this “kinked neck” or “stiff neck” feeling is easily self-treatable. In the following video, I demonstrate a very simple and effective method to self-treat that painful stiff neck feeling that we all get from time to time.
If you want a more detailed explanation of neck pain and ways to prevent it from occurring, be sure to read my post on neck pain, headaches, and the “core” muscles of your neck. You will discover why it’s important to insure proper cervical core strength in order to not only alleviate neck pain and headaches, but also to prevent them from reoccurring.
For additional ways to easily improve your posture and reduce pain in the neck and shoulder, be sure to subscribe to my e-mail list to gain immediate access to My Top 8 Stretches to Eliminate Neck, Upper Back, and Shoulder Pain for step-by-step exercise instructions and photos.
Do you suffer from foot, hip or knee pain? If so, hip external rotation weakness and poor single leg balance may be part of the reason for the ongoing pain as you overload and overuse other muscle groups in order to gain extra lower leg support. Weakness in the deep external rotation muscles is commonly associated with many lower extremity overuse injuries.
Injuries commonly associated with hip weakness include:
Foot/ankle injuries such as plantar fasciitis, Achilles tendinitis or posterior tibialis syndrome.
Hip related issues including piriformis syndrome, hip bursitis, and hip impingement.
Knee injuries such as Patellar Femoral Pain Syndrome (PFPS) and Iliotibial Band Syndrome (ITBS).
The deep hip external rotator muscles need to work along with the hip abductors (such as the gluteus medius) to insure proper lower extremity positioning when the leg is in full weight bearing. (Particularly, in a single leg stance.) One leg bears the full weight while the opposite leg is in the swing phase while walking, running or skipping.
The deep hip rotators (also known as the short external hip rotators) are a group of muscles including: the superior and inferior gemelli muscles; obturator internus; quadratus femoris; and the piriformis. This group of muscles is extremely important for stability of the body, pelvis, and leg as the leg/foot initiates full ground contact.
The clamshell exercise is a commonly prescribed exercise designed to target the hip abductors and hip external rotators. However, this exercise is often performed incorrectly or ineffectively.
In the following video, I demonstrate my preferred method of performing the clamshell exercise in order to insure optimal effectiveness.
In order to engage the deep hip rotators, you should feel the muscles working deep into the buttocks and directly behind the greater trochanter (the hard bone that pokes up at the top of the hip).
This exercise should be performed very slowly. I advise a count of 5 seconds up, a 5 second hold, and then a 5 second slow return to the starting position for at least 10 repetitions.
If you aren’t feeling the deep hip rotators activate, then you may need to reposition your legs. Usually, repositioning the knees and moving them up toward your head into a more fetal position will do the trick.
Proper core and lumbar extensor strength is the key to preventing an episode of low back pain (LBP) as well as an important component to treating LBP. Low back pain is estimated to affect nearly 80% of the U.S. population at one time or another. In general, most of us don’t spend enough time properly strengthening our core muscles. In this video post, you will learn how to engage your abdominal muscles with a simple ball exercise that I recommend to all of my patients initially in my LBP rehabilitation program.
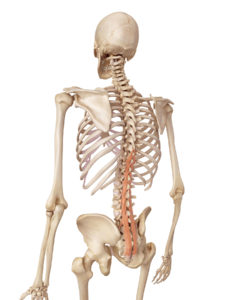
The core muscles are part of the body’s natural method of stabilizing the spine. The core muscles, along with intra-abdominal pressure, help to form the round cylinder that is utilized to support the spine. Ligaments and boney articulations are also important in spinal stabilization. Most people don’t realize that the core actually consists of two separate groups of muscles, the inner and outer core muscles, and neither group involve the rectus femoris muscles (the six pack).
The Multifidus Muscles
The inner core consists of the muscles of the pelvic floor, the transversus abdominis (TVA), diaphragm, and the multifidus muscles (which span the vertebrae along the back side of the spine as shown above). The TVA wraps all the way around the stomach and attaches to the spine. This is what helps to form the cylinder. When contracted (in conjunction with the pelvic floor and diaphragm), it helps to increase the intra-abdominal pressure to support the spine.
The other muscles that help to support the spine are known as the outer core muscles. These muscles are responsible for movement of the trunk and spine as well as aiding in stability. The inner core muscles do not actually produce any trunk or spine movement. The outer core muscles consists of the following muscles: lumbar paraspinal muscles; the quadratus lumborm; the internal and external obliques; and the psoas major and minor (hip flexors). Some may also include the glutes (buttocks muscles), hamstrings, and quadriceps as part of the outer core muscles.
Those working on core strength may not be performing the correct exercises. Performing proper core exercises (and particularly, lumbar stabilization exercises) are the primary treatment modality for LBP.
In this video, I demonstrate an easy and effective way to actively engage the inner core abdominal muscles. This exercise is typically safe even early on during the rehabilitation process for low back pain.
For more information on how to effectively exercise and work the core muscles in order to prevent or treat LBP, be sure to check out my book, Treating Low Back Pain during Exercise and Athletics. You will learn how to address specific causes of LBP as well as the best practices on how to prevent and self-treat when you experience an episode of LBP. In this step-by-step LBP rehabilitation guide (complete with photos and detailed exercise descriptions), you will discover how to implement prevention and rehabilitation strategies to eliminate pain and get back to training and exercise sooner.
AVAILABLE NOW ON AMAZON!
In addition, check out this sample video, Segment 2: What are the Core Muscles?, taken from my Treating Low Back Pain (LBP) during Exercise and Athletics Video Package which you can purchase HERE.
Proper rotator cuff and scapular muscle strength is critical to preventing and treating shoulder pain. In this video, I demonstrate one of my favorite rotator cuff and scapular stabilizing exercises using an exercise band. It works the lower trapezius, deltoid and rotator cuff muscles.
The rotator cuff is a critical component to shoulder mobility. It’s made up of four different muscles whose job is to make sure that the ball of the humerus (arm bone) rotates, slides, and glides properly in the socket, which is made up of the scapula. The rotator cuff allows the other major muscles of the arm, such as the deltoid and Latissimus dorsi (lats), to properly perform their movements.
The scapulothoracic muscles are the lower trapezius, middle trapezius and rhomboids primarily and proper strength and function in these muscles is critical to insuring proper shoulder blade movement and general shoulder mechanics. Weakness in these muscles is often associated with shoulder impingement syndrome.
Weakness in the rotator cuff or scapulothoracic muscles can lead to rubbing of the rotator cuff tendon on the bone or impingement of the bursa within the shoulder leading to impingement syndrome (which can eventually lead to fraying and tearing).With proper muscle strength and balance, you can help reduce the risk of this occurring.
Shoulder impingement or a partial rotator cuff tear can be very painful and may take many weeks to recover. Many different causative factors can lead to these conditions. In most cases, shoulder impingement (or even small partial tears) can be completely rehabilitated and should (when treated properly) leave no residual effects once a person has recovered.
In addition to proper rotator cuff strength, it’s important to address adequate shoulder and thoracic (upper back) mobility. Be sure to check out My Top 8 Stretches to Eliminate Neck, Upper Back, and Shoulder Pain. Subscribe and you will automatically gain access to this FREE resource. Download the .pdf file, which is full of photos and exercise instructions, to get started!
Shoulder pain can be debilitating by limiting your ability to exercise and perform daily tasks. Be proactive in your care and management. If you continue to experience pain, seek additional help. Don’t let the pain linger. The longer a condition is left untreated, the more potential for harm and damage which potentially could lead to a longer recovery. The American Physical Therapy Association (APTA) is an excellent resource for learning more about physical therapy as well as locating a physical therapist in your area.
Which treatments have you found to be the most effective in dealing with shoulder pain? Please leave your comments below.
Elbow pain is a common issue that can affect a wide range of people including CrossFitters, weightlifters, weekend warriors, and office workers. One common type of elbow pain is tennis elbow (lateral epicondylitis) which affects the extensor muscles and tendons of the wrist.
There are many possible reasons for developing elbow pain. Typically the cause of pain is either from an acute onset or due to repetitive motion and/or muscle imbalance issues. Examples of an acute onset include over doing yard work or a specific injury such as a trauma. A repetitive motion and/or muscle imbalance issue can arise from chronic poor posture while sitting at work or from performing a job that requires repeating a task to the point that the tendons are overloaded.
5 Tips on How to Self-Treat Tennis Elbow:
1. RICE
As with many injuries, the initial treatment is RICE (Rest, Ice, Compression, and Elevation).
Rest. Limit any activities that cause pain.
Ice. Use ice as needed for pain and edema control. The rule for icing is to apply ice no more than twenty minutes per hour. Do not place the ice directly against the skin, especially if you are using a gel pack style. A bag of frozen peas can be ideal. Individuals with poor circulation or impaired sensation should take particular care when icing.
Compression. Consider wearing an elbow compression sleeve.
Elevation. Although it’s not too useful for this specific condition, it would be an excellent time to apply ice.
2. Identify the Offending Movement
If you’re experiencing elbow pain, try to identify which specific movement aggravates the elbow. Once you have identified the movement, initially avoid it until the pain subsides. Consider any issues with your technique that may have led to the pain, and address any long term muscle imbalances that may have developed.
3. Work on your Elbow Mobility
Addressing any tissue mobility issues and promoting increased blood flow can help to improve the healing response and reduce the pain. In this video, I demonstrate how to utilize a mobility/compression band as a self-treatment method for tennis elbow.
Mobility/compression bands, such as the Rogue Fitness VooDoo X Bands or EDGE Mobility Bands, are a novel way to self-mobilize tissue. The use of a mobility band not only helps to mobilize the tissue, but it affects blood flow to the area and speeds up healing. A mobility band also helps to reset some of the receptor cells in the muscle tissue which cause excessive muscle tightness as a means to work on tissue mobility. This will work to directly affect the painful tissues. (If you suffer from any form of blood clotting disorder or are on blood thinning medications, I would advise against utilizing mobility bands for any type of aggressive, deep compression.)
4. Work on your Upper Thoracic and Shoulder Mobility
Posture plays a critical role in the positioning of your extremities with movement and activity. Improper posture combined with poor ergonomics is a top reason to develop not only elbow pain, but also neck, upper back, shoulder, and wrist pain. Regardless if the activity is weightlifting or typing, your posture matters! Please refer to How to Improve Posture and Eliminate Pain.
If your elbow pain has developed from poor sitting postures or chronic repetitive stresses, then I highly encourage you to also work on upper body mobility by focusing on shoulder and thoracic mobility as well as lower body and spinal mobility. Subscribe to my e-mail list to gain immediate access to My Top 8 Stretches to Eliminate Neck, Upper Back, and Shoulder Pain for step-by-step exercise instructions and photos.
5. Trial other Methods of Self-Mobilization
Once you start to experience pain, be aggressive with your management and self-treatment. I like to use either a tennis ball or roll PVC pipe over the forearm area which can be an effective self-mobilization for tennis elbow. For more ideas on how to self-mobilize, please refer to My Top 3 Household Items for Self-Mobilization.
Cupping is another form of muscle tissue and fascia self-mobilization. There are many different methods and techniques you can use. In this video, I demonstrate how to use cupping to treat elbow pain affecting the wrist extensor muscles and tendons.
Elbow pain can be debilitating by limiting your ability to exercise and perform daily tasks. Be proactive in your care and management. If the pain persists, seek additional help. Don’t let the pain linger. The longer it’s left untreated, the more potential for harm and damage which potentially could lead to a longer recovery. The American Physical Therapy Association (APTA) is an excellent resource for learning more about physical therapy as well as locating a physical therapist in your area.
Have you tried using a mobility/compression band as a self-treatment method for tennis elbow? What was your experience like?Please leave your comments below.
Elbow pain is a common issue that can affect a wide range of people. Two of the most common types of elbow pain include: tennis elbow (lateral epicondylitis) which affects the extensor muscles and tendons of the wrist and golfer’s elbow (medial epicondylitis) which affects the flexor muscles and tendons of the wrist.
Possible reasons for developing elbow pain include:
Poor grip strength.
Muscle imbalances between wrist flexion and extension strength.
Improper weight lifting technique.
Overuse/overload/overtraining.
Mobility related issues in the wrist, shoulder or thoracic spine.
Excessive mobility or hypermobility may also be an issue. It tends to be more common in females than in males, and it’s usually associated with the shoulders or elbows.
Repetitive motion injury.
Poor posture.
Tackling an activity you don’t often do (such as digging holes for a new fence or trimming hedges).
Poor wrist, shoulder or thoracic mobility is also commonly related to elbow pain associated with exercise. If the wrist cannot flex or extend properly, it not only causes wrist pain, but excessive stretching of the forearm muscles and strain on the elbow (possibly leading to pain). Elbow pain can be very debilitating. It can limit your ability to exercise as well as limit your ability to perform daily tasks.
Poor shoulder or thoracic spine mobility can also cause excessive strain on the elbow. Consider exercises like the overhead lift or pull ups or even the squat. If the shoulder cannot fully flex or the thoracic cannot fully extend (allowing proper shoulder flexion), then the elbows will absorb more of the load. The lack of shoulder or thoracic mobility also affects proper alignment of the upper extremity during the movement. Over time and with multiple repetitions, this overloading can cause pain and injury to the elbow.
Whenever one part of the body doesn’t have adequate mobility, another part will do more to allow for the movement to take place. When an exercise is performed at a high speed, high relative weight or high repetitions, a lack of mobility can make you more susceptible to pain and injury.
Posture plays a critical role in the positioning of your extremities with movement and even when sitting (including office and/or computer work). Improper posture combined with poor ergonomics is a top reason to develop not only elbow pain, but also neck, upper back, shoulder, and wrist pain. Regardless if the activity is weightlifting or typing, your posture matters! Please refer to How to Improve Posture and Eliminate Pain.
Excessive mobility can have a similar effect. For example, if you’re performing an overhead lift, but your shoulders flex past 180 degrees, then the bar is too far behind your head. This causes excessive force to be placed on the shoulders and elbows. Again, this can lead to injury and pain particularly when performed at a high speed, high relative weight or high repetitions.
How to alleviate Elbow Pain:
RICE
As with many injuries, the initial treatment is RICE (Rest, Ice, Compression, and Elevation).
Rest. Limit any activities that cause pain.
Ice. Use ice as needed for pain and edema control. The rule for icing is to apply ice no more than twenty minutes per hour. Do not place the ice directly against the skin, especially if you are using a gel pack style. A bag of frozen peas can be ideal. Individuals with poor circulation or impaired sensation should take particular care when icing.
Compression. Consider wearing an elbow compression sleeve.
Elevation. Although it’s not too useful for this specific condition, it would be an excellent time to apply ice.
Self-Mobilization
Cupping is a form of muscle tissue and fascia self-mobilization. There are many different methods and techniques you can use. In this video, I demonstrate how to use cupping to treat elbow pain affecting the wrist extensor muscles and tendons.
Cupping can be used to treat elbow pain, elbow tendinitis, and tennis elbow. These CupEDGE Massage Tools are easy to use and helpful for self-treating tight and restricted areas (on other parts of the body, too). Another option would be to use a Mini Plunger. This technique should not cause bruising or discoloration.
Work on your Grip Strength
Developing proper grip strength is important in order to avoid elbow pain. Easy exercises to train grip strength include: dead lift; pull ups, and farmers carries. You can even work on hanging from a pull up bar for time as a way to judge your fitness while gaining strength and endurance in your grip.
A common mistake when training grip strength is to under estimate the importance of improving finger and wrist extensor strength. It’s critical to keep the appropriate balance between wrist flexors and wrist and finger extensors strength to lessen the risk of wrist and elbow overuse injuries such as tennis elbow or golfer’s elbow.
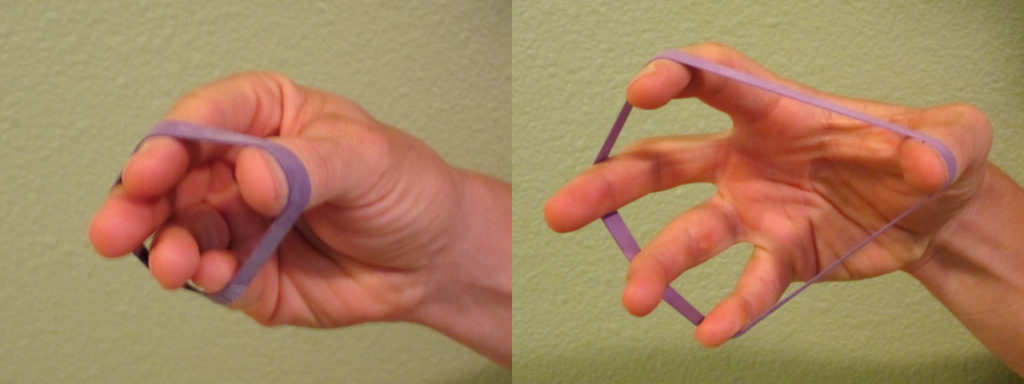
Your grip strength will improve more rapidly as your wrist and hand muscles find their optimal length tension relationship (which allows for maximum strength production). I often recommend using a thick rubber band as a way to improve finger extension strength (as demonstrated below). Work on extending each finger equally when performing two sets of 10-15 repetitions multiple times per week.
Elbow pain can be debilitating by limiting your ability to exercise and perform daily tasks. Be proactive in your care and management. If the pain persists, seek additional help. Don’t let the pain linger. The longer it’s left untreated, the more potential for harm and damage which potentially could lead to a longer recovery. The American Physical Therapy Association (APTA) is an excellent resource for learning more about physical therapy as well as locating a physical therapist in your area.
Have you tried cupping as a form of self-mobilization in order to alleviate elbow pain? What was your experience like? Please leave your comments below.