How to Fix a Crack in your Heel

Worrying about a crack in the skin of your heel might seem a bit odd since cracks are quite common. It’s estimated that this condition affects approximately 20% of the people in the United States with over half of the cases affecting females. These cracks are also referred to as heel fissures. They are painful and can become infected so they need to be taken seriously.

These cracks or fissures are typically associated with thickened callused areas along the heel and dry skin. If the skin is dry and callused, it doesn’t have good elasticity so the skin becomes stiff and prone to cracking (resulting in the fissures). The fissures are often associated with obesity, poor footwear or standing for long periods of time.

Risk Factors:

  • Prolonged standing.
  • Obesity.
  • Shoes without backs that allow the skin to stay open to the elements.
  • Poorly fitting shoes that cause friction or shearing in heel pad area.
  • Dehydrated skin.
  • Cold weather or very dry climates.
  • Diabetes which usually leads to poor skin healing due to its negative effects on blood flow and nutrient exchange in the lower extremities.*
  • Other skin conditions such as psoriasis, eczema or fungal infections like athlete’s foot.

*These cracks are at a high risk for infection (particularly, if you are diabetic).  See a physician right away if you are experiencing acute soreness, redness, swelling or severe pain in this area or the foot for more than a day or two.

How to Self-Treat a Crack in the Heel:

  • Identify the reason it developed in the first place. Is your skin constantly too dry or flakey? Then start a daily lotion and moisturizer routine. Are your shoes fitting properly or do you have a fungal infection that is affecting the skin? Deal with any known risk factors for the condition.
  • If you have a large callus in this area, be sure to keep the callus trimmed down and in check. You may need to initially get help from a podiatrist if your callus is exceptionally thick or if you are diabetic. Otherwise, use a heel file or pumice stone. Keep the skin moisturized through a quality lotion that does not have additional ingredients or perfumes for smell. A product like Kerasal Intensive Foot Repair Ointment can help soften very hard and rough skin along the heel.
  • While you work on keeping the area moisturized and getting the callus smaller, skin glues can be helpful to prevent the area from splitting further and to provide a barrier to prevent infection.
  • Use a product like Flexitol Heel Balm which contains 20% Urea. This can help soften the skin and reduce the callus area. If you want it to work even better, try applying a barrier cream (like petroleum jelly or lanolin lotion) over top. Consider wearing cotton socks over top of the barrier cream to help keep moisture in. It also allows the skin to breath and can prevent staining of your bedding.
  • Try to limit excessively long and hot baths or showers as this will dry the skin further.
  • Always use fragrance free products.
  • Always moisturize the area after bathing or showering.
  • Wearing shoes with a closed heel can help heal and prevent cracks to the back of the foot. Shoes with closed heels with cushioning give support to the problematic area.
  • Try to wear padded socks. Wearing cotton socks with shoes may help to reduce friction as well along the heel. Cotton socks can also soak up sweat and moisture, allow the skin to breathe, and help to prevent the skin drying out.

If the condition is severe, worsens or just doesn’t seem to heal, additional medical care may be required. A medical provider (like a podiatrist) can help:

  • Remove dead skin.
  • Prescribe stronger softening or removal agents.
  • Apply medical glue to seal cracks.
  • Prescribe an antibiotic if there is an infection.
  • Wrap the heel with dressings or bandages to protect the area and/or help it heal through different medications and bandages.
  • Recommend shoe inserts, heel pads or heel cups.

Cracked heels are common, but can be problematic and downright painful if left untreated. If you’re not experiencing relief and progressing with the heel crack significantly improving after two to three weeks of aggressively managing the symptoms, contact your medical provider.

Do you have any specific remedies for fixing a cracked heel? Please share your tips!

If you have a question that you would like featured in an upcoming video or blog post, please comment below or submit your question to contact@thePhysicalTherapyAdvisor.com. In case you haven’t already, be sure to subscribe to my e-mail list and YouTube channel as well as join our community on Facebook by following The Physical Therapy Advisor!

7 Tips to Self-Treat Morton’s Neuroma

Do you have pain between your toes?  Does it feel like you are always standing on a pebble or have a lump in your socks between your toes?  This may be a Morton’s neuroma.  A neuroma is a painful condition that affects the ball of your foot.  It involves a thickening of the tissue that surrounds the digital nerve bundle.  A Morton’s neuroma is one of the most common types of neuromas, typically occurring between the 3rd and 4th toe, but can form between any of them.

Morton’s neuromas occur due to repeated stresses, irritation, and pressure at the ball of the foot, affecting one of the nerves that lead to the toes.  It’s effectively a repetitive trauma or overuse injury.  There is typically no swelling bumps or bruises with a Morton’s neuroma.

Symptoms:

  • Numbness or tingling affecting the ball of the foot, between the toes, and/or the toes themselves.
  • Sharp, stabbing or burning pains that are intermittent and only affect either the ball of the foot or toes (usually 3rd and 4th toe).
  • The sensation of standing on a pebble or marble or having a lump in your shoe or sock.
  • When running, the pain is often felt during the push off from the toes, prior to the swing through phase.

7 Tips to Self-Treat a Morton’s Neuroma:

1. Avoid wearing tight fitting, ill-fitting, and high heeled shoes.  Be sure that your shoes have an appropriately sized toe box.  In the case of athletic shoes (particularly, for distance running), extra room in the toe box can be beneficial as the foot will often swell during the course of the run.  If you wear high heeled shoes, consider wearing them less frequently and/or switching to a shorter heel.  Even wearing socks that are too small can potentially cause too much compression and lead to increased symptoms.

2. Orthotics.  Many people respond well to a rigid orthotic with an extension underneath the first metatarsal bone.  You may not necessary need custom orthotics.  Many running stores sell an over-the-counter orthotic such as Superfeet Blue Premium Insoles.  The blue tends to fit most feet, but a variety of options are available for customization.  In my experience, these insoles can last 1,000 to 1,500 miles easily.

If the over-the-counter options aren’t helping you, please see a physical therapist or podiatrist for custom orthotics.  Seek assistance from a professional who is a runner and has experience with treating other runners.  A full length orthotic is indicated.  Try to find one that has a little cushion over the hard rigid plastic portion.  This will significantly help with comfort.  Be sure to see a sample of any custom orthotics before you buy.  I recommend not buying any orthotics without a small layer of foam or cushioning.  The top layer can wear out, but hard rigid plastic without a cushion is too uncomfortable for most people to wear regularly.

3. Improve your foot mobility and strength.  Weakness in the foot and ankle muscles (as well as the smaller foot intrinsic muscles) is often found in cases of a Morton’s neuroma as part of the biomechanical issues that lead to its development.  Complete with instructions and photos, this guide, Morton’s Neuroma Rehabilitation Exercises, outlines how to safely perform exercises in order to improve your mobility and strength.

4. Improve your balance.  Poor balance and proprioceptive awareness is often associated with muscle weakness in the foot and ankle as well as the knee and hip musculature.  Poor balance and weakness throughout the kinetic chain will cause the foot and ankle complex to have to work harder to compensate (potentially, overworking the tissues).  Also, weakness and balance deficits can lead to poor foot biomechanics.  Please refer to the Balancing on One Foot exercise in the Morton’s Neuroma Rehabilitation Exercises. 

5. Stretch.  It’s critical to maintain proper calf and foot mobility.  Be gentle in stretching any muscles or tissue near the painful site as to not aggravate the neuroma further.  Although the initial focus is on stretching the calf muscles, also consider a full lower body stretching protocol.  Tightness in the calf muscles and loss of dorsiflexion is a risk factor for many foot related disorders.  Work on improving general calf and ankle mobility with an emphasis on dorsiflexion.  Stretching shouldn’t cause more than a mild increase in pain or discomfort.  (If you are lacking mobility in any other part of your body, this is the perfect time to work on it.)

6. Mobilize the Foot.  Be sure to avoid the painful areas (particularly, near the neuroma site).  It’s critical to insure proper foot mobility in the ankle as well as the first metatarsal joint.  Poor mobility in the foot, specifically the first toe, will affect the biomechanics of the foot.  Proceed with great caution if you attempt to mobilize the tissue in or near the neuroma. 

7. Seek Help.  Research concludes that nearly 80% of all cases of Morton’s neuroma can be treated through conservative measures (as outlined above).  However, if you’re not experiencing relief after two to three weeks of aggressively managing the symptoms, contact your local physical therapist for an assessment and help in managing the condition.  The American Physical Therapy Association offers a wonderful resource to help find a physical therapist in your area.  You may need assistance in identifying the biomechanical cause of the condition in order to eliminate the pain and may need additional hands on techniques or modalities to help address the injury.  A custom orthotic may be necessary.  Other modalities, such as iontophoresis (a process of transdermal drug delivery by use of a voltage gradient on the skin either via a hand held machine or self-contained patch) or low-level laser therapy (LLLT), may be indicated.

More specific strategies to help you determine the cause of your Morton’s neuroma along with more thorough treatment and prevention strategies for those suffering from a Morton’s neuroma are covered in the Resilient Runner Program, which is designed to help YOU meet YOUR training goals by insuring you have the tools to avoid injury, recover quickly, and train at a peak level.

What’s Inside the Resilient Runner Program:

  • Guidance on preventing and self-treating common running related injuries, including Hip Flexor Pain, Runner’s Knee, IT Band Syndrome, Piriformis Syndrome, and more!
  • Specific guidelines on when and how to return to running after experiencing an injury.
  • Rehabilitation guides with step-by-step photos demonstrating recommended exercises.
  • Step-by-step instructions on how to apply Kinesiological tape.
  • Downloadable podcasts, videos, and more!

If you’re tired of ongoing aches, pains, and injuries, learn how to become a resilient runner so that you can continue to train and compete in order to meet your goals!

I WANT TO BE RESILIENT!

Plantar Fasciitis? Do this First Thing in the Morning

Plantar fasciitis is a very painful and potentially very debilitating condition. It’s one of the most common causes for heel and/or bottom of the foot pain. In the case of plantar fasciitis, the fascia on the bottom of the foot becomes swollen and irritated and may cause pain when you stand and/or walk. It’s typically at its worst in the morning with your first several steps after sleeping.

In this video, I demonstrate a simple, yet effective warm up to perform whenever you get up from sitting or lying down to prevent foot pain from plantar fasciitis.

Since the tissue on the bottom of the foot tightens as you sit or lay down for any length of time, be very intentional about preparing this area BEFORE you walk. This will lessen the pain and speed recovery. This is why I recommend doing this warm up throughout the day and especially, first thing in the morning.

CLICK HERE TO WATCH NOW

Be sure to check out my post, How to Self-Treat Plantar Fasciitis, for more tips! If you’re not experiencing significant relief upon progressing into your exercise program, please consult a medical professional. I recommend a physical therapist who specializes in feet or who works with athletes for the treatment of plantar fasciitis. The American Physical Therapy Association offers a wonderful resource to help find a physical therapist in your area.

If you have a question that you would like featured in an upcoming video or blog post, please comment below or submit your question to contact@thePhysicalTherapyAdvisor.com. In case you haven’t already, be sure to subscribe to my e-mail list and YouTube channel as well as join our community on Facebook by following The Physical Therapy Advisor!

Want Stronger Hips? Do This

Many lower extremity overuse injuries can stem from poor hip strength. The hip plays a critical role in determining how the foot will actually impact the ground and ultimately how the force of that impact will translate back up the leg. In other words, the hip is a critical component of the lower extremity kinetic chain.

Weakness in the hip musculature (particularly, hip abductors and hip external rotators) will often lead to knee pain as well as many foot and lower leg overuse injuries not to mention pain in the hip itself. Plantar fasciitis as well as knee pain may be caused by hip weakness.

In this video, Hip Strengthening with Band, I demonstrate a unique and advanced exercise designed to specifically strengthen your hip and lower leg in order to address common muscles imbalances found in the hip musculature. It’s a different version of the monster walk using a pull up assistance band. Addressing these muscle imbalances can lead to the permanent resolution of your pain and symptoms.

CLICK HERE TO WATCH NOW

Be sure to check out my other videos, Treating Hip Impingement: Basic Techniques and Treating Hip Impingement: Advanced Techniques.

If you’re interested in more thorough guide along with other videos on how to self-treat lower extremity injuries and pain, check out the Resilient Runner Program. This is the perfect guide to help you take control of your health and fitness as well as self-manage common aches, pains, and injuries. Even if you’re not a runner, this program is appropriate for those who love to stay active and want to enjoy a healthy lifestyle.

If you have a question that you would like featured in an upcoming video or blog post, please comment below or submit your question to contact@thePhysicalTherapyAdvisor.com. In case you haven’t already, be sure to subscribe to my e-mail list and YouTube channel as well as join our community on Facebook by following The Physical Therapy Advisor!

How to Self-Treat a Calf Strain/Pull

https://www.marathontrainingacademy.com/calf-strain-pull

Marathon Training Academy

April 20, 2021

In this guest post for Marathon Training Academy, I address the factors that increase your risk of developing a calf strain/pull. You will learn how to recognize the symptoms and how to self-treat this condition so you don’t lose too much time with your training. Continue Reading

Autoimmune Disorders: What Impedes Recovery

Autoimmune disease is becoming increasingly more prevalent. Although the exact reasons for this increase are unknown, it’s likely multifactorial. Physical therapy has been important for a long time in managing autoimmune conditions such as Rheumatoid Arthritis (RA) that have an obvious orthopaedic impact. However, physical therapists must also understand how other autoimmune disorders (such as Crohn’s Disease, Leaky Gut Syndrome, Celiac Disease, and Ulcerative Colitis) can directly and indirectly impact the plan of care and treatment recommendations.

From a physical therapy standpoint, understanding all types of autoimmune disorders and how they impact nutrient absorption is critical to positive physical therapy outcomes for any musculoskeletal diagnosis.

The following video is a portion of a lecture created for the New Hampshire American Physical Therapy Association (NHAPTA). Kim Steinbarger, PT, MHS, DHSc Candidate and I discuss the role of physical therapy in managing autoimmune disorders and how autoimmune disorders can directly and indirectly impact physical therapy treatment plans. This lecture was specifically for rehabilitation professionals, but it contains important information for anyone impacted by autoimmune disease.

CLICK HERE TO WATCH NOW

If you or a loved one need help managing an autoimmune disease, please contact your local physical therapist for an assessment. The American Physical Therapy Association offers a wonderful resource to help find a physical therapist in your area.

Have you or a loved one been impacted by an autoimmune disease? Please share below. 

If you have a question that you would like featured in an upcoming blog post, please comment below or submit your question to contact@thePhysicalTherapyAdvisor.com. In case you haven’t already, be sure to subscribe to my e-mail list and YouTube channel as well as join our community on Facebook by liking The Physical Therapy Advisor!

The #1 Thing NOT to do if You have Scoliosis

By Rita Miller, PT, MPT, BSPTS C2 Certified in Scoliosis Specific Exercises 

Everyone’s spine has natural curves. These curves round our shoulders and make our lower back curve slightly inward. When viewed from the side, the upper back has a normal round back or kyphosis, while in the lower spine there is “swayback”, or lordosis. When viewed from behind, a spine normally appears straight but some people have spines that also curve from side to side and rotate. This condition of side-to-side spinal curvature is called scoliosis.

Unlike poor posture, these curves can’t be corrected simply by learning to stand up straight. On an x-ray, the spine of a person with scoliosis looks more like an “S” or a “C” than a straight line. A slight curvature may be normal. Scoliosis is present when the spine has one or more abnormal curves of greater than 10°, as measured on the x-ray.

In childhood, idiopathic scoliosis occurs in both girls and boys. However, as children enter adolescence, girls are five to eight times more likely to have their curves increase in size and require treatment.

WHAT CAUSES AIS?

Adolescent Idiopathic Scoliosis (AIS) is a genetic condition, meaning it is inherited and a family may have more than one member with the diagnosis. The exact reason why the spine curves remains unknown (idiopathic). A difference in the rate of growth between the front and back of the spine is the leading theory.

SIGNS AND SYMPTOMS

Adolescent Idiopathic Scoliosis does not usually cause pain, neurological dysfunction such as weakness or numbness in the legs, or respiratory problems (shortness of breath). Most patients are highly functional and without any symptoms. 

Most patients or parents note one or more of the following changes in the patient’s appearance:

  • Chest shifted to one side
  • Head not centered over bottom
  • One shoulder blade more noticeable than the other
  • Unevenness of the waist
  • Clothes hang unevenly
  • One shoulder higher than the other
  • One hip higher than the other
  • Unevenness of the front of the chest

CURVE PROGRESSION

Although we do not know the cause of idiopathic scoliosis, we do know that curves tend to progress based on two major factors: growth remaining in the spine and the curve size. Idiopathic scoliosis curves can get larger during growth of the spine especially during the rapid adolescent growth spurt. Age, the timing of the onset of menstrual periods in girls, the status of the growth plates of the pelvis and hand are all good predictors of how much spine growth is left.

We can review these parameters to estimate the risk of curve progression in your child. Even after your child stops growing, a large curve can get worse. Generally, curves in the thoracic spine greater than 45 or 50 degrees and lumbar curves greater than 35 or 40 degrees will progress even into adulthood. When significant growth remains AND the curve is larger than these thresholds, curve progression is 100 percent.

What Kind of Non-Surgical Treatments Are Available?

Depending on age, skeletal maturity, and curve size, scoliosis has traditionally been managed non-surgically with either a “wait and see” approach if curves are under 25 degrees, or bracing if curves are over 25 and the child has yet to reach full skeletal maturity. More recently, PSSE (Physiotherapy Scoliosis Specific Exercises) have started to be recognized by the Scoliosis Research Society as an effective way to manage the effects of scoliosis during the “wait and see” period, and also during bracing. These exercises are customized for each patient to return the curved spine to a more natural position.

So what is the #1 thing NOT to do if you have a diagnosis of AIS?

Do nothing! “Wait and see” is a fine approach when it comes to certain more invasive approaches, but it is a terrible idea if you plan on a conservative treatment approach. Physical therapy and specifically, Schroth scoliosis specific exercises are proven to be a safe and effective treatment approach with little to no risk of injury. An ever increasing body of evidence demonstrates its effectiveness.

ScoliSpine (located in Boise, Idaho) is the first to be certified in a Scoliosis Specific Exercise Program in the state of Idaho based on the principles of Katherina Schroth known as the “Schroth Method.”

Katharina Schroth (1894-1985) developed the Schroth Method, based on her personal experience with scoliosis as a teen. She dedicated countless hours attempting different corrections of her curve and discovered certain positions, movements and breathing techniques which made her own torso deformity less obvious. Trained as a teacher, Ms. Schroth started sharing her techniques with patients in the 1920’s and eventually established her own clinic in Germany. Her daughter, Christa Lehnert-Schroth P.T. (www.schroth-skoliosebehandlung.de and schrothmethod.com) helped her further develop the theory underlying the Schroth Method. Over one thousand patients are treated annually at Asklepios Katharina-Schroth Klinic in Germany and there is frequently a several month long waiting list.

Courtesy of ScoliSpine

What results can be expected after completing a Schroth program?

  • Improved posture
  • Improved core stability and strength
  • Easier breathing
  • Improved overall movement pattern and function
  • Improved self-management and understanding of the spine
  • Better pelvis alignment *Depending on your age, bone maturity and the degree of curvature, bracing may also be a part of the treatment.

Schroth-specific breathing complements bracing as children are able to achieve a more balanced breathing pattern with bracing and exercise, and Schroth-specific exercises improve postural strength which may improve brace compliance and overall comfort. Adults with scoliosis can also benefit from the Schroth Method.

About Rita Miller, PT

Rita Miller, PT, MPT, CSCS, C2 Certified in Scoliosis Specific Exercises is the owner of ScoliSpine located in Boise, Idaho. Read more

Is Back or Sciatic Pain Preventing You from reaching Your Exercise Goals?

We all know the importance of exercise, fitness, and generally staying active in order to age well. For many, exercise and fitness is a way to have fun and stay in shape. Others use activity to manage stress or chronic illnesses (such as diabetes, osteoporosis or heart disease). The benefit of consistent exercise has a positive effect on our physical, mental, and social well-being. It can be very disappointing when low back or sciatic pain prevents you from reaching your exercise goals.

Low back pain (LBP) or sciatic pain is the most common injury/pain complaint for those in the western world. LBP is estimated to affect nearly 80% of the U.S. population at one time or another. Worse yet, once you have experienced an episode of LBP you have a 90% chance of having a reoccurrence.

How can you address your back or sciatic pain in order to get back to doing the activity that you love (whether that is walking, running, or hitting the gym)? First, you need to assess your risk factors.

Risk Factors for Low Back Pain (LBP) or Sciatic Pain:

  • Sitting too much.
  • Slouched sitting.
  • Prior episodes of LBP.
  • Smoking.
  • Poor core and back extensor muscle strength.
  • Lack of a proper warm up and a cool down.
  • High training volumes with inadequate rest (overtraining syndrome).

Some of the specific risk factors for LBP are also risk factors for other types of injury. Lack of adequate core strength (particularly, strength in the outer core and pelvic/hip musculature) can contribute to other types of injuries, so it’s an important to address the weakness sooner rather than later.

Consider the amount of repetitive force your body must absorb even with walking (not to mention during sports or exercise). The outer core muscles are responsible for movement of the trunk and spine as well as aiding in stability. (Although critical for stability, the inner core muscles don’t actually produce any trunk or spine movement.)

The outer core muscles consists of the following muscles: lumbar paraspinal muscles; the quadratus lumborm; the internal and external obliques; and the psoas major and minor (hip flexors). Some may also include the glutes (buttocks muscles), hamstrings, and quadriceps as part of the outer core muscles.

Imbalances or a lack of strength within the core musculature often will manifest in altered lower body mechanics and an inability for the body to properly absorb and distribute forces. Over time, the body’s tissues eventually break down and can lead to a repetitive use injury in the lower extremity.

As a physical therapist, I always assess the core and hip musculature and look for imbalances in strength when determining the root cause of low back or sciatic pain. In the majority of cases, I find that a component of hip and core muscle weakness has led to the pain.

The good news is that this is a completely preventable problem. Most of us already know that we need to cross train and that proper core strength is important. However, too many of us either don’t dedicate enough time to the process or we aren’t performing the correct exercises. Performing proper core exercises and particularly, lumbar stabilization exercises are the primary treatment modality for low back pain (LBP).

Proper core and lumbar extensor strength is the key to preventing an episode of LBP and is also a critical step in avoiding other types of injuries affected by weakness in the core and pelvic/hip muscles. The most important factor in meeting your exercise goals is to be consistent. Don’t let low back or sciatic pain prevent you from staying active and enjoying your favorite activities.

Treatment for back or sciatic pain doesn’t have to include addicting medications, scary injections, surgery or high medical bills. For the approximate price of just one co-pay to see a doctor, you will receive my easy to read book with step-by-step instructions and a complete video package designed to help you prevent and self-treat reoccurring low back pain episodes.

The Treating Low Back Pain (LBP) during Exercise and Athletics Book and Video Package includes:

AVAILABLE NOW ON AMAZON!

Treating Low Back Pain during Exercise and Athletics eBook

In this eBook, you’ll learn why it is critically important to prevent the first episode of low back pain. LBP has reoccurrence rates as high as 90%. If you have already experienced an episode of LBP, you’ll learn why exercise is an important component to long term management. Most importantly, you will understand how to avoid pain and injury in order to take your training to the next level. Topics include:

  • Specific strategies for LBP prevention.
  • How to address specific causes of LBP.
  • Best practices on how to prevent and self-treat when you experience an episode of LBP.
  • A step-by-step LBP rehabilitation guide complete with photos and detailed exercise descriptions.
  • How to implement prevention and rehabilitation strategies.

 7-part Series of Instructional Videos

Nearly 60 minutes of actionable advice to prevent and treat LBP as it relates to active individuals, sports, and athletics. An in-depth look at treating LBP with a 7-part series of instructional videos in which I address the following:

  • Potential Risk Factors for Lower Back Pain
  • What are the Core Muscles?
  • Prevention during Exercise (Part 1 and 2)
  • Initial Treatment
  • Further Treatment and Taping
  • Long Term Management Strategies and Final Recap

Save 15% with discount code LBP

“As a long time back pain sufferer I can honestly say I’ve tried it all. True LBP will make you desperate enough to try anything. Long story short – Ben Shatto truly rescued me from this vicious pain cycle. Ben’s methods of physical therapy whether it’s hands on treatment or this amazing video packet, his methods prove to be cutting edge and highly effective. Healing takes work and this video package is a fantastic foundation for the healing process to ignite!” –Sandy

When Can I Return to Exercise after having Low Back or Sciatic Pain?

“When can I return to my normal activity after experiencing an episode of severe low back or sciatic pain?” is a question I am often asked as a physical therapist. Low back pain (LBP) and sciatic pain can be so severe and debilitating that it can completely derailing your training and lifestyle! It’s hard to run, exercise or even move if your back, buttocks or leg hurts.

Believe it or not, in spite of what your back or sciatic pain is telling you, initial activity and exercise are a critical component to treatment and recovery and is backed by extensive scientific research. 

Everyone’s experience with low back or sciatic pain is different. The severity of pain can widely vary. For some, even walking normally can be difficult. A guide for which exercises and movements to perform is critical in order to successfully return to activity.

One crucial indicator that you’re ready to taper back into more regular activity (as you progress your rehabilitation-based exercise) is whether or not you can walk with a normal gait. In particular, can you walk normally with a longer stride length during your normal gait cycle?

The ability to walk normally (notice that I didn’t say without discomfort) is an important milestone. It means that the spine is being stabilized well enough from the core musculature and that the nerves in the leg are not too tight or inflamed to tolerate and accommodate for the stretch that will occur from other activities.

If you are unable to walk normally, then the emphasis should be on regaining lumbar and lower extremity range of motion in addition to performing core and lumbar stabilization exercises. Limit your sitting, but do not try to taper back into other activities (at least not yet).

It’s critical to remember that everyone’s recovery will be different. Recovery and tapering back into your normal activities should be entirely symptom dependent. Listen to your body on what it can handle. The pain will tell you if you need to stop.

When to Return to Exercise after having Low Back or Sciatic Pain:

Follow the rule of thumb for movement: If the pain worsens by spreading peripherally down the buttock and into the leg and/or foot, then the condition is worsening. You must stop that activity. If the pain centralizes and returns back toward the spine (even if the pain worsens slightly), then keep moving as the condition is actually improving.

  • Don’t resume your running, jogging or other training activities until you can walk normally at a quick pace.
  • Be sure to slowly taper back into your training as your back begins to feel better. Don’t quickly resume your prior training volume. Instead, taper back up.
  • Prior to activity and training, perform a very thorough warm up (including press-ups, superman exercises, and bridging). Then transition into an activity specific warm up.
  • Continue with a core and lumbar strengthening program at least until you resume your full volume of training.

Prior to returning to your full and normal training activities, insure the following:

  • Complete lumbar mobility has returned.
  • You no longer have sensations, weakness or instability within the spine.
  • If you experienced leg pain, your involved leg is as flexible as the other. The pain is now either gone or centralized (meaning that you’re not experiencing pain in the leg).
  • Your hip mobility on both sides is equal.
  • Your involved leg is as strong as the other leg, particularly hip abduction (glutes medius) and the hip external rotators. Test this by jumping up and down on one leg. Do you feel strong? Is there pain associated with this? If the strength isn’t there or the pain remains, you are not ready to taper up to full training activities.
  • You can jog, run, sprint, and jump without pain.

With proper treatment, low back or sciatic pain should resolve in as quickly as two weeks. Severe episodes can take 4-6 weeks or longer. Continue with your rehabilitation protocol until you’re performing all exercises normally.

Treatment for back or sciatic pain doesn’t have to include addicting medications, scary injections, surgery or high medical bills. For the approximate price of just one co-pay to see a doctor, you will receive my easy to read book with step-by-step instructions and a complete video package designed to help you prevent and self-treat reoccurring low back pain episodes.

The Treating Low Back Pain (LBP) during Exercise and Athletics Book and Video Package includes:

AVAILABLE NOW ON AMAZON!

Treating Low Back Pain during Exercise and Athletics eBook

In this eBook, you’ll learn why it is critically important to prevent the first episode of low back pain. LBP has reoccurrence rates as high as 90%. If you have already experienced an episode of LBP, you’ll learn why exercise is an important component to long term management. Most importantly, you will understand how to avoid pain and injury in order to take your training to the next level. Topics include:

  • Specific strategies for LBP prevention.
  • How to address specific causes of LBP.
  • Best practices on how to prevent and self-treat when you experience an episode of LBP.
  • A step-by-step LBP rehabilitation guide complete with photos and detailed exercise descriptions.
  • How to implement prevention and rehabilitation strategies. 

7-part Series of Instructional Videos

Nearly 60 minutes of actionable advice to prevent and treat LBP as it relates to active individuals, sports, and athletics. An in-depth look at treating LBP with a 7-part series of instructional videos in which I address the following:

  • Potential Risk Factors for Lower Back Pain
  • What are the Core Muscles?
  • Prevention during Exercise (Part 1 and 2)
  • Initial Treatment
  • Further Treatment and Taping
  • Long Term Management Strategies and Final Recap

Save 15% with discount code LBP

“As a long time back pain sufferer I can honestly say I’ve tried it all. True LBP will make you desperate enough to try anything. Long story short – Ben Shatto truly rescued me from this vicious pain cycle. Ben’s methods of physical therapy whether it’s hands on treatment or this amazing video packet, his methods prove to be cutting edge and highly effective. Healing takes work and this video package is a fantastic foundation for the healing process to ignite!” –Sandy

3 Mistakes Athletes and Weekend Warriors make that cause Low Back Pain

As low back pain sufferers already know, it’s very difficult to exercise and train at a high level when you are experiencing low back pain (LBP). Nothing will derail your best laid training plans and routines faster than a severe episode of low back pain. LBP is the most common injury and pain complaint for athletes and non-exercisers alike. It’s estimated to affect nearly 80% of the U.S. population at one time or another, and it’s one of the top reasons for physician visits.

Fortunately, most LBP is mechanical–meaning it’s from a physical or structural cause not related to conditions such as cancer or infections. The problem with this type of LBP is that it usually comes back. People who have had an episode of mechanical LBP are 90% more likely to experience it again.

If you want to train hard and compete at a high level or even just enjoy the weekend’s events, then avoiding LBP is critical. Avoiding the following three most common mistakes can save you from costly medical visits, prescriptions, chiropractic visits, and physical therapy services. More importantly, avoiding injury and LBP insures that you can keep training to your heart’s content!

The 3 Most Common Mistakes:

Sitting too much.

Prolonged sitting (and especially, prolonged sitting on a vibrating surface) is one of the biggest risk factors for LBP. Sitting (slouched in particular) causes excessive strain on the lumbar discs and ligaments. Even if you exercise regularly, many of us still work in an office setting which forces us to sit more than we should. This excessive and prolonged sitting not only impacts our spine, but it also leads to tight hamstrings and hip flexors and generally tends to inhibit proper gluteal muscle function.

Even if you are running, exercising, and training during most days of the week, we all spend too much time sitting. To make this worse, many of us are sitting with chronically poor posture.

  • Limit the amount of sitting that you spend at one time. Ideally, move from your sitting position every hour to walk preferably. If you aren’t able to walk, then try to shift your position at least once every twenty minutes. Frequent position changes can help you to avoid LBP. Avoid a long car trip directly before or after a long run, race or event. For destination events, it’s best to arrive at least a day or two early and wait a day prior to returning home.
  • Sit with correct posture. Whenever possible, make sure that your knees stay below your hip level and that you are able to maintain your natural lumbar curve. A McKenzie Lumbar Roll is a great tool to help you maintain correct posture.

Poor core training.

Everyone has heard about the benefits of core training. However, most people aren’t doing it correctly. This isn’t about sit ups or crunches. Proper core strength involves training your abdominal muscles and back extensors to produce a rigid cylinder when exercising and moving. The core muscles are not prime movers, but stabilizers. They must be trained this way. The strength needs to be proportional front to back to insure this rigid cylinder for proper spinal stabilization. In general, most of us don’t spend enough time strengthening a key core muscle in back known as the multifidus (shown below) nor do we spend enough time strengthening the back extensors in general.

The core muscles are part of the body’s natural method of stabilizing the spine. The core muscles, along with intra-abdominal pressure, help to form a round rigid cylinder that is utilized to support the spine. Ligaments and boney articulations are also important in spinal stabilization. Most people don’t realize that the core actually consists of two separate groups of muscles, the inner and outer core muscles, and neither group involve the rectus femoris muscles (the six pack).

  • The inner core consists of the muscles of the pelvic floor, the transversus abdominis (TVA), diaphragm, and the multifidus muscles (which span the vertebrae along the back side of the spine as shown above). The TVA wraps all the way around the stomach and attaches to the spine. This is what helps to form the cylinder. When contracted (in conjunction with the pelvic floor and diaphragm), it helps to increase the intra-abdominal pressure to support the spine.
  • The other muscles that help to support the spine are known as the outer core. These muscles are responsible for movement of the trunk and spine as well as aiding in stability. The inner core muscles do not actually produce any trunk or spine movement. The outer core muscles consists of the following muscles: lumbar paraspinal muscles; the quadratus lumborm; the internal and external obliques; and the psoas major and minor (hip flexors). Some may also include the glutes (buttocks muscles), hamstrings, and quadriceps as part of the outer core muscles.

Those who work on core strength may not be performing the correct exercises. Performing proper core exercises and particularly, lumbar stabilization exercises are the primary treatment modality for LBP.

To learn how to effectively exercise and work the core muscles in order to prevent or self-treat LBP, be sure to check out my Treating Low Back Pain (LBP) during Exercise and Athletics Book and Video Package. USE DISCOUNT CODE LBP AT CHECKOUT FOR 15% OFF!

Not performing a proper warm up. 

An adequate warm up should always be performed to help minimize the risk of injury and maximize your ability to perform at an optimal level. A proper warm up should include: a cardiovascular warm up; a dynamic warm up; a specific spine warm up; and when indicated, a sport specific warm up.

Cardiovascular Warm Up

To properly prepare the body for activity, the first stage of the warm up is to increase blood flow throughout the body, but in particular, to the core muscles and spine. I recommend approximately 10 minutes as this allows for better mobility in the joints and tissues of the body. It starts to prime the nervous system for activity. It also promotes healing as movement is necessary to bring in the nutrients necessary to heal (if there is already damage or an injury). The cardiovascular warm up will vary and is dependent on your activity or sport.

Dynamic Warm Up

After the initial cardiovascular warm up, progress into a dynamic warm up series. This will typically involve warming up the muscles and joints of the spine, pelvis, and lower legs.

The purpose of the dynamic warm up (specifically in the lower extremity) is to insure adequate mobility in the areas that will be involved in the activity. This will almost always include the hamstrings, hips, and pelvis. Adequate lower leg mobility is important in order to perform your specific exercise or activity. The more motion that can occur through the pelvis and legs, the more force can then be generated and passed through the pelvis.

More mobility in the lower legs and pelvis means less need for mobility in the spine. This means less stress during motion will be placed on the spine—therefore, decreasing your risk of injury. The point is to maximize spinal stability and encourage movement through the hips, pelvis, and upper thoracic.

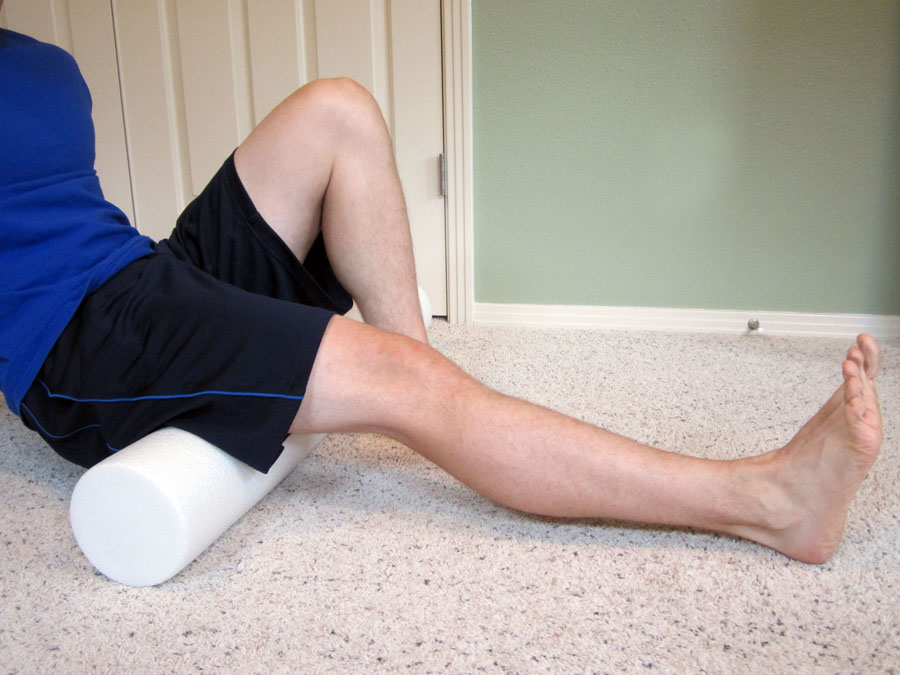
One example of this is to mobilize your hamstrings by using the foam roller (as demonstrated below).

Spine Specific Warm Up

I am a big proponent to performing a very specific spinal muscle warm up upon completion of the cardiovascular and dynamic warm ups. Since you may have already experienced an episode of LBP, a very specific and thorough warm up is important for prevention. Priming the specific muscles of the core (particularly, the multifidus and lumbar extensors) is a critical step to avoiding re-injury. The multifidus is a critical muscle in preventing LBP and must be active to properly stabilize the spine. It helps to prevent shearing forces from affecting the spine which is critical to avoiding LBP.

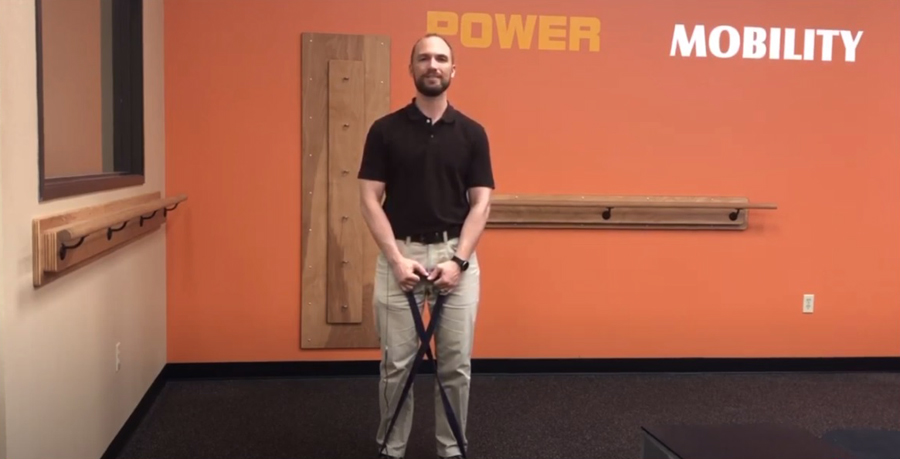
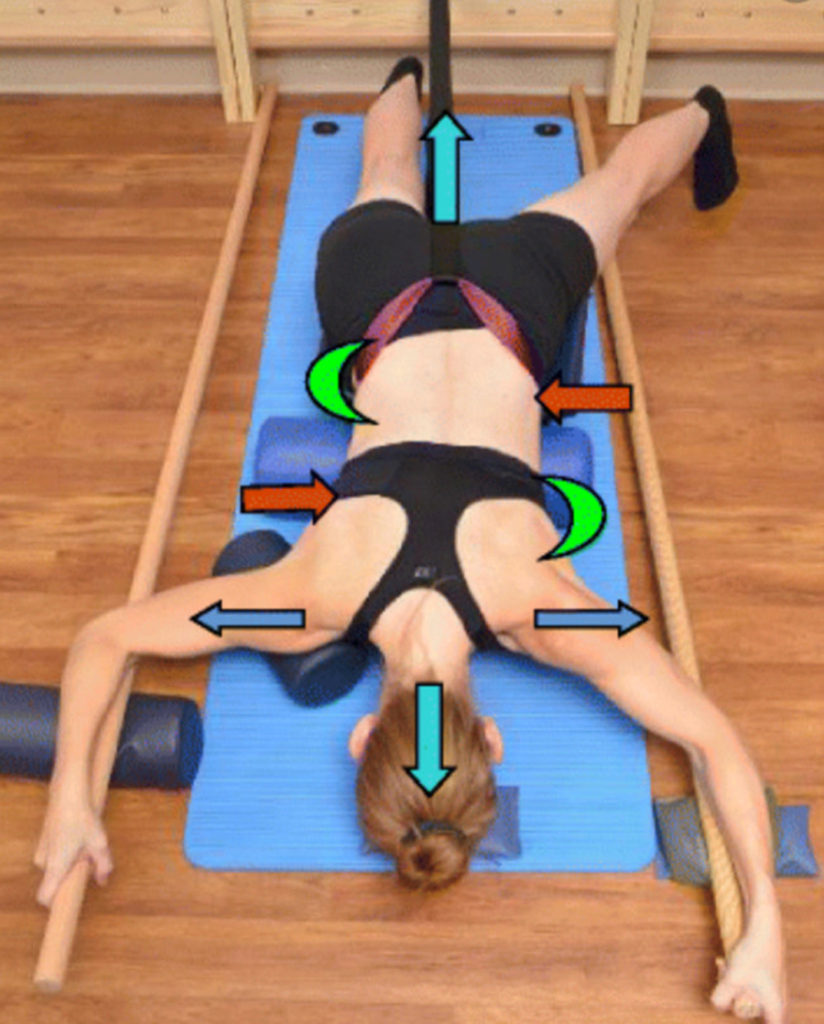
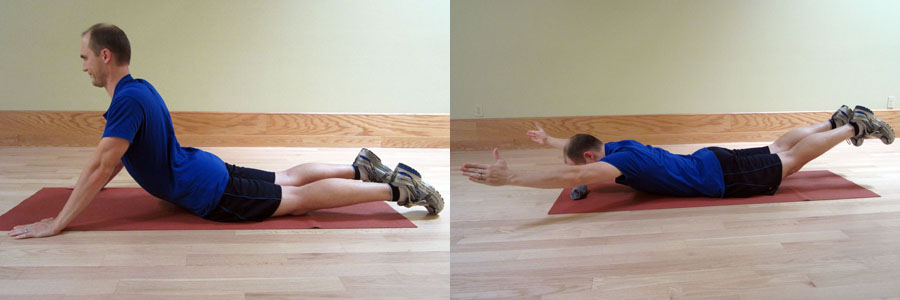
Examples of a spine specific warm up may include performing press-ups and the superman exercise (as demonstrated below).

Sport Specific Warm Up

This warm up will vary significantly depending on the type of endeavor you are about to participate in. For example, a sprinter will need a very different warm up compared to an ultramarathon runner or someone performing in a CrossFit competition. For runners, the warm up varies. Are you racing on a flat course or are you heading out for a very hilly trail run?

It’s important to evaluate the requirements for the event and be ready to perform the actual movements required to compete at a high level. A proper warm up allows your body to immediately perform at its peak and reduces the risk of injury. Regardless of the sport or event, this is also the perfect time to make sure all of your equipment is appropriate for the conditions of the event.

Don’t skip the warm up regardless of your training or event time and/or location! You may be the only one performing a thorough warm up, but it’s because you understand the importance of one in order to prevent LBP and to improve your performance.

It’s important to identify the common mistakes that can cause LBP. By implementing these prevention strategies, you can avoid injury and keep training. Fitness is a lifelong pursuit. If you are injured or just not having fun, then you will not stay engaged and motivated in the long term. Don’t let LBP affect your ability to stay active and keep enjoying your favorite activities!

AVAILABLE NOW ON AMAZON!

In my book, Treating Low Back Pain during Exercise and Athletics, you will learn how to address specific causes of LBP as well as the best practices on how to prevent and self-treat when you experience an episode of LBP. In this step-by-step LBP rehabilitation guide (complete with photos and detailed exercise descriptions), you will discover how to implement prevention and rehabilitation strategies to eliminate pain and get back to training and exercise sooner.

Learn how to prevent, self-treat, and manage LBP so you can get back to your daily life and exercise goals more quickly without additional unnecessary and costly medical bills!

I WANT TO GET RID OF MY BACK PAIN!