How to Properly Perform I’s, T’s, and Y’s Exercises

The purpose of I’s, T’s, and Y’s exercises on an exercise ball is to address lower and mid trapezius and scapula muscle weakness and to generally activate the posterior chain (including the lumbar spine extensors).  Poor posture due to poor thoracic mobility and poor scapular muscle strength are often major contributors to neck, shoulder, and upper back pain.  Poor lumbar extensor strength is linked to low back pain.

I’s, T’s, and Y’s exercises on an exercise ball can be helpful in treating the following: 

  • Poor posture
  • Shoulder pain
  • Cervical pain
  • Headaches
  • Thoracic pain
  • Upper and lower back pain

Begin by performing the I’s, T’s, and Y’s exercises on a Thera-Band Exercise Ball.  Please refer to I’s, T’s, and Y’s Exercises for step-by-step instructions.  Start slowly without resistance.  Keep your chin tucked and head aligned with the body.

Version One:  Move your arms slowly up and down in each position of I, T, and Y.

Version Two:  Hold each position for the specified time.

To increase the difficulty for either version, add a 1-3 pound weight in each hand.  These exercises shouldn’t cause any pain in your neck, shoulder or upper/lower back. 

When this exercise is performed correctly, it engages and strengthens many critical muscles that help control many of our most common postures and movement patterns.  A slouched posture with a forward head and rounded shoulders can be associated with many common pain syndromes including:  neck pain and headaches; upper back pain; and shoulder pain.

It’s important to try to keep the proper postural alignment with your shoulders under your ears, and the shoulder blades set in a back and down position.  This is particularly important when performing any activity while using the shoulder.  This series of exercises can help to strengthen the important muscles that can help you maintain proper postural alignment.

Be sure to check out my video post, How to Use an Exercise Ball to Improve Posture and Treat Shoulder, Neck, and Back Pain, in which I demonstrate how to perform I’s, T’s, and Y’s exercises on an exercise ball in order to address lower and mid trapezius and scapula muscle weakness.

When performing these exercises, it is important to understand that they should never be painful.  You may feel a mild to moderate discomfort because the exercises are difficult, but if you are experiencing pain (particularly, the pain you are trying to treat) please discontinue the exercise and speak to your physical therapist.

Have you tried the I’s, T’s, and Y’s exercises on an exercise ball before?  If so, what has your experience been like?  Please leave your comments below.

If you have a question that you would like featured in an upcoming blog post, please comment below or submit your question to contact@thePhysicalTherapyAdvisor.com.  Be sure to join our growing community on Facebook by liking The Physical Therapy Advisor!

Neck Pain and Headaches? Work Your Core?!

You may have heard that if you suffer from low back pain (LBP) that you need to work your “core” muscles, but what if you suffer from neck pain (cervicogenic pain) and/or headaches?  Well then yes, you would need to work the core muscles of the neck.  Like the lumbar spine, the neck also has a group of core muscles that are specifically designed to insure proper cervical segmental stability and to maintain proper head posture.  When weakness and dysfunction are present within this group of muscles, there is often ongoing neck pain that can lead to headaches.

Muscles of the cervical neck “core” include the deep neck flexors and deep neck extensors.  Most people don’t know the names or how to spell these rarely talked about muscles.  For those who like the nitty gritty details, the deep neck flexor muscles include the longus colli and longus capitis.  The deep neck extensor muscles include the multifidus and the semispinalis cervicis.  The sub occipital muscles (including the rectus capitus posterior major and minor) and the obliquus capitus superior and inferior also play a role in cervical stability.  These muscles as a group make up the core muscles for the cervical spine.

When classifying muscles, and especially the cervical muscles, it can be useful to think of them conceptually as global movers and local stabilizers. 

Global movers are involved in the generation of torque and produce movement.  They function more like a light switch, either moving your head or not.  When dysfunctional, there are spasms, pain, and a restricted range of movement.

Local stabilizers are the deeper muscles that control segmental movement and neutral positioning of a joint and the head.  Their activity is tonic (always on).  It’s like a light switch that is always on, but with a dimmer controlling the intensity.  Local stabilizers operate at much lower levels of contraction for long periods of time.  Dysfunction in the local muscles results in the inhibition of muscle function, delayed timing or recruitment of when the muscle is stabilizing which causes loss of segmental control and poor cervical vertebral joint positioning.  This is often associated with chronic neck pain and headaches as well as muscle spasms in some of the larger muscles (such as the upper trapezius) as it attempts to compensate for the underlying muscle inhibition.

The neck presents a unique challenge of both mobility and muscularly speaking.  It requires intricate muscular control to balance the weight of the head in space.  The neck also moves the head through a large range of motion available; all while positioning it accurately to allow us to use our senses (sight, smell, hearing, and taste) most effectively.

Mobility and stability are both vitally important to how the neck functions.  This is why the deep segmental stabilizing muscles are extremely important.  These deep core muscles (also known as the “inner unit”) have been shown to weaken in the presence of neck pain or injury regardless of the cause.  As part of a compensation pattern, one will often find that the prime mover muscles at the front of the neck, called the SCM (sternocleidomastoid muscle), become overactive trying to protect the neck.

Unfortunately, this creates excessive shear and compression forces on the neck which brings the head forward into the poking chin posture.  This dysfunction pattern tends to persist even when the pain subsides unless properly retrained.  This may explain why so many people experience recurrent episodes of neck pain.  Discover why it’s important to insure proper cervical core strength in order to not only alleviate neck pain and headaches, but also to prevent them from reoccurring.

Most of the time neck pain is mechanical in nature.  This means that there is a structural or mechanical issue affecting proper motion in the neck leading to either neck pain or headaches.  Since the trigger is mechanical (starting or worsening with certain movements), it can just as easily be reduced or eliminated if the correct movements can be initiated.  Mechanical neck pain is often experienced as cervical pain, headache pain or other correlated pain patterns in your upper back and down your arms (even to your fingers).

Neck Pain (Cervicogenic Pain) Symptoms include:

  • Pain in the front of your head, behind your eyes or side of your head.
  • Pain which begins from your neck that extends between your shoulder blades and upper shoulders.
  • Pain which is exacerbated or changed by certain neck movements or neck positions.
  • Pain which is triggered by pressure applied to the upper part of the neck near the base of the skull (known as the sub occipital area) or in the upper trapezius area.
  • Pain down one or both arms.  It can be felt as far as your fingers.
  • Stiff neck.
  • Altered or blurred vision as well as nausea, vomiting, and/or dizziness.

Potential Causes for Cervicogenic Headaches

There are plenty of reasons why one might develop neck/cervical derangements or dysfunction.  Examples include: motor vehicle accidents; sports; falls; sleeping on a poorly fitted pillow; poor posture; and carrying items that are too heavy (such as a backpack).  Chronically sustained non-symmetrical postures, stress, and a sedentary lifestyle are also potential causes.

The actual pain generating structures of the neck (listed below) vary wildly and can be difficult to pinpoint.

  • Nerve related injury or pain
  • Muscle spasms
  • Trigger points
  • Facet joint dysfunction
  • Cervical mal-alignments
  • Cervical disc issues
  • Postural dysfunction

Cervicogenic pain and headaches tend to be more common in women than men.  In general, women experience this due to minor anatomical differences.  Men tend to have muscular necks. Women tend to have longer more slender necks with less muscle to provide support to the head (meaning that there is less muscle strength for support).

Treatment for Neck Pain (Cervicogenic Pain) and Headache Pain

Research suggests the most effective management of neck pain conditions include both manual therapy (hands-on mobilization) and manipulation with specific exercises.  If you have to choose one or the other, I find that a correctly designed and implemented exercise program to be the most effective over the long term.

The first step to designing a treatment plan is by identifying a pattern to the pain.

Which head motions change or alter your neck or headache pain?  Does the pain get worse or does it improve when you turn your head?  What happens when you look up, look down, slouch or sit up straight?  What happens when you repeat this movement?

Determine how your pain responds.  This is also known as establishing a directional preference.  You might be moving in the wrong direction if the pain spreads away from the spine and down into the upper back or arm.  Stop that particular movement, and try the opposite direction.

In my experience, most episodes of cervical pain and headaches tend to respond better to cervical extension biased movements and improvements in posture.  Gaining extension in the thoracic spine is also critical to treatment.

In order to determine if extension biased (cervical retraction or extension) movements help you, I recommend starting with this exercise (as shown below).  Sit up straight, and retract your chin straight back.  Repeat 10-20 times.

Carefully monitor symptoms for peripheralization or centralization.  The rule of thumb for movement:  If the pain worsens by spreading peripherally down the arm into the hands, fingers, shoulder blade/upper back or the headache gets worse, then the condition is worsening (peripheralizing).  Stop that activity.  If the pain centralizes and returns back toward the cervical spine, and the headache pain improves (even if the pain in the neck worsens slightly), then keep moving as the condition is actually improving.

If you are unable to help or change the pain in any way, then you may need assistance from a medical provider.  For a thorough discussion and an excellent treatment resource, please refer to Treat Your Own Neck  by Robin A. McKenzie.

Once you have determined a directional preference, then you can focus on the deep core and stabilizer muscles.  For my initial neck core strengthening exercises, please refer to Deep Neck Flexion Exercises.

Once you’re able to engage the deep neck flexors, you can next progress into strengthening your scapulothoracic and postural muscles.  Be sure you are engaging the deep neck flexors during these exercises to insure proper stability of the neck.

For the I’s, T’s, and Y’s exercises (as shown below), work up to holding each position for 30 seconds.  Repeat 3 times.  Keeping the correct posture and deep cervical flexor muscles engaged during this exercise is critical to engaging the full core of the neck.

Other Treatments for Neck Pain (Cervicogenic Pain) and Headache Pain:

  • Focus on your posture.  Poor posture is the bane of modern society.  The most common example of poor posture is a forward head with rounded shoulders.  This causes excessive muscular tension throughout the cervical spine, upper trapezius region, and mid-thoracic area.  Over time, this leads to muscle weakness and dysfunction in the cervical spine and upper thoracic area.  Proper posture allows for the optimal alignment of your spine.  Neurologically speaking, this allows for your muscles to down regulate by reducing tension.  Poor posture is almost always associated with muscle knots and trigger points.  My Top 8 Stretches to Eliminate Neck, Upper Back, and Shoulder Pain is a downloadable .pdf file with my recommended stretches using foam roller exercises to address posture.  These simple exercises (with complete instructions and photos) will help you to improve poor posture and can be performed at home.

DOWNLOAD NOW: My Top 8 Stretches to Eliminate Neck, Upper Back, and Shoulder Pain

  • Manual Therapy.  An osteopathic physician, physical therapist or chiropractor can use manual therapy techniques.  This includes joint mobilization and manipulation which can be beneficial in reducing pain and addressing some of the mechanical causes.  However, manual therapy is a passive treatment.  For long term treatment and prevention, an active approach needs to be taken.  I would encourage you to perform proper exercises to insure that you have adequate cervical and upper thoracic strength and mobility.  Also, address any precipitating factors (such as poor posture).
  • Massage.  Although massage can be a form of manual therapy, it can also be thought of as separate intervention.  There are many types of body workers that can utilize many different forms of massage or manual treatments.  Many trigger points and muscle spasms will refer pain into the head (which causes the headache).  It’s important to actively and physically address the muscle tension.  This is the time to contact a massage therapist, body worker, physical therapist, athletic trainer or friend who is skillful in body work or massage to relieve the area in spasm.  The specific massage technique to use will vary according to your preference.  Massage techniques range from a light relaxing massage to a deep tissue massage or utilization of acupressure points.  This can also be an effective prevention strategy.
  • Other self-mobilization tools.  Many times, a friend or massage therapist isn’t available to assist when you need the help the most.  A foam roller cannot effective reach places in the upper back or arms, so other self-mobilization tools may be necessary.  You can get creative and use a tennis ball or golf ball, but I like a specific tool called the Thera Cane Massager.  This tool allows you to apply direct pressure to a spasming muscle.  When held for a long enough period of time, the Thera Cane Massager will usually cause the muscle spasms to release and provide much needed pain relief!
  • Topical agents.  Many topical agents can help to decrease and eliminate muscle spasms.  They can also mediate the pain response helping to reduce neck pain or headache pain.  You can apply a small amount of topical agent directly over the pain area if it’s accessible and not near your eyes.  (Please use common sense).  You may find that one product works better than another.  Some of my favorite products in my medicine cabinet include:  Biofreeze Pain Relieving Gel, Arnica Rub (Arnica Montana, an herbal rub), and topical magnesium.
  • Magnesium bath.  The combination of warm water with magnesium is very soothing and relaxing.  Magnesium is known to help decrease muscle pain and soreness.  Options include:  Epsoak Epson Salt and Ancient Minerals Magnesium Bath Flakes.  I find that the magnesium flakes work better, but they are significantly more expensive than Epson salt.
  • Acupuncture.  I am personally a big fan of acupuncture.  It is very useful in treating all kinds of medical conditions.  It can be particularly effective in treating headaches, muscle trigger points, muscle cramps, spasms, and pain as it addresses the issues on multiple layers.  Acupuncture directly stimulates the muscle by affecting the nervous system response to the muscle while producing a general sense of well-being and relaxation.
  • Medications.  Medications can be an effective short term solution to headache pain, but I strongly encourage you to transition off of medications over time.  In some cases, prescription medications may be used initially to help you tolerate the pain as you work toward prevention.  Please speak to your physician regarding prescription options.
  • Speak with your Physical Therapist (PT) or Physician (MD or DO).  If you are suffering with neck pain and headaches, there are options.  Please speak to your medical provider to determine if other causes are contributing to the problem.  Physical therapy is very effective treatment for those suffering with neck pain and headaches.  The American Physical Therapy Association (APTA) offers wonderful resources to help find a physical therapist in your area.  In most states, you can seek physical therapy advice without a medical doctor’s referral (although it may be a good idea to hear your physician’s opinion as well).

Don’t give up hope!  Neck pain and headaches can be difficult to manage, but with proper care, most of the pain can be cured or effectively managed.  Begin by implementing one or two of these treatment tips, then assess how well they worked for you.  If the technique helped, continue with it then implement another strategy.

If you suffer from neck pain and headaches, which treatments have worked the best for you?  Please share below. 

If you have a question that you would like featured in an upcoming blog post, please comment below or submit your question to contact@thePhysicalTherapyAdvisor.com.  Be sure to join our growing community on Facebook by liking The Physical Therapy Advisor!

Q & A: Spinous Process Fracture

Q.  My son was recently injured in a weight room accident that resulted in a C7 spinous process fracture. The neurosurgeon says not to worry about it and that he can return to sport in six weeks.  He is a very talented athlete, and he’s trying to get a college football scholarship.  I’m concerned for his safety and scholarship prospects.  Do you have any advice? -Jennifer

A.  I am so sorry to hear about your son’s injury, Jennifer. Weight lifting is such a critical component to any training program as well as for those who are trying to maintain muscle mass and general health. Sadly, accidents happen and can be very serious. However, weight training will be an ongoing critical training component if your son is to compete in football at a collegiate level.

Thank you for letting me share his imaging pictures. Viewing the imaging allows for a better discussion, but please note that I have not evaluated your son.  The following advice is only for the purpose of general discussion.

Spine_Collage

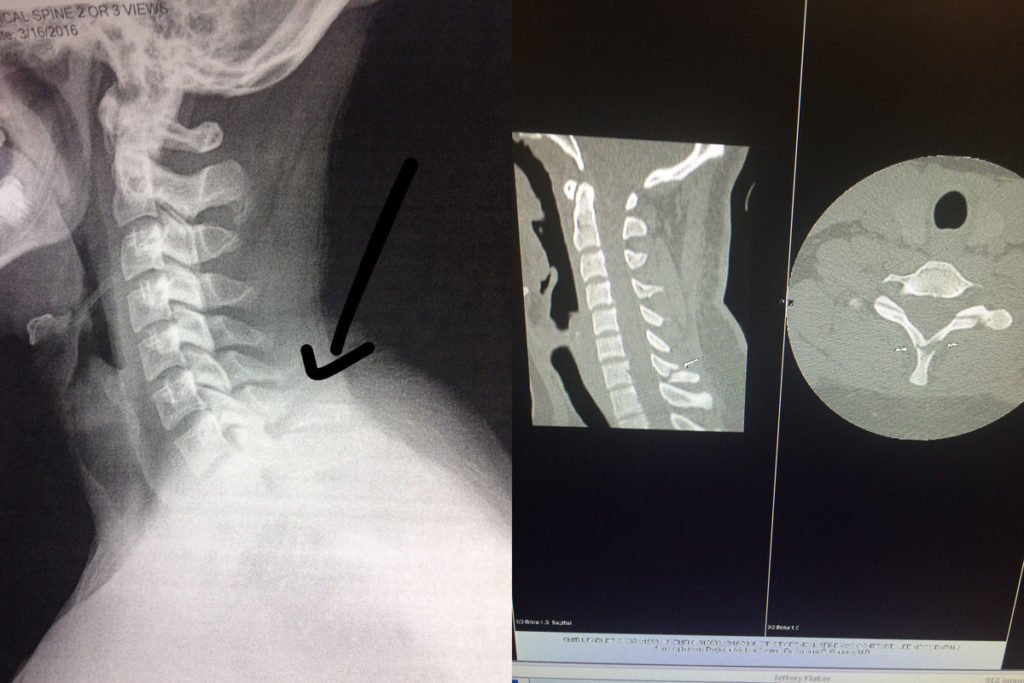
(Left: X-ray of C7 fracture. Right: CT Scan of C7 fracture.)

As you can notice on the imaging provided, only the spinous process was injured. Although close to the lamina of the vertebra (which has a primary role of protecting the spinal cord), it was not injured.  This was confirmed by the physician’s physical exam, X-rays, and CT Scan. I’m glad that the injury was taken seriously with appropriate medical follow up.  One should never take unwarranted risks when evaluating spinal injuries.

This particular fracture is also known as a Clay Shoveler’s Fracture. This occurs when the end of the spinous process is either broken off by a physical impact (as in the case of Jennifer’s son when the barbell hit his neck) OR as a result of the muscle pulling so hard that it breaks the bone and literally tears off part of the spinous process.  The role of the spinous process, particularly in the cervical region, is to help limit cervical hyper extension.  More importantly, the spinous processes are there as an attachment point for muscles and ligaments.

C7 is the largest cervical vertebrae in the neck. The C7 vertebra is right in the middle of transition from the cervical spine to the thoracic spine and is home to many fascial attachments and muscular attachments from the neck and shoulder girdle.  Many of the deeper neck extensors and rotators such as the splenius capitus and splenius cervicis as well as the trapezius, rhomboids and serratus posterior muscles have C7 attachment points.

Typical Symptoms

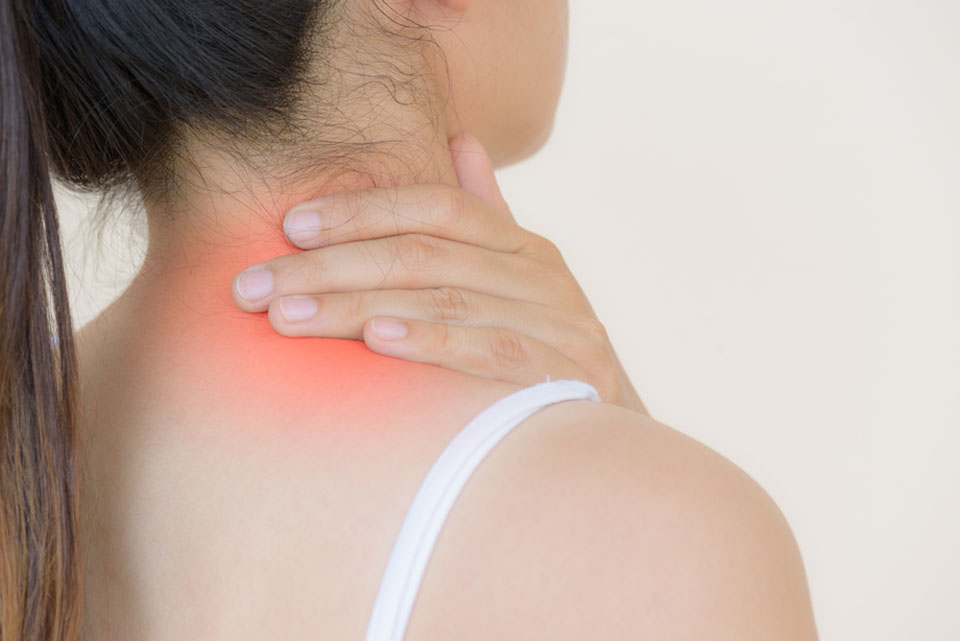
In most cases, there is pain immediately after the injury which is often described as a burning or “knife-like” stabbing pain.  Other symptoms include muscle tightness and sharp pain that increases with repeated activity and movement of the neck or shoulder girdle. The pain is often described as feeling similar to a severe muscle strain in the upper back.  The area of fracture as well as the nearby spinous processes is typically very tender as are the nearby muscles.

If only the spinous process is injured, you should not see any neurologic symptoms. You will likely see loss of cervical motion and possibly shoulder motion as those motions will cause muscles to pull directly on the site of injury which limits one’s desire to move.  Symptoms are typically worse with the head down or when the arms are active in front of the body (such as driving or working at the computer).

Treatment Considerations

Bone healing is a complex process and will differ significantly among individuals. Factors affecting bone healing include:  the type of fracture and the patient’s age; underlying medical conditions; and nutritional status.  For a person with good health status, the bone will take on average six to eight weeks to heal to a significant degree.  In general, children’s bones heal faster than those of adults.

However, with a spinous process fracture that is separated to this degree, the bone will most likely never heal. The bone will not re-attach itself back to vertebrae.  When this occurs, it’s known as a non-union.  Scar tissue and fascia will surround the injury site and in most cases, form a solid fibrous pseudo-union between the two pieces of bone.  In most cases, there will be no deleterious effects from the injury and healing process.  Like bone healing, this process typically takes six to eight weeks for most individuals.

Acutely there is likely to be pain, but long-term pain typically subsides. However, as with all injuries, there is the risk of chronic pain or long-term irritation to the area associated with the muscle and tendon that insert/attach onto the spinous process involved in the injury.

Pain Management

Initially, I don’t recommend treating with NSAIDS (non-steroidal anti-inflammatory medication) as there is research that indicates that the healing response could be delayed. Instead and whenever possible, I would recommend other alternatives for pain management like applying heat or ice. Typically no more than 20 minutes per hour would be recommended, and don’t apply heat or ice directly to the skin (use a towel as a barrier).

Pain medication, such as acetaminophen, is always an option if recommended by your physician. You may also want to consider utilizing topical agents, which can help to decrease pain and muscle spasms. The method of action varies greatly according to the product used.  You may find that one product works better than another.  Some of my favorite products in my medicine cabinet include:  Biofreeze Pain Relieving Gel; Arnica Rub (Arnica Montana, an herbal rub); and topical magnesium.

Another option is oral magnesium. You can take Mag Glycinate in pill form or by eating foods higher in magnesium such as spinach, artichokes, and dates. Taking additional magnesium (particularly at night) can help to reduce muscle cramps and spasming.  It is also very helpful in reducing overall muscle soreness and aiding in a better night’s rest.  Most people are deficient in the amount of magnesium they consume on a regular basis.  I recommend beginning with a dose of 200 mg (before bedtime) and increasing the dose as needed.  I would caution you that taking too much magnesium can lead to diarrhea.  Mag Glycinate in its oral form is the most highly absorbable.  Although not as absorbable, Thorne Research Magnesium Citrate and magnesium oxide can also be beneficial.

Soft tissue massage of the adjacent muscles as well as electrical stimulation can both be used to reduce pain.  If pain persists, please discuss the options with your physician.

Activity Modification and Exercise Considerations

Activity involving the head, neck, and shoulders should be limited initially. In some cases, the physician may ask that a cervical collar be worn for several weeks.  Opinions on this vary greatly and will be dependent on the exact location of the fracture.

The basic idea is to avoid heavy use of the muscles that would specifically pull on the injury site. This would include muscles that flex, extend, rotate or side bend the head as well any arm movements that move the shoulder.  This would obviously include any type of heavy lifting or placing anything on top of the injury site like a barbell.

Although this seems very limiting, you can still move the neck and shoulders. Gently perform range of motion (ROM) of the neck and shoulders to maintain full mobility. This will also help to limit pain and muscle spasms of the surrounding tissues.  The idea is to limit extreme movement, limit the movement under load, and limit the speed of movement.

I would specifically limit most activity for at least six to eight weeks to insure an adequate amount of scarring has occurred. In addition to the above noted limitations, I also wouldn’t perform any activities that would be jarring to the body (such as jogging).  If you want to maintain your cardiovascular endurance, you could peddle on a stationary bike while keeping your upper body mostly relaxed.

At around the four to six week mark, I would slowly start working on the cervical extensor and shoulder girdle muscle exercises (as demonstrated below).  You will want to engage the muscles symmetrically as to not cause asymmetrical pulling over the injury site.  These exercises will help to engage the muscles (the cervical extensors and scapular muscles, including the rhomboids and trapezius muscle) specifically used to stabilize the injury site.

ITYExerciseCollage

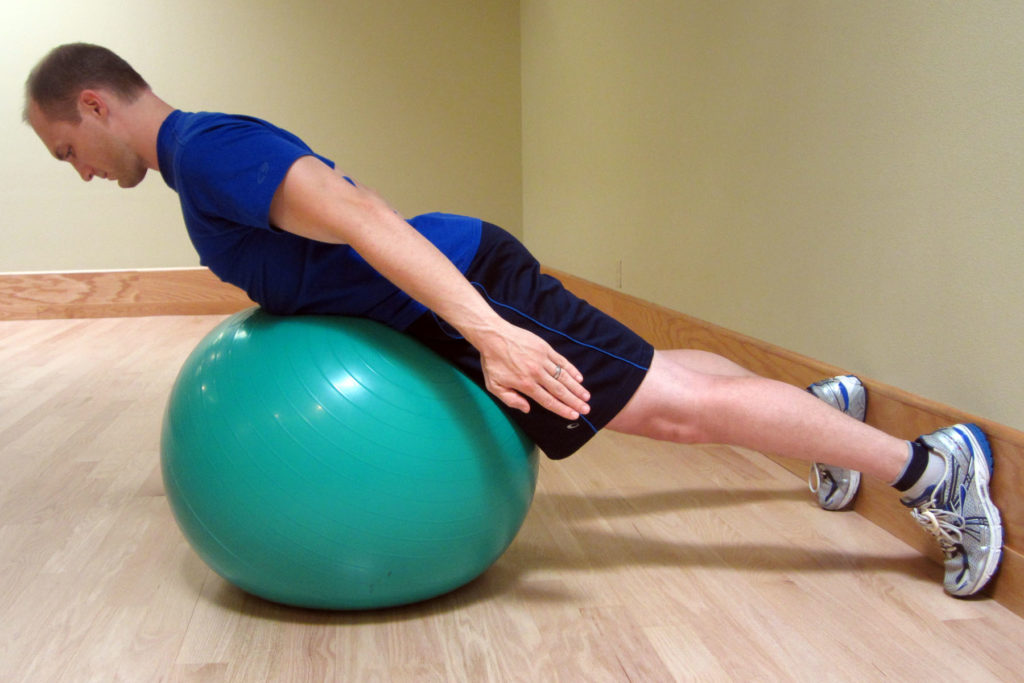
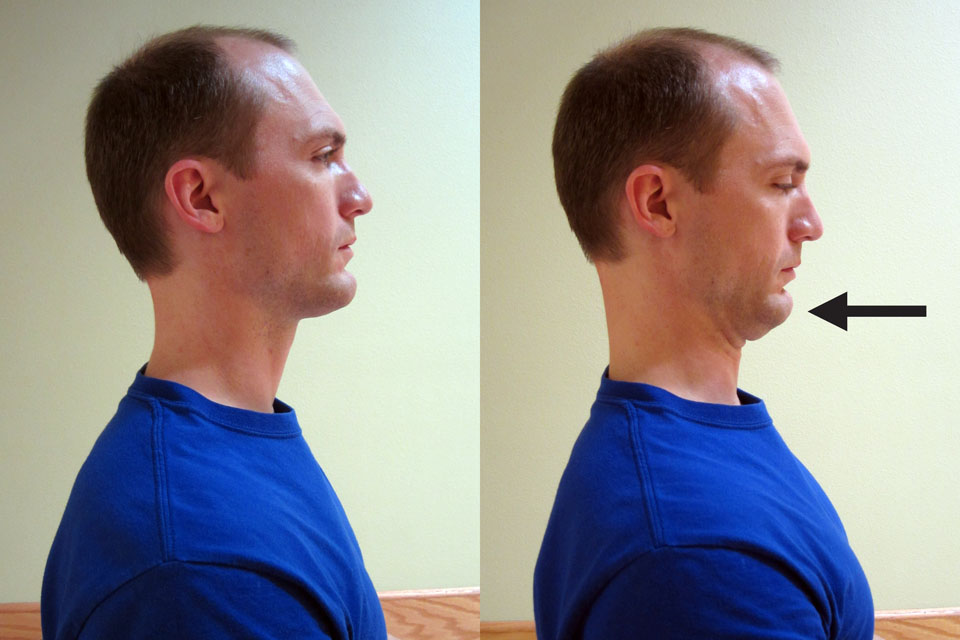
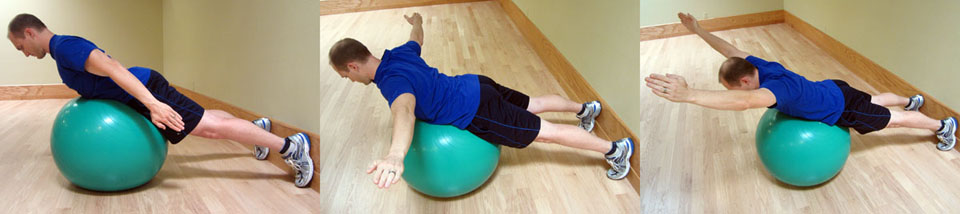
Begin by performing these I’s, T’s, and Y’s exercises on a Thera-Band Exercise Ball. Start slowly without resistance.  Keep your chin tucked and head aligned with the body.  Move your arms slowly up and down in each position of I, T, and Y.  Start with 10 repetitions for 3 second holds, and then progress the number of repetitions as long as there is no pain.

Once you can easily and pain free perform 20 repetitions with 3 second holds, add a 1-2 pound weight in each hand and start the progression initially at 10 repetitions.  Be sure to always let pain guide the progression.  The exercise should remain pain free.

After the six to eight week mark, initiate a slow, but steady return to exercise. Start with lower extremity exercises such as the leg press, body weight lunges, squats or step ups.  During this time, progress with targeted exercises designed to strengthen the muscles of the mid trapezius, rhomboids, and neck extensors.

Let pain guide your progression. If you perform an activity that causes pain near the injury site, then that activity should continue to be avoided in the short-term.  Continue to perform exercises bilaterally to be sure that the force/pull over the injury site is symmetrical.  For example, when you start on rowing, then it should be a two-handed row and not a one-handed version.

Progression of exercise of the associated muscles should be slow and again, pain should be carefully monitored. Any pain provoking movements early in the rehabilitation phase should be avoided.  When returning back to weight training, start with a weight approximately 50% of your prior max.  Work within that weight for a week or two, and then slowly progress back to the prior weight used (depending on your symptoms).

You may also return to light jogging. If there is no increase in your pain level, then slowly progress back into full running and sprinting.

Exercises to avoid for at least twelve weeks include: barbell squats; overhead press; power cleans; squat cleans; and snatches.  Avoid anything that would put direct pressure over the injury site or exercises that include a speed and power component under load (such as the power clean).

Rehabilitation Recap

Due to the amount of information presented, I want to re-iterate the important parts of the rehabilitation process. Be sure that you have your physician’s clearance prior to resuming activity.

0-4 weeks: This is the time for pain management and activity modification. You want the area to scar down.  Exercise and activity should be limited although you should maintain full range of motion (ROM) of the neck and shoulder girdle if possible.

4-6 weeks: Initiate a cervical stabilization program and scapulothoracic exercises starting without any resistance.  Perform the I’s, T’s, and Y’s exercises on an exercise ball (as demonstrated above).  Progress with these exercises and continue with cardiovascular exercise such as riding a stationary bike.  You may also start bench pressing, but begin light and monitor your pain level.

6-8 weeks: Progress with shoulder and upper back exercises. Be sure to use two-handed movements.  Depending on your pain level and strength, lower body exercises can be initiated.  Begin with body weight exercises, and then progress to resistive exercises.  Continue to limit direct pressure over the injury site or asymmetric forces.  Lower body exercises, such as the leg press and dead lift, may be started.  Exercise should be mostly pain free.  If you experience pain during an exercise or movement, discontinue for now and then retry it in a week or two.

8-12 weeks: During this phase, slowly start tapering up on all activity.  During this time, you can progress your jogging to eventually sprinting as well as road bicycling.  You can progress back into lower extremity exercises as tolerated as long as there isn’t any significant associated pain at the injury site.  Focus on neck and upper extremities exercises with two-hands/arms bilateral exercises.  Focus on exercises that develop strength in the muscles surrounding the injury site without causing increased pain or asymmetrical force.  The preference is for two-arm movements for now.  This is also the time to start working on thoracic mobility to insure the entire vertebral chain can move freely.  Be sure to have full shoulder and cervical mobility.  Continue to avoid any specific pressure on the injury site.  If you haven’t already, you could start the following:  dead lifting; front squat; and lunges with load.

12+ weeks: Return to full activity. However, let pain and common sense continue to be your primary guide.  At this stage, you can return to light squatting.  I recommend a low-bar position as this typically lines up just below the spine of the scapula and should be below the C7 injury site.  Start single arm movements, such as a one-armed row, as well as power movements, such as the clean and snatch.  You can also initiate overhead lifting.  The key is to progress slowly and see how your body responds.  Begin with 50% of the load used prior to your injury.

If you don’t already own a copy, I would highly recommend that you purchase Starting Strength: Basic Barbell Training by Mark Rippetoe. This text should be regarded as the authority on strength training and should be used as a guide for beginners to advanced weight training enthusiasts.

Once a full return to weight training activities has been accomplished, a full return to sport should also be possible. Any sports that involve high impact, such as football or mixed martial arts, should have your physician’s approval in order to insure that the fracture is stable.  In most cases, the level of pain present will be a great indication of how stable the injury site is.

If you are unsure about how to properly progress in your training and rehabilitation, I recommend that you work with a highly qualified trainer or sports medicine professional to insure that you are performing your particular exercise and sport in a manner that will keep you safe and the fracture stable. The American Physical Therapy Association (APTA) offers a wonderful resource to help find a physical therapist in your area.  In most states, you can seek physical therapy advice without a medical doctor’s referral (although it’s a good idea to hear your physician’s opinion as well).

Good luck to your son and you, Jennifer! I hope you find this information helpful.  Thankfully, this type of injury usually results in a full return to function without many long-term deleterious effects.  The key is to allow adequate healing time, and then slowly and strategically progress back into full activity.

Have you ever suffered from a spinal fracture or avulsion fracture? Have you experienced an accident while weight training?  Please share your story below.

If you have a question that you would like featured in an upcoming blog post, please email contact@thephysicaltherapyadvisor.com. For additional health and lifestyle information, join our growing community on Facebook by liking The Physical Therapy Advisor!

Disclaimer:  The Physical Therapy Advisor blog is for general informational purposes only and does not constitute the practice of medicine or other professional health care services, including the giving of medical advice. No health care provider/patient relationship is formed.  The use of information on this blog or materials linked from this blog is at your own risk.  The content of this blog is not intended to be a substitute for professional medical advice, diagnosis, or treatment.  Do not disregard, or delay in obtaining, medical advice for any medical condition you may have.  Please seek the assistance of your health care professionals for any such conditions.