How to Self-Treat IT Band Syndrome

Pain in the lateral (outside) leg or knee is commonly associated with a condition known as Iliotibial Band Syndrome (ITBS).  (Iliotibial Band Syndrome is also known as IT Band Syndrome, ITB Syndrome, or IT Band Friction Syndrome.)  Pain can range from the lateral side of the leg up toward the hip area to just below the lateral side of the knee joint (where the head of the fibula bone begins).  The pain can be very debilitating to the point that running or hiking activities have to be stopped.  Even walking becomes difficult.  I will address the many potential causative factors for IT Band Syndrome and offer advice on how to self-treat this condition.

TherabandRoller

The IT Band is a very thick fibrous band of tissue that spans from the hip’s origin point at a muscle known as the Tensor fasciae latae (TFL).  The TFL transitions into the IT band and progresses down the lateral thigh and ends at the head of the fibula.  The IT Band’s primary function is to provide additional lateral support for the knee joint (particularly when standing or landing on one leg).  IT Band Syndrome is often associated with an over use injury.  It can be very painful, but it can be easily self-treated if you handle your pain and symptoms quickly.

How to Self-Treat IT Band Syndrome: 

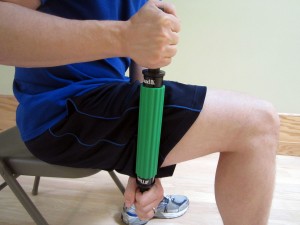
  • Improve your mobility. Mobility issues and myofascial restrictions are highly correlated with ITBS. Tightness in the IT Band or in the deep hip internal or external rotators is a contributing factor to ITBS. The tighter the IT Band, the more likely it will rub on the femoral condyle and develop into pain. Bowlegged describes a medical condition known as a varus deformity, an inward rotation of the tibia resulting in a leg that looks like it is bowed out. It can develop due to chronic friction of the IT Band along the femoral condyle. ITBS may also occur after a total knee replacement (TKA). I recommend using a foam roller to address tightness in the quadriceps or IT Band. To learn how to use a foam roller, please refer to Foam Rolling for Rehabilitation. I also recommend a Thera-Band Standard Roller Massager, which is very firm and allows for a deep amount of pressure. You may also utilize a tennis or lacrosse ball to mobilize the Tensor fasciae latae (TFL) appropriately. The foam roller and roller massager don’t work as well because the greater trochanter of the hip (the boney part of the hip that sticks out) tends to be in the way. Stretching the IT band or the TFL is very difficult, so I tend to utilize other mobilization techniques. However, I recommend a few pelvic and hip stretches. Please refer to IT Band Syndrome Rehabilitation Exercises for my top stretches, foam rolling, and self-mobilization techniques to address IT Band related issues.
  • Strengthen your hip muscles. Weakness in the hip external rotators and the hip abductors, like the Gluteus medius and the Tensor fasciae latae (TFL), can lead to IT Band Syndrome. Strengthening of these muscle groups can help avoid future ITB issues as well as reduce your risk of developing Patellar Femoral Pain Syndrome (PFPS). Please refer to Hamstring, Hip Flexor, and Piriformis Stretches for LBP for additional hip and lower leg stretching exercises.
  • Over use injury due to downhill running? IT Band Syndrome is often associated with an over use injury. For runners, a common cause of ITBS is running downhill. Few runners actually train appropriately for a race with downhill running. Afterward, they end up with a case of ITBS. I have been guilty of improper training in the past. If you have ever run in the Robie Creek Half Marathon, then you understand the importance of downhill training. To avoid ITBS, adequately train for the downhill portion of the race. Also, vary your running routine and surfaces while training. Although ITBS is often associated with over use, always address other contributing factors as well.
  • Check your shoes. Your shoes may be worn out and may be the cause of the pain. If you wear a shoe that helps to limit overpronation, remember that the inner cushion and structure of the shoe can wear out before its outer appearance. If this occurs, the shoe can no longer adequately control inappropriate foot and heel movements such as overpronation. This could result in IT Band Syndrome or other hip, knee, or ankle related issues. Shoes typically only last 350-500 miles. If you are nearing those miles, then it may be time to change. If you’re unsure if your shoes are performing correctly, visit your local running shoe store. The trained staff can inspect your shoes for wear and tear. They may ask you to walk or run in order to watch your gait to fit you in the appropriate shoe. Another option to help control overpronation is an over-the-counter orthotic such as Superfeet Blue Premium Insoles. The blue tends to fit most feet, but a variety of options are available for customization. In my experience, these insoles can last 1,000 to 1,500 miles easily. If the over-the-counter options aren’t helping you, please see a physical therapist or podiatrist for custom orthotics.
  • Did you progress too quickly into a minimalistic shoe? If you are used to a standard built up shoe, progressing into a minimalistic shoe may be more difficult and take more time. Unless you are a child or teenager, expect a safe transition to take at least three months. Don’t transition during a period of intense sports. I highly recommend waiting until the off season as progressing slowly is always a better choice.
  • Have your gait analyzed while running. Gait or running abnormalities can increase your risk of developing IT Band Syndrome. Over striding tends to occur while running downhill. Scissoring occurs when your leg crosses over the midline with each step. Both over striding and scissoring are easily recognized by a professional. Check with your local running store or a physical therapy clinic for a monthly gait analysis clinic. If you’re unable to obtain a gait analysis, ask your spouse or a friend to video record you (from behind) while you’re running. Then watch the recording to see if you notice either over striding or scissoring.
  • Don’t forget to ice. IT Band Syndrome is typically is due to a specific event. Afterward, there is usually an active inflammatory process occurring. I typically apply ice to the lateral part of the knee, but place it on your most painful location. The rule for icing is to apply ice no more than twenty minutes per hour. Don’t place the ice directly against the skin, especially if you are using a gel pack style. Individuals with poor circulation or impaired sensation should take particular care when icing. A bag of frozen peas can be a cheap alternative or you could use one of my favorite gel pack style cold packs.
  • Start a supplement. ITB Syndrome is typically associated with a specific event and an active inflammatory process typically occurs. I am a supporter of natural supplements and remedies. Many supplements include herbs which are designed to help reduce inflammation. Phenocane Natural Pain Management combines the following: Curcumin, an herb that reduces pain and inflammation; boswellia, a natural COX2 inhibitor that also reduces pain and inflammation; DLPA, an amino acid that helps to increase and uphold serotonin levels in the brain; and nattokinase, an enzyme that assists with blood clotting and reduces pain and inflammation. If you are taking blood thinner medication, please consult with your physician prior to taking Phenocane Natural Pain Management.

If you’re not experiencing relief after a week or two of aggressively managing the symptoms, contact your local physical therapist for an assessment and help in managing IT Band Syndrome.  The American Physical Therapy Association offers a wonderful resource to help find a physical therapist in your area.

Has a specific treatment for IT Band Syndrome helped you? Which treatments haven’t worked for you?   Additional discussion can help others to manage this condition more effectively.  Please leave your comments below.

Looking for that exercise or book I mentioned in a post?  Forgot the name of a product or supplement that you’re interested in?  It’s all listed in the new Resource Guide.  Check it out today!

If you have a question that you would like featured in an upcoming blog post, please comment below or submit your question to contact@thePhysicalTherapyAdvisor.com. Be sure to join our growing community on Facebook by liking The Physical Therapy Advisor!

Q & A: Can CrossFit Cause Elbow Pain?

Q.  A lot of CrossFitters, including myself, seem to have tendinitis of the elbow or other achy elbow issues. Do you know why that is?  What exercises are we doing to cause it?  What therapy would you recommend to help the pain?  I appreciate you and love this blog that you are doing!  I always look forward to reading it! -Stephanie

A.  Thanks, Stephanie, for the great question! I have worked with quite a few CrossFitters who have experienced elbow pain.  I have treated people new to the sport and those who participate at a high level.  Elbow pain can be debilitating by limiting your ability to exercise and perform daily tasks.  I will address potential causes and how to alleviate elbow pain associated with exercise. (Note: You don’t have to be a CrossFitter to benefit from this information.)

CrossFit_ElbowExercise_6x4

Possible reasons for developing elbow pain include:

  • Poor grip strength.
  • Muscle imbalances between wrist flexion and extension strength.
  • Improper lifting technique (which is the primary problem for the newer participant).
  • The progression of training is too quick (which again tends to be an issue for the newer participant).
  • Mobility related issues in the wrist, shoulder, or thoracic spine. (Poor mobility can affect both those who are new to the sport as well as CrossFit veterans.)
  • Excessive mobility or hypermobility may also be an issue. It tends to be more common in females than in males and is usually associated with the shoulders or elbows.

Poor technique is a frequent complaint in regard to safely performing CrossFit. Many people believe that there isn’t enough emphasis placed on proper lifting technique or specific CrossFit exercise techniques (particularly with the new participant).  Some complain that the emphasis is on speed, not form, during WODs (Workout of the Day).  This may be true in some Boxes (gyms/clubs), and it’s a valid concern.

Please be honest with yourself when you start a new activity. This is especially important if you’re starting very high intensity activities with very specific movements which require a high degree of skill to perform such as CrossFit.  Beginners to CrossFit should spend the necessary time to learn the proper technique.  With any new activity, there is always a learning curve.  It’s the responsibility of the coach and the client to insure proper form.

The power clean is an example of a common movement in CrossFit and Olympic Weightlifting. This exercise can cause elbow pain when performed incorrectly.  One reason for elbow pain to develop during this movement is that the bar is reversed curled.  It causes excessive strain on the wrist extensor muscles instead of the participant exploding the bar upward, and then dipping underneath. There shouldn’t be a reverse curl movement to this lift. I witness it fairly often as a common mistake.  If you’re experiencing aches and pain in your elbow or elsewhere, please see your coach or athletic trainer to insure that your lifting technique is correct.

Poor wrist, shoulder, or thoracic mobility is also commonly related to elbow pain associated with exercise. If the wrist cannot extend properly, it not only causes wrist pain, but excessive stretching of the forearm muscles and strain on the elbows (possibly leading to pain).

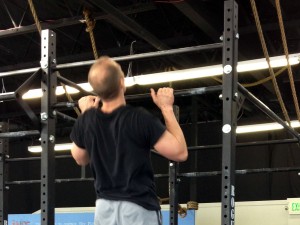
Poor shoulder or thoracic spine mobility can also cause excessive strain on the elbow. Consider exercises like the overhead lift or pull ups.  If the shoulder cannot fully flex or the thoracic cannot fully extend (allowing proper shoulder flexion), then the elbows will absorb more of the load.  The lack of shoulder or thoracic mobility also affects proper alignment of the upper extremity during the movement.  Over time and with multiple repetitions, this overloading can cause pain and injury to the elbow.

Whenever one part of the body doesn’t have adequate mobility, another part will do more to allow for the movement to take place. When an exercise is performed at a high speed, high relative weight, or high repetitions, a lack of mobility can make you more susceptible to pain and injury.

Excessive mobility can have a similar effect. For example, if you’re performing an overhead lift, but your shoulders flex past 180 degrees, then the bar is too far behind your head.  This causes excessive force to be placed on the shoulders and elbows.  Again, this can lead to injury and pain when performed at a high speed, high relative weight, or high repetitions.

Top 7 Recommendations to alleviate Elbow Pain associated with Exercise:

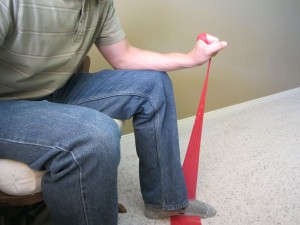
  1. Work on your Grip Strength. Practice bar hangs for time. Carry barbell plates (one in each hand) to challenge the grip strength. Don’t just work on wrist flexion or gripping exercises, but also work on wrist extension to improve grip strength and decrease your risk of lateral elbow pain. Use an exercise band (as shown below) to perform 2-3 sets of 20 repetitions. Extend the wrist up, and then slowly back down toward the floor. Be sure to move very slowly during the eccentric/muscle lengthening position (when your hand returns to the floor). IMG_5215_GripStrengthExercise_RGB
  2. Identify the Offending Movement. If you’re experiencing elbow pain, try to identify which specific movement aggravates the elbow. Once you identify the movement, work with your coach or athletic trainer to insure proper lifting technique.
  3. Work on your Mobility. CrossFit is not just about metabolic conditioning or strength training. You need to develop all aspects of your fitness, and this includes your flexibility. Work on upper body mobility by focusing on shoulder and thoracic mobility as well as lower body and spinal mobility. A free resource for shoulder and thoracic mobility is My Top 8 Stretches to Eliminate Neck, Upper Back, and Shoulder Pain which you can automatically download when you subscribe to my e-mail list. You will receive each week’s blog post sent directly to your e-mail making it even easier and more convenient!
  4. Warm Up. Prior to activity, be sure to perform a cardiovascular warm up to insure that the muscles are ready to stretch and perform high level activities. Perform a dynamic warm up by taking the associated muscle (or muscles) needed for the workout through the anticipated and needed range of motion (ROM) in a quick and brisk manner. A foam roller can also be utilized as part of your warm up. For more instruction, please refer to Foam Rolling for Rehabilitation and Does Foam Rolling Help or Hurt Performance?
  5. Static Stretch and Self-Mobilization Post Work Out. Continue to work on the immobile areas through static stretching and/or self-mobilization. Again, a foam roller can also assist. If you prefer a very comprehensive guide for improving mobility, I recommend Kelly Starrett’s Becoming a Supple Leopard.
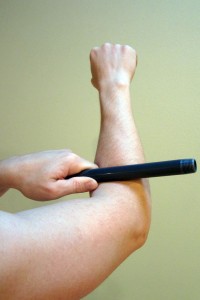
  6. Be Proactive. Once you start to feel pain, be aggressive with your management and self-treatment. I like to use either a tennis ball or roll PVC pipe over the forearm area, which can be an effective treatment for lateral epicondylitis (“tennis elbow”). For more ideas on how to self-mobilize, please refer to My Top 3 Household Items for Self Mobilization.
  7. Contact your Physical Therapist. If the pain persists, seek additional help. Don’t let the pain linger. The longer it’s left untreated, the more potential for harm and damage which potentially could lead to a longer recovery. The American Physical Therapy Association (APTA) is an excellent resource for learning more about physical therapy as well as locating a physical therapist in your area.

Elbow pain can be debilitating by limiting your ability to exercise and perform daily tasks. Be proactive in your care and management.  Most importantly, don’t let the pain linger. You can find more tips and strategies on managing pain and injury by simply using the search function (located on the upper right-hand sidebar).

What specifically causes your elbow pain? Which treatments have you found to be the most effective?  Additional discussion can help others to manage his/her pain.  Please leave your comments below.

If you have a question that you would like featured in an upcoming blog post, please comment below or submit your question to contact@thePhysicalTherapyAdvisor.com. Be sure to join our growing community on Facebook by liking The Physical Therapy Advisor!
My Top 3 Household Items For Self-Mobilization

Many household items can be used to perform self-myofascial release.  Why is self-mobilization and fascial release so important? Mobilization has effects on the musculoskeletal system, the vascular system, and the fascial system. Having good mobility (free of adhesions) can positively improve performance or recovery, and it’s important in maintaining a healthy body. With common household items, you can manage muscle spasms and cramping as well as those painful areas due to training (or more commonly, poor posture and sitting).

Muscle spasms and cramps can be terribly painful.  They tend to occur at the most inopportune time and place.  In a pinch, many household items can be used to assist in eliminating muscle spasms, cramps, tightness, and pain.  When available, my first choice is almost always the foam roller.  It is versatile and can be used to mobilize tissue as well as boney articulations.  The foam roller also works great to increase spinal extension mobility.  For more information on foam rolling, please refer to Foam Rolling for Rehabilitation and 5 Ways to Improve Range-of-Motion (ROM).

My Top 3 Household Items for Self-Mobilization:

1. PVC Pipe – This works great for sore forearms (including “tennis elbow”) as well as tight hamstrings or shin splints. You can use one hand or both to press or rub the PVC pipe over sore or tender areas. The amount of pressure shouldn’t be painful. Avoid pressing on especially boney areas.

PVCPipeForTennisElbow

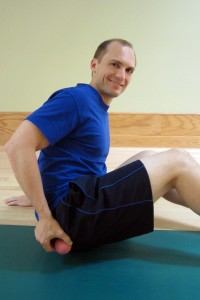
2. Tennis Ball* – This is perfect to pinpoint those hard to reach places on the back or in the buttock region. Hold pressure over the sore area or spasming muscle until the spasm releases. This could take a couple of minutes depending on the severity of the spasm. (*A tennis ball may be substituted with another firmer and smaller rubber ball as shown below.)

TennisBallForSpasms

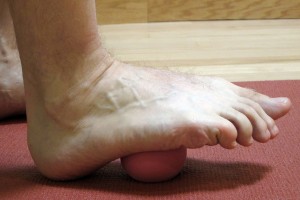
3. Racquetball – This is perfect for self-foot mobilization or if you need to provide more pressure using a firmer ball. If you suffer from plantar fasciitis or poor mobility in your feet, I highly recommend performing this daily for a couple of minutes on each foot. Be sure to work the entire foot, not just the arch.

RaquetballForFootMobilization

Muscle spasms, cramps, tightness, and muscle soreness are often quite painful!  These three common household items can be used to help mobilize, minimize, and/or eliminate muscle pain.  For more helpful ideas, please refer to Muscle Cramping & Spasms – Treatment Options, in which I discuss specific treatment options for managing pain including: massage, self-mobilization tools, topical agents, and supplements.

What are your top household items for dealing with muscle cramping and spasms?  Please post your comments below as we could all use a few more tricks to eliminate pain!

If you have a question that you would like featured in an upcoming blog post, please comment below or submit your question to contact@thePhysicalTherapyAdvisor.com.  Be sure to join our growing community on Facebook by liking The Physical Therapy Advisor!