Mobility Bands: Benefits and How to Use

Mobility bands (like the VooDoo Floss Band) are gaining in popularity as a self-treatment tool particularly among the athletic population. There are many brands manufacturing mobility or floss bands with most of them being very similar. Most mobility bands utilize a long piece of thicker elastic latex rubber to compress tissue in or around varying locations. Other brands (like the CTM Band) have made innovations to the more traditional style band which allows for a more aggressive mobilization into the soft tissue. (“CTM” stands for compression, tension, and movement.)

Reasons why you may choose to utilize a mobility band include:

  • Pain modulation.
  • Decrease myofascial type pain from muscle spasms and trigger points.
  • To improve range of motion of a particular joint or tissue.
  • To decrease edema and swelling.
  • To reduce blood flow as part of a workout strategy such as blood flow restriction (BFR) training.
  • To improve blood flow as part of a treatment OR as recovery/rehabilitation strategy in order to reduce edema or swelling in an injured area.

If you suffer from any form of blood clotting disorder or are on blood thinning medications, I would advise against utilizing mobility bands for any type of deep compression.

Presently, there are few research studies on the effectiveness and efficacy of utilizing mobility bands. However, there is a lot of antidotal evidence including my own.

What we know from the existing research is that “flossing” appears to have the most impact on ankle mobility and performance. In particular, short-term increases in ankle dorsiflexion mobility can have positive effects on activities (such as squatting and single-leg jump performance) and reduce ankle pain.

Present studies investigating the effect of flossing on the shoulder and elbow joints are yet to show significant improvements in mobility or power. However, increases in elbow mobility were noted in tennis players that had an existing mobility restriction.

The exact mechanism of action on how and why mobility bands work is still under debate. The general feeling is that depending on the intended use of the mobility bands, there are likely multiple mechanisms of actions. One or more of the mechanisms are likely being emphasized to produce the desired effect. My thought is that there are three major systems affected when utilizing mobility bands: circulation (blood flow); fascial (mobilization); and neuromodulation (improved range of motion through a nervous system response).

Blood Flow

Blood flow is affected because of the amount of compression provided by the mobility band. An immediate effect on the tissues will occur. This happens when the mobility band is applied (restricting the blood flow), and when it’s taken off (allowing for a rush of blood to the area).

This can have two positive, yet different effects: to decrease swelling and to cause nutrients to be delivered to the affected tissues. If the mobility band is used over an edematous (swollen) area, then the mechanical compression from the mobility band can help to decrease the swelling. To enhance the effects of the compression, all one must do is repeatedly move the compressed area through a normal range of motion. This combines the body’s natural muscle pump with mechanical compression while more swelling maybe eliminated. This is a short term effect as the mobility band should only be applied for 60-90 seconds at a time. (This technique is probably not suitable for highly edematous areas or those who suffer from lymphedema.)

As the mobility band is removed, the body’s immediate reaction is to restore blood flow which can cause hyper perfusion of the tissues. This hopefully will cause additional nutrients to be delivered via blood flow into the affected tissues.

Fascial Mobilization

Another theory on how mobility bands work is via fascial shearing. By adding a compression force to a tissue and then sliding it back and forth, one creates a type of “tack and floss” motion that seems to affect soft tissue and fascia. This is effectively a method of self-fascial mobilization.

Compressing muscle groups and taking them through their range of motion creates a flossing effect (which is where the term VooDoo flossing came from) between individual muscles. Compressing the fascia while flossing the tissues (by moving the extremity back and forth) may break up adhesions in the fascia that exist. This will allow for better range of motion and movement while reducing pain by addressing myofascial restrictions.

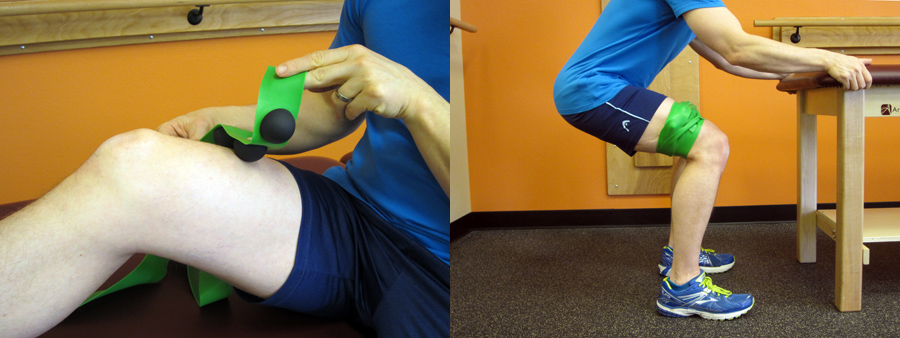
The CTM Band has taken this concept and added small rubber knobs within the band to increase the intensity of the flossing. Depending on how the knobs on the band are positioned, this creates a more pin point tack and floss scenario. This particular band can be highly effective for muscle groups in the calf, quadriceps, and hamstring area. Use code MTA15 for a 15% discount. (CTM Band techniques are not typically performed during the acute phases of recovery. They are more for prevention /pre-hab or to be used during the sub-acute or chronic phases during rehabilitation/recovery.)

Along with the tack and floss theory and depending on where the mobility bands is placed (like over a knee or ankle joint); one may produce a significant enough compression force over a joint with the mobility band that it creates a distraction force. This may create extra room in the joint capsule. Mobilizing a joint with the VooDoo Floss Band allows that particular joint’s full range of motion (without restrictions). In this case, there is an actual mechanical force affecting tissue length and/or mobility. This could have a mechanical “mobilizing” effect if the capsule was tight, but it could also be affecting joint mechanoreceptors (neuromodulation).

Neuromodulation

By positioning the mobility band over a joint to cause a distraction force over the joint and within the capsule, thereby allows for improved alignment and freedom of motion within the joint. This can have a neuromodulation affect over the joint which allows for improved range of motion. Although this can be a mechanical change, it may also be a neuromuscular change where joint mechanoreceptors are activated in a positive way. This can allow you to more freely utilize the extremity that you applied the mobility band to. Neuromodulation may also be achieved just through the unique stimulation caused by the band activating neuromechanoreceptors. The mobility band likely has multiple effects at once; more research needs to be done.

How to Use a Mobility Band

When using a mobility band, you generally wrap it toward your heart. The goal is to create a large compression force around the restricted joint or tissue. To achieve this, wrap the mobility band starting 2-3 inches below the area you want to treat. Aim to finish wrapping about the same distance above the treatment location. While wrapping, overlap about half the width of the mobility band. For mobility, a stretch of around 50-75 percent can be applied to the mobility band at the area you are treating. If you have any leftover band, additional compression can be applied by making an “X” over the treatment area.

Once the mobility band has been applied, you can try moving into the position causing restriction or by moving the joint or limb in all possible directions. There are guidelines for how long to keep the mobility band on. A general rule is to aim for around 1-2 minutes.

The application of the mobility band is going to compress the underlying tissues. However, care must be taken to not over compress or injure tissues. Discontinue use if you begin to feel the following:

  • You begin to feel numbness or pins and needles (a sensation of uncomfortable tingling or prickling).
  • You suddenly feel claustrophobic.
  • You are losing volitional control of the extremity.
  • You are experiencing increased pain or instability within a joint.

The mobility band should only be applied on the extremities. It should not be applied over your trunk area or any acute injuries including fracture sites, blood clots, wounds or any tissue areas that may be extremely sensitive to compression. Do not utilize if you have any medical reason not to utilize this technique. Common sense should always be utilized when using mobility bands as a treatment modality. If you’re not sure, then please speak to a medical practitioner prior to utilization. If you suffer from any form of blood clotting disorder or are on blood thinning medications, I would advise against utilizing mobility bands for any type of deep compression.

More specific instructions and examples on how to and why you may want to utilize a mobility band as part of a rehabilitation protocol (or even just to aid in recovery after longer runs) are covered in the Resilient Runner Program, which is designed to help YOU meet YOUR training goals by insuring you have the tools to avoid injury, recover quickly, and train at a peak level.

What’s Inside the Resilient Runner Program:

  • Guidance on preventing and self-treating common running related injuries, including Hip Flexor Pain, Runner’s Knee, IT Band Syndrome, Piriformis Syndrome, and more!
  • Specific guidelines on when and how to return to running after experiencing an injury.
  • Rehabilitation guides with step-by-step photos demonstrating recommended exercises.
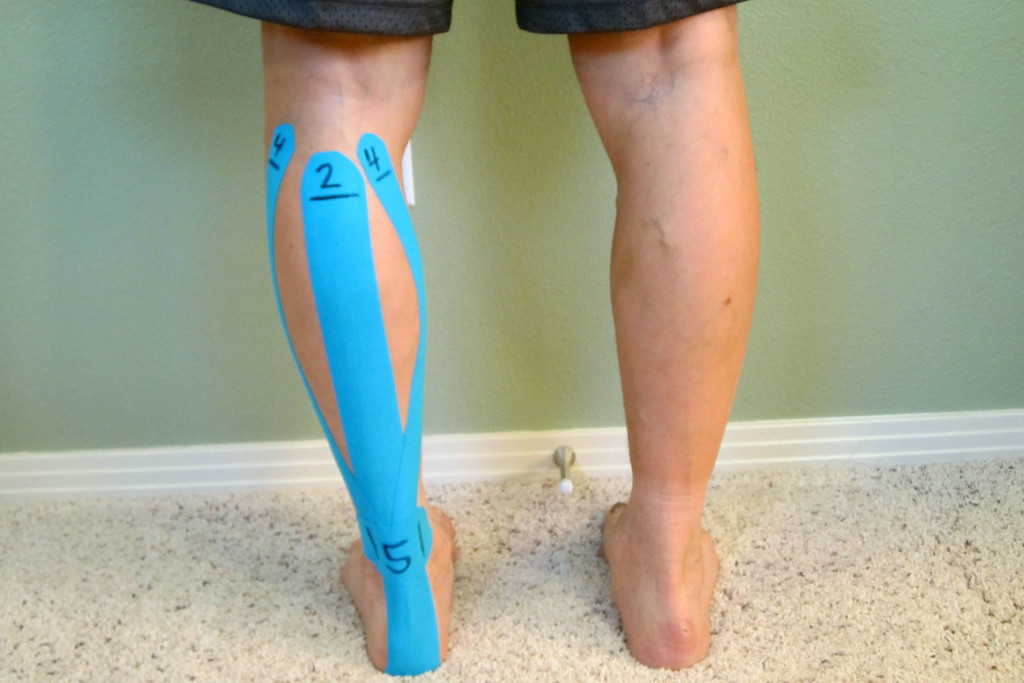
  • Step-by-step instructions on how to apply Kinesiological tape.
  • Downloadable podcasts, videos, and more!

If you’re tired of ongoing aches, pains, and injuries, learn how to become a resilient runner so that you can continue to train and compete in order to meet your goals!

I WANT TO BE RESILIENT!

Knee Pain: Causes and Cures

Knee pain affects almost every single person at some point in their lives. From sprains, to cartilage issues, all the way through to posture-related injuries and muscle tears, knee pain seems to play a role in the sometimes debilitating struggle for a pain-free life. We understand how the nagging, irritating, and oftentimes overwhelming pain in your knee affects your day-to-day activities, not to mention your social life, and that’s why this post is all about knee pain: what it is, why it is, and what can be done about it.

When it comes to knee pain, few people really understand its origins. This is not least because of the complex structure of the knee joint and its position in the body. In fact, the knee is one of the most important body parts. Why? Well, it not only grants the lower leg an immense amount of flexibility, but it also support and maintains the mobility of the upper leg and, finally, the torso and entire upper body. In other words, the knee is an invaluable part of the body’s mobility and stability.

It is no wonder, then, that the knee joint is also the site where most of the body’s pressures and strains accumulate. From walking, to running, and even to standing, the knee is subject to an incomprehensible amount of daily pounding and weight. In truth, your knees withstand more strain than you know, and without their resilience you would probably be far less mobile. Which is why, of course, knee pain is so debilitating.

As a knee experiences the constant pressure and strain placed on it by our everyday activities, it gradually starts to experience wear-and-tear, that is, muscles lose their strength and the cartilage is subsequently placed under more and more stress – hence, the pain. Quite often, if this state of affairs isn’t appropriately addressed, the cartilage might give way or tear, leading to serious injuries requiring surgery, or worse still, a complete knee replacement. Amongst these rather alarming injuries are the likes of ACL injuries, knee fractures, dislocations, PCL injuries, tears, popping, swelling, tendon injury, knee cap dislocations, and a myriad more – and, if the names don’t scare you, the pain will.

In lieu of this, it is easy to see why the maintenance of a healthy knee joint is vital. Unfortunately, however, many people already suffering from knee pain turn to temporary solutions for comfort: from painkillers, to surgery, and all the way around to injections and rest, people just aren’t taking action. The issue with pain in the knee joint is that rest and procrastination, not to mention tablets, only make things worse – as you know, the pain often only increases if you try to wait it out, and in the end you’re left with an even longer road to recovery. Yet, in a world where there is so much conflicting information, what can you do? Where do you turn? And how can you get rid of this pain?

Luckily, there are ways to combat knee pain and, in many cases, totally eradicate your daily discomfort, thus getting you back to the activities you love. Take a look:

Exercise – All Things in Moderation

We know you might be active, love golf, running, and sports. Maybe you just like walking and enjoy being outside. The good news is, activity and mobility are sure-fire ways of fast-tracking your journey to a pain-free life. Importantly, however, you need to be very sure that the exercises you do are moderate, low-impact, and do not place unnecessary or damaging strain on your knee. Movement is key… but, in moderation.

That having been said, try doing exercises that strengthen your knee as well as give it extra motion. Straight leg raises, whereby the leg is slowly lifted to extend the knee joint, are really helpful. Try leg presses and balancing exercises to increase the flexibility and strength of the knee joint. In addition, why not try cycling? Riding a bike is a low-impact form of exercise and is incredibly beneficial for strengthening the muscles around the knee joint. It’s all about support: find activities that support your knee so as to get you moving and feeling stronger… all in preparation for those things you long to get back to doing.

Physical Therapy

While increasing the amount of low-impact physical activity you do is helpful, the best and most effective way of eliminating your knee pain – fast and safely – is physical therapy. A professional, hands-on physical therapist is able to diagnose and treat the root-case of your problem, thereby offering you a permanent solution to your knee-pain. And not only that, physical therapy gives you a set of tailor-made exercises and stretches you can do at home; this means that your road to health doesn’t stop when you leave the PT room – you’ll be able to maintain your pain-free life well beyond your physical therapy sessions. Physical therapy is so much more than just a temporary mask for your pain: it’s about your health and your happiness.

Physical therapy gives you the opportunity to restore functionality in your knee, the tools to help rebuild and strengthen muscles, and the comfort of knowing that the range of motion in your knee is being systematically increased.

Don’t let knee-pain ruin even one more day of your life. It’s time to get back to that golf game you’ve been dying to play, that yoga class that’s been in the back of your mind for weeks, and the training for that marathon you’ve waited forever to run. Knee pain is terrible, but there are solutions. To learn more about physical therapists or find one in your area, visit the American Physical Therapy Association (APTA). ​

If you have a question that you would like featured in an upcoming blog post, please comment below or submit your question to contact@thePhysicalTherapyAdvisor.com.  In case you haven’t already, be sure to subscribe to my e-mail list and YouTube channel as well as join our community on Facebook by liking The Physical Therapy Advisor!

Does Kinesiological Tape Really Work?

I was first introduced to Kinesiological (Kinesio) style taping during a continuing education class in 2005.  Since then, this style of taping has exploded in the mainstream with athletes and celebrities alike wearing it.  Research on this modality was initially scant.  Today there are over 540 published studies with even more antidotal testimony!  Although the research is ongoing and published regularly, I get asked all the time about what can you use Kinesiological tape for and how exactly it works.  I will review three theories on how Kinesiological tape actually works and the different reasons for using it.

Kinesiological Taping For Achilles Tendinitis

How does Kinesiological Tape Work?

  • Sensory Theory (also known as the Gate Control Theory) – The basic premise of this theory is that the Kinesiological tape, when applied to the skin, activates sensory receptors present on the skin. These receptors relay information to/from the brain.  Since the sensory receptors are faster than other types of receptors (such as pain) the brain reacts to the sensory information first.  This can lead to altered movement patterns and awareness to the area.  It can also allow for decreased sensations of pain.  This theory is similar as to why we think topical analgesics (such as Biofreeze) work as well as why transcutaneous electrical nerve stimulation (TENS units) can reduce pain.
  • Circulatory Theory – The basic premise of this theory is that the when the Kinesiological tape is applied with little tension it forms convolutions in the skin. These convolutions create channels and reduce pressure within the tissues, lymph system, and circulatory system which aids in blood and lymphatic flow.
  • Muscle Activation Theory – The premise of this theory is that when the Kinesiological tape is applied at different levels of tension on the skin over the muscles and tissues, the Kinesiological tape can either mechanically or neurological increase or decrease muscle activation via a nervous system response.

Presently the truth behind Kinesiological taping is that we really don’t know exactly how or why it works.  Based on my clinical experience, I believe that the Kinesiological tape interacts with the body’s tissues in different ways depending on how and where the Kinesiological tape is applied.  Depending on how the Kinesiological tape is utilized, any one or combination of the three theories is likely correct.

Research states that Kinesiological style taping is at least as effective as other minimal interventions for musculoskeletal pain which may include topical analgesics like Arnica montana (Arnica Rub) or Biofreeze.

Research has also shown that taping can reduce pain acutely within first week of injury and possibly even in cases of pain which has been present for as long as three to four weeks (or longer).

Research concludes that there are some improvements in muscle and joint range of motion (ROM) and a reduction of pain.  However, because the improvement isn’t significant or long standing it shouldn’t be used as a standalone intervention.  Kinesiological taping is best used in combination with other interventions (such as manual therapy based techniques and exercise) which have been proven to affect outcomes over the long-term.

When Kinesiological tape is used in conjunction with other treatments, it may help speed up the recovery as the Kinesiological tape can allow for other techniques to be utilized more effectively due to the loss of pain, swelling or easing of movements.

Although there have been hundreds of research studies performed, the effectiveness of Kinesiological tape is still questioned primarily due to issues with research design.  Many of the taping applications are based on theory and not science.  Since there isn’t a consistent application pattern, the research studies aren’t comparing the same techniques over large enough patient populations to show a true effect.  In addition, researchers still need to quantify how much tension is actually being used and the actual Kinesiological taping technique being used versus other types of techniques or interventions.

Unfortunately, without better quality research it’s unclear if the results shown in many of the studies are due to an actual effect or through placebo.  For now, none of the studies show significant benefits regarding long-term pain alleviation or improved strength or range of motion (ROM).  So for now, the main conclusion is that Kinesiological taping should be used only as a short-term treatment in combination with other treatments.  I personally use Kinesiological tape, and I often find that my clients experience success with specific tape applications for different conditions.

What do you use Kinesiological Tape for?

  • Reduce pain
  • Reduce swelling and edema
  • Support muscles and joints
  • Reduce muscle tension
  • Increase strength
  • Improve performance
  • Enhance or correct movement patterns through stimulation of sensory receptors
  • Provide compression
  • Enhance healing by slightly lifting skin away from sore or injured tissues to improve blood flow and lymphatic drainage
  • Support injured joints and muscles without impeding range of motion (ROM)

There are dozens of companies’ now manufacturing Kinesiological style tape.  There are many high quality tapes being manufactured with all kinds of colors, designs, and variations in adhesive quality and elasticity.  Personally, my favorite brands are based on price point and actual use.  This includes ease of application and how long the Kinesiological tape actual stays on.  The brands I use most include:  Kinesio Tape, RockTape, Thera-Band Kinesiology tape, Spider tape, and KT TAPE.  Although there are many more brands available, I have not personally used them.

There are many different applications Kinesiological taping can be used for.  Like any treatment modality, it can work wonders for one person and do nothing for another, but should we really be surprised?  Many of our most popular pharmaceuticals are no different.  Kinesiological taping has the benefit of rarely having significant side effects.  There are rarely side effects to utilizing this style of tape as the products utilized tend to be very hypoallergenic.  Occasional skin irritation has been the only noted side effect I have known of in my clinical experience.  In order to avoid skin related issues (including application and removal tips), please refer to Skin Care with Taping.

I have found success with utilizing Kinesiological taping as an adjunct treatment strategy and as part of a complete treatment approach.  If you are interested in specific applications for different conditions, please see the following in which I demonstrate different taping techniques.

Step-by-step guides:

Kinesiological Taping for Osgood-Schlatter Disease

Kinesiological Taping for Patellar Femoral Pain Syndrome

Kinesiological Taping for Shin Splints

Video:

How to Apply Kinesiological Tape When Treating Achilles Tendinitis

Books with step-by-step guides specific for ankle sprains and low back pain:

The Physical Therapy Advisor’s Guide to Treating Ankle Sprains and Strains

The Physical Therapy Advisor’s Guide to Treating Low Back Pain During Activity and Exercise

Have you tried using Kinesiological taping before?  If so, what was your experience like, and did it help you?  Please leave your comments below.

If you have a question that you would like featured in an upcoming blog post, please comment below or submit your question to contact@thePhysicalTherapyAdvisor.com.  Be sure to join our growing community on Facebook by liking The Physical Therapy Advisor!

How to Self-Treat Metatarsalgia

MTA_Metatarsalgia

http://marathontrainingacademy.com/how-to-self-treat-metatarsalgia

Marathon Training Academy

February 22, 2016

In this guest post for Marathon Training Academy, you will learn how to identify the potential causative factors for metatarsalgia and how to self-treat this condition so you don’t lose too much time with your training.

Pain in the female footMetatarsalgia is a general term that refers to pain in the foot (typically around the ball of the foot). It’s common in runners, track and field athletes, and for those who participate in high impact related sports (such as basketball and soccer).  It’s also commonly associated with overuse syndrome.

Metatarsalgia is pain and irritation at the end of the metatarsal joints near the toes. Potential causes for the pain include:  a stress fracture; gout; osteoarthritis; hammertoes; calluses; and pain in the joint from swelling and irritation.  It can also be from neuromas, in which nerves tend to bundle and become irritated between the metatarsal heads.

Metatarsalgia typically begins as a mild discomfort which grows steadily and quickly to the point that a person may struggle to walk, stand, or run. The key to treatment and management of this condition is to intervene quickly and to identify the actual cause or causes that led to the pain and irritation.  Learn the potential causative factors for metatarsalgia and how to self-treat this condition so you don’t lose too much time with your training.  Continue Reading

How to Self-Treat Shin Splints

If you have ever experienced shin splints (anterior compartment syndrome), you know how excruciatingly painful it can be.  You may struggle to run or walk.  The pain can linger for weeks and months–taking the fun out of running and exercise.  In the previous post, I discussed How to Prevent Shin Splints.  Now I will provide simple treatment options to quickly help aid in your recovery.  Shin splints can typically be easily self-treated if you don’t have a more serious medical condition, such as a stress fracture, causing the pain.

ShinSplints_Treatment_Landscape

How to Self-Treat Shin Splints: 

  • Ice. Although shin splints can occur insidiously, they are often associated with a specific event. An active inflammatory process typically occurs. Apply the ice to the anterior tibialis muscle (the muscle right next to the shinbone). The rule for icing is to apply ice no more than twenty minutes per hour. Do not place the ice directly against the skin, especially if you are using a cold pack. A bag of frozen peas can be a cheap alternative. Individuals with poor circulation or impaired sensation should take particular care when icing.
  • Rest. If you are experiencing an episode of shin splints, then you will need to rest. Avoid running (particularly downhill). At the very least, taper your training intensity and avoid exercises that place undue stress on the shins, particularly the anterior tibialis muscle. Utilize this time to incorporate cross training activities, such as yoga, to improve flexibility as shin splints can be linked to poor mobility.
  • Consider changing your shoes. Your shoes may be worn out and may be the cause of the pain. If you wear a shoe that helps to limit overpronation, remember that the inner cushion and structure of the shoe can wear out before its outer appearance. If this occurs, the shoe can no longer adequately control inappropriate foot and heel movements such as overpronation. This can lead to shin splints as well as IT band syndrome or other hip, knee, or ankle related issues. Shoes only last 350-500 miles. If you are nearing those miles, then it may be time to change.
  • Add an orthotic. Additional foot control is often needed to normalize gait mechanics. Many running stores sell an over-the-counter orthotic such as Superfeet Blue Premium Insoles. The blue tends to fit most feet, but a variety of options are available for customization. In my experience, these insoles can last 1,000 to 1,500 miles easily. If the over-the-counter options aren’t helping you, please see a physical therapist or podiatrist for custom orthotics. Seek assistance from a professional who is a runner and has experience with treating other runners.
  • Warm up prior to exercise. I recommend that you increase your normal warm up time by at least 10 minutes in order to increase blood flow to the area. This allows for better mobility and also prepares the tissues for exercise. Consider using a self-massage tool to roll up and down the anterior tibialis as part of your warm up. My favorite self-massage tools for this area include the Thera-Band Standard Roller Massager and The Stick Self Roller Massager. I also recommend using the massager on your calf muscles. Perform calf stretches, but be mindful that prolonged static stretching before exercise may worsen performance.
  • Cool down. After performing your exercises, take extra time to cool down and stretch. Focus on calf stretching as well as general lower extremity mobility stretches. Use the same self-massage tools as you did during your warm up. If you are prone to developing shin splints, I highly recommend regular massage and mobilization of the anterior tibialis muscle, as well as the calves. Tightness in the calves and Achilles tendon are a risk factor for developing shin splints. Be sure to emphasize stretching your calves. Hold each of the following stretches for at least 30 seconds, 3 times on each leg, 2-3 times a day. (These stretches shouldn’t cause more than a mild increase in pain or discomfort.)

Calves

  • Self-mobilize the tissue. Be sure to mobilize the tissue of the anterior tibialis. For this particular area, you may want to use one of the self-massage tools referenced above. You could also use a tennis or lacrosse ball to aggressively work out the tissue along the shin. Remember that mobility issues and myofascial restrictions in the lower legs are highly correlated with the development of shin splints. Use the foam roller to address any lower leg tightness or restrictions. I tend to use the foam roller for the larger parts of the leg including the thigh, back of the leg, calves, and buttock muscles. To learn how to use a foam roller, please refer to Foam Rolling for Rehabilitation.
  • Work on the stabilizing muscles of your hips and ankles. As part of a comprehensive rehabilitation protocol, I almost always have clients work on keeping the muscles of the pelvis, hips, and ankles strong. This will help to maintain normal gait mechanics during exercise and running. Not only will this help to prevent shin splints, it will likely help to prevent developing other orthopaedic issues such as plantar fasciitis and hip or knee pain. Please refer to Ankle Resistance Exercises and How to Safely Self-Treat Low Back Pain for my recommended hip and lumbar stabilization strengthening exercises.
  • Work on your balance. Poor balance is often associated with muscle weakness in the foot and ankle as well as the knee and hip musculature. Weakness and balance deficits can lead to poor foot mechanics, which can lead to excessive strain. I always include balance work as part of my recommended rehabilitation protocol. Please refer to Improving Balance by Using a Water Noodle, How Do I Improve Balance? (Part I), and How Do I Improve Balance? (Part II).
  • Kinesiological taping. The purpose of the tape is to assist the anterior tibialis muscle with its contraction and to possibly help with swelling and nutrient exchange by assisting the lymphatic system. I have had luck using the KT TAPE and Mummy Tape brands. When treating shin splints, I recommend following these step by step instructions for Kinesiological Taping for Shin Splints. For application and removal tips, please refer to Skin Care with Taping.
  • Use a compression sleeve or stocking. This condition is often associated with swelling and inflammation in the anterior compartment of the lower leg near the shinbone (tibia). The compression sleeve/socking can help to limit the amount of swelling and promote blood flow back out of the lower leg. This insures better nutrient exchange, waste removal, and can limit the swelling. I particularly recommend wearing a pair while you are in the rehabilitation phase or tapering back into full activity. There are many different styles of compression socks and sleeves, but I prefer Vitalsox Graduated Compression Socks. If you prefer a sock style, then I recommend choosing a pair that is at least knee high.
  • Start a supplement. Many herbs help to reduce inflammation and pain. One of my favorites is called Phenocane Natural Pain Management.  It combines the following: Curcumin, an herb that reduces pain and inflammation; boswellia, a natural COX2 inhibitor that also reduces pain and inflammation; DLPA, an amino acid that helps to increase and uphold serotonin levels in the brain; and nattokinase, an enzyme that assists with blood clotting and reduces pain and inflammation. (If you are taking blood thinners, please consult with your physician prior to use as the herbs could interact with some medications.)
  • Ask for help. If you’re still experiencing pain after implementing these self-treatment strategies, then it may be time to seek additional help. Your medical physician can help to determine if your pain is associated with a stress fracture. He/she could also prescribe stronger anti-inflammatory medication if necessary. The American Physical Therapy Association offers a wonderful resource to help find a physical therapist in your area. In most states, you can seek physical therapy advice without a medical doctor’s referral (although it may be a good idea to seek your physician’s opinion as well).

Have you ever experienced shin splints?  If so, which treatment techniques have you found to be the most effective? Please leave your comments below.

Looking for that exercise or book I mentioned in a post?  Forgot the name of a product or supplement that you’re interested in?  It’s all listed in the new Resource Guide.  Check it out today!

If you have a question that you would like featured in an upcoming blog post, please comment below or submit your question to contact@thePhysicalTherapyAdvisor.com. Be sure to join our growing community on Facebook by liking The Physical Therapy Advisor!