How to Self-Treat an Ankle Sprain (Part III)

As a physical therapist, I find that the most exciting part of a person’s rehabilitation is the full return to function, activity, or sport.  Countless variations of exercises and activities are performed while working toward restoring the full functional use of the ankle.  Concluding the three part series, the final stage in rehabilitation is centered on improving ankle and foot strength, stability, as well as addressing any balance deficits.

How rehabilitation progresses will vary greatly for each individual.  Therefore, no treatment plan will be alike.  For discussion purposes, I will address a generic treatment plan, which should be modified for your personal needs and activity level.  In this final stage of rehabilitation, you will progress to normal daily activities, including any athletic endeavors.  This is also when you work toward limiting any future reoccurrences of the sprain.

At this stage in recovering from a lateral ankle sprain, you should be walking relatively normally and mostly pain-free.  Running and more active side-to-side movements likely still cause pain.  Although not contra-indicated, these types of activities should be limited (unless you’re wearing a good lace up brace or are being regularly taped by a professional).

The initial portion of the rehabilitation is centered on improving ankle and foot strength, stability, as well as addressing any balance deficits.  This process begins with statically based exercises and activities.  Ultimately, it progresses into dynamic strength, balance, and mobility activities.  How rapidly a person progresses in this phase is wildly variable.  The key is to progress at your own pace.  If you start experiencing increasing pain, feelings of ankle instability, and sensations that it may “roll” or sprain again, then you need to taper down your activity level.  After the pain subsides, continue to focus on the activities that that didn’t cause pain or discomfort previously.

The following treatment plan includes exercises for strength and balance as well as mobility drills and full athletic simulation drills.  Each category is listed in an easiest to most challenging format.  You shouldn’t progress to the next exercise until the first one is mastered.

Strength

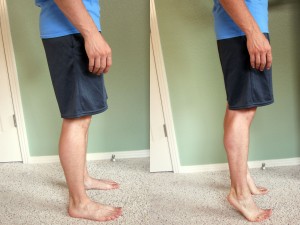
  • Heel/Toe Raises – A person should be able to perform 25 heel raises in a row with only minimal fingertip assistance on a counter top.  A normal amount of calf strength would be considered once you can perform 25 heel raises. 

HeelToeRaisesCollage

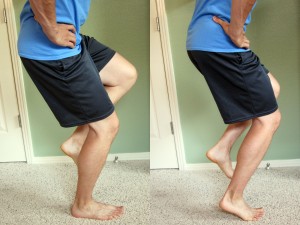
  • One Leg Squat – Perform a one leg squat without using your hands for balance to increase the difficulty level.  The one leg squat on your tip toes is a harder variation which involves more calf muscle activation.  Start with two sets of 10 repetitions, then progress to three sets of 10 repetitions.

OneLegSquat_Collage

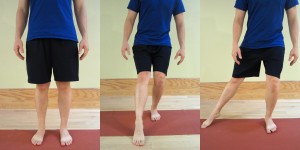
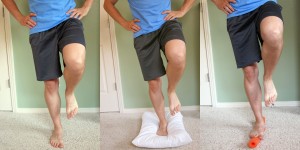
  • Clock Exercise – Stand on your affected (injured) foot and attempt to touch your tip toe of the non-affected side as far out as you can reach.  Bring your foot back to the center or starting point according to the hands on a clock.  For example, 1 o’clock to 6 o’clock (clock-wise) or 12 ‘o clock to 6 o’ clock (counter clock-wise) depending on which foot is affected.  Perform the routine between three to five times slowly.

ClockExercise

Balance

  • Stand on one foot – A 30 second hold with eyes open during the first time, then closed during the second time, is considered normal.
  • Stand on one foot on a pillow – A 30 second hold for two to three repetitions.  As you progress, stand on the pillow and perform the Clock Exercise as described above.
  • Stand on one foot and bounce a ball against a wall.
  • Stand on a Wobble Board, Bosu Balance Trainer or other unstable surface.

Mobility Drills

  • Initially, start with forward and backward movements and progress from a walk, to a jog, to a sprint.
  • Jump Rope
  • Side Stepping – Progress the speed as pain allows and if you’re not experiencing the feeling of instability.
  • Karaoke or Grapevine – Walk or run sideways while alternating the placement of the foot either in front or behind the other.
  • Sprint Ladder – A number of agility drills can be performed with the sprint ladder.  Search YouTube and pick your favorite video which closely mimics the footwork desired for your particular sport or activity.
  • Short side-to-side Wind Sprints – While sprinting, touch your hand to the ground at each change of direction.

Full Athletic Simulation Drills

  • Depending on your sport of choice, return to your sport specific training drills.  You may still require additional support.  I recommend wearing a good lace up brace or being taped by a professional for support.  Additional support should only be used temporarily and with the intention of progressing from using them as your ankle can tolerate.

If you continue to experience pain and swelling, and/or require an accelerated time table for recovery (or return to competition), then I recommend the services of a sports medicine physical therapist or athletic trainer.  Many modalities, such as electrical stimulation, manual techniques and taping methods can assist in recovery when properly utilized.  To find a qualified physical therapist in your area, search at American Physical Therapy Association (APTA).

Depending on your time table for recovery and the severity of your injury, the information provided in this three part series on ankle sprains will likely be very helpful in your recovery.  Each person and injury is different.  If you’re interested in a more complete and comprehensive look at self-rehabilitating an ankle sprain, be sure to check out Treating Ankle Sprains and Strains.

Knowing how to effectively self-treat and manage ankle sprains and strains is important in order to resume your training and normal activities without the risk of additional damage, injury or re-injury.  When you can confidently self-treat, you can limit pain levels, return to activity faster, and prevent reoccurrences.
AVAILABLE NOW ON AMAZON!

In my book, Treating Ankle Sprains and Strains, you will learn how to safely and confidently self-rehabilitate a common ankle sprain.  It will guide you through the ins and outs of self-treating your ankle so you can avoid costly rehabilitation bills.  Beginning with the acute phase of rehabilitation, I will walk you through the treatment plan on how to rehabilitate your ankle through the intermediate (sub-acute) phase of rehabilitation and return to full activity and sport.

Learn how to safely self-treat and properly rehabilitate your ankle so you can get back to your daily life and exercise goals more quickly without additional costly medical bills!

BUY NOW

How to Self-Treat an Ankle Sprain (Part II)

Ankle sprains are one of the most common and prevalent musculoskeletal injuries.  Although more likely to occur in children, ankle sprains can happen to anyone anytime.  In my last post, How to Self-Treat an Ankle Sprain (Part I), I addressed how to handle the initial acute phase of an ankle sprain.  I will continue to guide you through the treatment plan on how to rehabilitate your ankle in this three part series by addressing the progression from the acute phase into the intermediate phase.

Sprains are categorized as Grade I, II, or III.  A Grade I sprain is the most common.  It’s typically associated with only mild damage to the ligament, and instability doesn’t affect the joint.  A Grade II sprain is a partial tear to the ligament and is usually associated with some laxity (hypermobility).  If this occurs, it’s best to wear a brace for several weeks.  Ideally, scar tissue will form and compensate for the lax ligament, so the joint doesn’t become hypermobile.  Good muscle strength and proprioception of the lower foot is important to limit future sprains.  In Grade III sprains, a full tear of the ligament occurred.  One typically consults with an orthopaedic surgeon for possible repair.  After surgery, a guided physical therapy program is recommended.

For discussion purposes, I will only address a Grade I sprain.  Initially, one may wear an air splint, ACE wrap, or some other lace-up or slip-on style brace to help with stability, inflammation, and pain control of the ankle.  In most cases, a person will want to transition from wearing the brace as soon as the initial pain subsides.  (If one had a Grade II sprain, he/she would wear a splint for several weeks so that the ankle would initially stiffen.)

At this point in your recovery, you are likely three to seven days since the initial injury.  This phase of rehabilitation can last from seven days to several weeks before progressing into the final phase of rehabilitation (and ultimately, back to full function).  Progression out of the intermediate phase is always symptom dependent.  You should be able to stand with equal weight on your feet and not experience an increase in ankle pain.  The ankle is likely stiff at this time, but it is time to start walking, progress range of motion (ROM), and start gentle resistive exercises.

Walking

If you have been using a crutch to unweight the foot, then start the progression to weight bearing during walking.  If you have been walking, then increase the amount of weight you have been putting on the ankle and foot.  At this time, the focus will be to normalize your walking pattern.  This means having a good heel strike, rolling onto the foot into full weight bearing on the leg, and then propelling forward with a good toe off.  You will continue to use the crutch as long as needed until you can walk nearly normal without limping.  Until then, utilize the crutch to unweight the leg and foot as much as necessary to perform a nearly normal walk or gait sequence.

Range of Motion (ROM)

Start to increase the range of motion of the ankle.  Initially, work to progress the plantarflexion and dorsiflexion movement (the forward and backward movement of the ankle).  As pain subsides, progress the side to side motion as well as all other motions.

Recommended Exercises:

Ankle Pumps – A very easy exercise.  Just pump your ankle forward and backward into plantarflexion and dorsiflexion movement.  Perform 10-15 repetitions several times a day on both feet.

Ankle_Combined

Ankle Alphabet – Move the foot and ankle only by pretending your big toe is a pen, and draw the alphabet using capital letters.  Perform 1-2 times a day.

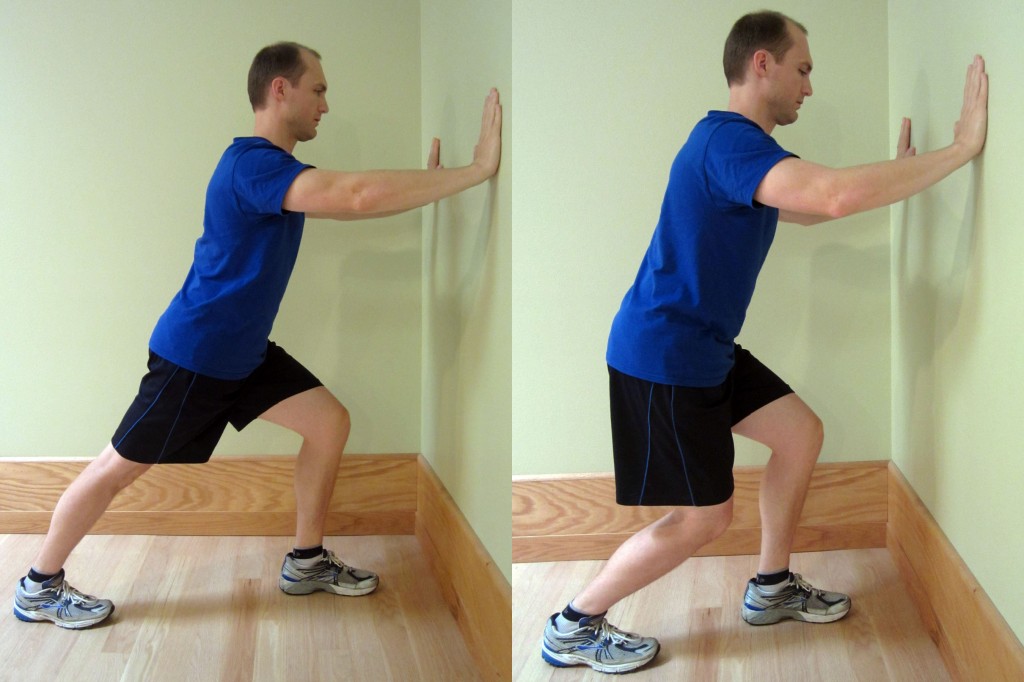
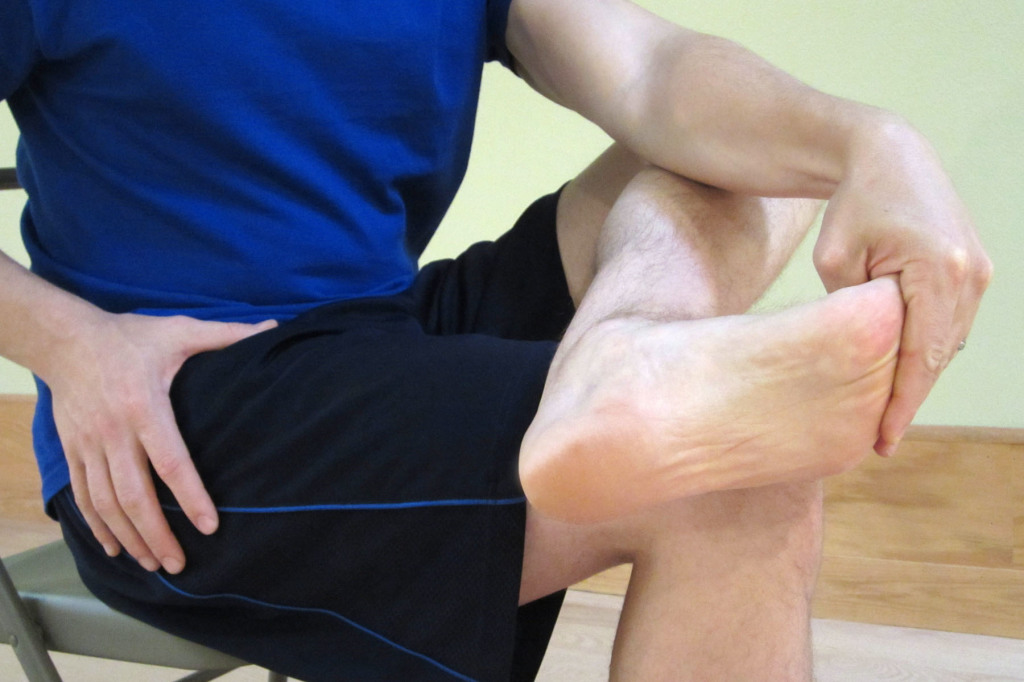
Calf Stretching – Hold each stretch for at least 30 seconds, three times on each leg, 2-3 times a day.  This stretch shouldn’t cause more than a mild increase in pain or discomfort.

Calves

Gentle Resistive Exercises

Perform plantarflexion and dorsiflexion movement by initially using an exercise band.  I recommend using a Thera-Band Exercise Band.  As your pain improves, you can progress to standing heel and toe raises as long as you don’t experience more than a mild increase in pain levels.

As pain and range of motion improve, progress to inversion and eversion with the exercise band.  Stop if you experience more than a mild increase in pain levels.

Initial Balance and Proprioception Exercise

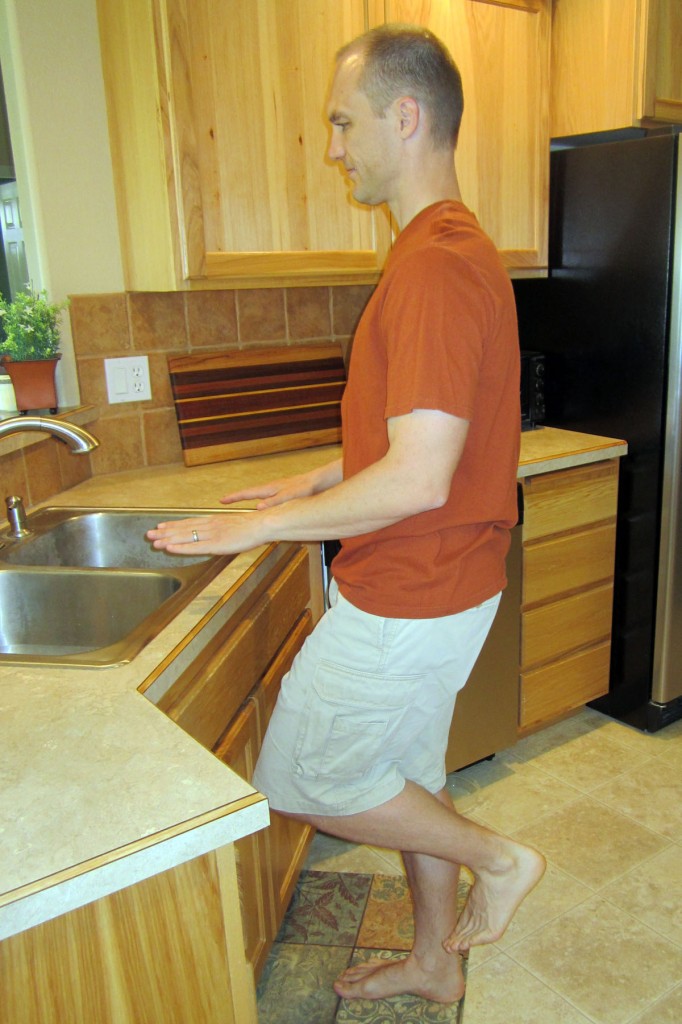
Stand on one foot. Initially, you may need to use your hand (or a finger) on a counter top for added support.  As the pain subsides and your balance improves, you may need to increase the difficulty level.  As you progress, balance will become of greater importance.

Toward the end of the intermediate phase, you should be walking fairly normally.  There will likely be some swelling.  It’s typical for some amount of swelling to come and go.  It will be directly related to how long you are on your feet and your general lower extremity circulation.  I highly recommend you continue to wear compression stockings during this time.  You may also continue to experience soreness and pain–particularly after a long day or a lot of upright activity.  Continue to utilize a regular icing protocol as needed for pain and swelling.  Also, continue to supplement with CapraFlex.

It’s time to progress into the final stage of rehabilitation once you have returned to near normal walking, your pain levels are relatively low, and you are able to complete the basic exercises listed above.  The final stage of rehabilitation includes a full return to daily activities and eventually, all sport or athletic activities.  I will address the specifics of the final stage of rehabilitation in Part III.

Knowing how to effectively self-treat and manage ankle sprains and strains is important in order to resume your training and normal activities without the risk of additional damage, injury or re-injury.  When you can confidently self-treat, you can limit pain levels, return to activity faster, and prevent reoccurrences.

AVAILABLE NOW ON AMAZON!

In my book, Treating Ankle Sprains and Strains, you will learn how to safely and confidently self-rehabilitate a common ankle sprain.  It will guide you through the ins and outs of self-treating your ankle so you can avoid costly rehabilitation bills.  Beginning with the acute phase of rehabilitation, I will walk you through the treatment plan on how to rehabilitate your ankle through the intermediate (sub-acute) phase of rehabilitation and return to full activity and sport.

Learn how to safely self-treat and properly rehabilitate your ankle so you can get back to your daily life and exercise goals more quickly without additional costly medical bills!
BUY NOW

Do I have Morton’s Neuroma in my Foot?

Do you have pain between your toes?  Does it feel like you are always standing on a pebble or have a lump in your socks between your toes?  This may be Morton’s neuroma.  A neuroma is a thickening of the tissue that surrounds the digital nerve bundle.  Morton’s neuroma is one of the most common types of neuromas and typically occurs between the third and fourth toes.

Morton’s neuromas occur due to repeated stresses, irritation, and/or pressure at the ball of the foot which affects one of the nerves that leads to the toes.  There typically isn’t any swelling, bumps or bruises with Morton’s neuroma.  Learn how to determine if you have Morton’s neuroma in your foot and how to self-treat it.

Morton’s Neuroma Symptoms include:

  • Numbness or tingling which is affecting the ball of the foot, between the toes, and/or the toes themselves.
  • Sharp, stabbing and/or burning pains that are intermittent and only affect either the ball of the foot and/or toes (usually the third and fourth toes).
  • The sensation of standing on a pebble or marble or having a lump in your shoe or sock.
  • When running, the pain is often felt during the push off from the toes prior to the swing through phase.

Common Risk Factors for developing Morton’s Neuroma:

  • Sports and activities that involve repeated impact affecting the feet (such as jogging and running sports).
  • Poorly fitting footwear.  This is particularly true for high heel shoes, but it’s also very common in athletic and running shoes.  Most commonly, the toe box is too small.  A sole that is overly flexible in the wrong location can cause excessive give in a location which isn’t in proper alignment with the metatarsals of the foot.
  • People with common foot deformities, such as bunions, hammertoes, flat feet or overly high arches, are at risk for developing Morton’s neuroma.
  • Poor ankle mobility, particularly excessive tightness in the Achilles tendon or calf muscles.
  • Poor foot muscle strength, particularly the foot intrinsic muscles which help to support the arch of the foot.
  • Women are eight to ten times more likely to develop Morton’s neuroma.  High heels are a likely culprit.

Do I have Morton’s Neuroma in my Foot?

Morton’s neuroma is often diagnosed through a physical examination and imaging.  However, a very thorough history and physical examination can be quite conclusive.  The imaging is typically only to rule out other possible causes of the pain such a stress fracture.

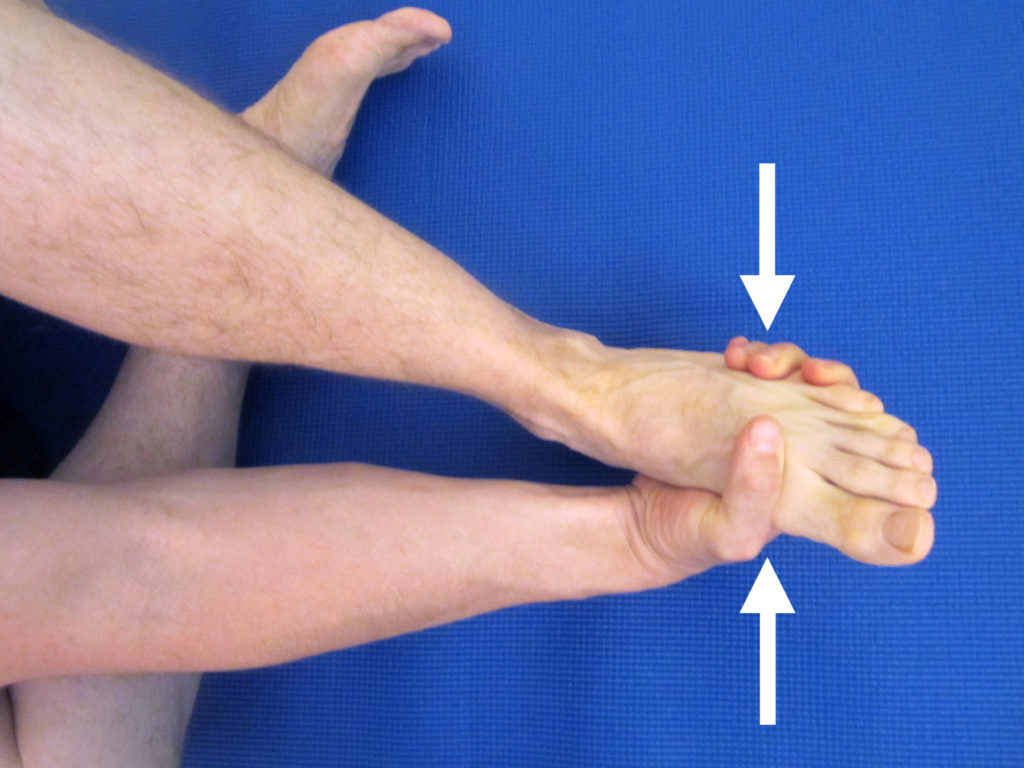
The physical examination includes palpating between the toes.  The painful area will feel “thicker” on the affected foot in comparison to the other.  There is often an associated clicking of the bones when the area is squeezed or moved back and forth.  When the forefoot is squeezed and held for several seconds for a Morton’s Neuroma test, it will often reproduce or worsen the symptoms of burning and or tingling.

How to Self-Treat Morton’s Neuroma:

Avoid wearing tight fitting, ill-fitting, and high heeled shoes.  Be sure that your shoes have an appropriately sized toe box.  In the case of athletic shoes (particularly, for distance running), extra room in the toe box can be beneficial as the foot will often swell during the course of the run.  If you wear high heeled shoes, consider wearing them less frequently and/or switching to a shorter heel.  Even wearing socks that are too small can potentially cause too much compression and lead to increased symptoms.

Orthotics.  Many people respond well to a rigid orthotic with an extension underneath the first metatarsal bone.  You may not necessary need custom orthotics.  Many running stores sell an over-the-counter orthotic such as Superfeet Blue Premium Insoles.  The blue tends to fit most feet, but a variety of options are available for customization.  In my experience, these insoles can last 1,000 to 1,500 miles easily.  If the over-the-counter options aren’t helping you, please see a physical therapist or podiatrist for custom orthotics.  Seek assistance from a professional who is a runner and has experience with treating other runners.

Metatarsal buttons and pads.  Adding a metatarsal button or pad may be enough to spread out the metatarsal heads and alleviate the pain for those who don’t want a full orthotic.  Although often a metatarsal pad may be incorporated into a custom orthotic.  I recommend these Pro-Tec Athletics Metatarsal Pads.

Anti-inflammatories.  Initially an anti-inflammatory may be necessary.  Speak to your physician about the best type of anti-inflammatory for you.  In severe cases, a cortisone injection may also be warranted.  However, you must address the biomechanical causes for the pain in order to prevent it from recurring.

I am a supporter of natural supplements and remedies.  Many supplements include herbs which are designed to help reduce inflammation and support the healing response. 

My most recommended supplement to help recover from injury is Mt. Capra CapraFlex.  Essentially, it combines an organic glucosamine and chondroitin supplement with other natural herbs which are designed to reduce inflammation and support healing.  CapraFlex can be taken long term or intermittently.

Phenocane Natural Pain Management combines the following: Curcumin, an herb that reduces pain and inflammation; boswellia, a natural COX2 inhibitor that also reduces pain and inflammation; DLPA, an amino acid that helps to increase and uphold serotonin levels in the brain; and nattokinase, an enzyme that assists with blood clotting and reduces pain and inflammation.

Another supplement I frequently recommend to help recover from injury is Tissue Rejuvenator by Hammer Nutrition.  It contains glucosamine and chondroitin as well as a host of herbs, spices, and enzymes to help support tissues and limit inflammation.  It’s a fantastic supplement.

I recommend taking either CapraFlex OR Tissue Rejuvenator, not both concurrently.

I initially recommend trying a 30 day protocol.  If the supplements are aiding your recovery, you may choose to continue taking them for an additional 30 days.  I sometimes implement this protocol as part of a prevention strategy during times of heavy volume or high intensity training.  (Please consult with your pharmacist and/or physician prior to starting any new supplementation protocol.  Herbs could interact with some medications particularly if you are taking blood thinners.)

Improve your foot mobility and strength.  Complete with instructions and photos, this guide, Morton’s Neuroma Rehabilitation Exercises, outlines how to safely perform exercises in order to improve your mobility and strength.

Weakness in the foot and ankle muscles (as well as the smaller foot intrinsic muscles) is often found in the case of Morton’s neuroma as part of the biomechanical issues that led to its development.  I recommend initiating a complete ankle/foot strengthening protocol.  Please refer to Ankle Resistance Exercises Using the Elastic Exercise Band.

Improve your balance.  Poor balance is often associated with muscle weakness in the foot and ankle as well as the knee and hip musculature.  Weakness and balance deficits can lead to poor foot biomechanics.  Standing on one foot can be an excellent way to improve your balance.  This technique is demonstrated in the Morton’s Neuroma Rehabilitation Exercises.  For additional ideas on how to improve your balance, please refer to Improving Balance by Using a Water Noodle.

Research concludes that nearly 80% of all cases of Morton’s neuroma can be treated through conservative measures (as outlined above).  In the rare cases where conservative measures fail, then one may need to consider surgical options.

One surgical option offered is decompression surgery.  During this surgical intervention, the surgeon can relieve the pressure on the nerve by cutting nearby structures (such as the ligament that binds together some of the bones in the front of the foot).  Unfortunately, this alters the shape of the foot and may affect foot dynamics into the future.  Another option is to resect or remove the nerve.  Surgical removal of the nerve is usually successful, but the procedure can result in permanent numbness in the affected toes.

If you’re not experiencing significant relief from Morton’s neuroma upon changing your footwear and addressing other risk factors while progressing into your exercise program, please consult a medical professional.  I recommend a physical therapist that specializes in feet.  The American Physical Therapy Association offers a wonderful resource to help find a physical therapist in your area.

Has a specific treatment for Morton’s neuroma helped you?  Which treatments haven’t worked for you?  Please leave your comments below.

Looking for that exercise or book I mentioned in a post?  Forgot the name of a product or supplement that you’re interested in?  It’s all listed in the Resource Guide.  Check it out today!

If you have a question that you would like featured in an upcoming blog post, please comment below or submit your question to contact@thePhysicalTherapyAdvisor.com.  Be sure to join our growing community on Facebook by liking The Physical Therapy Advisor!

How to Self-Treat Metatarsalgia

MTA_Metatarsalgia

http://marathontrainingacademy.com/how-to-self-treat-metatarsalgia

Marathon Training Academy

February 22, 2016

In this guest post for Marathon Training Academy, you will learn how to identify the potential causative factors for metatarsalgia and how to self-treat this condition so you don’t lose too much time with your training.

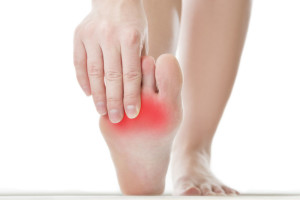
Pain in the female footMetatarsalgia is a general term that refers to pain in the foot (typically around the ball of the foot). It’s common in runners, track and field athletes, and for those who participate in high impact related sports (such as basketball and soccer).  It’s also commonly associated with overuse syndrome.

Metatarsalgia is pain and irritation at the end of the metatarsal joints near the toes. Potential causes for the pain include:  a stress fracture; gout; osteoarthritis; hammertoes; calluses; and pain in the joint from swelling and irritation.  It can also be from neuromas, in which nerves tend to bundle and become irritated between the metatarsal heads.

Metatarsalgia typically begins as a mild discomfort which grows steadily and quickly to the point that a person may struggle to walk, stand, or run. The key to treatment and management of this condition is to intervene quickly and to identify the actual cause or causes that led to the pain and irritation.  Learn the potential causative factors for metatarsalgia and how to self-treat this condition so you don’t lose too much time with your training.  Continue Reading

How to Prevent and Self-Treat Shin Splints

MTA_ShinSplints

http://marathontrainingacademy.com/self-treat-shin-splints

Marathon Training Academy

September 12, 2015

In this guest post for Marathon Training Academy, you will discover the common causes for shin splints and learn simple prevention strategies and treatment options to quickly help aid in your recovery.

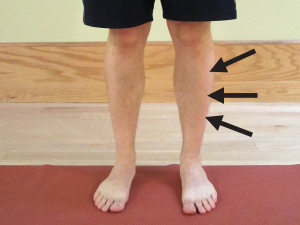
ShinSplints_Arrows_LandscapeThe term shin splints, also known as an anterior compartment syndrome, refers to pain along the shinbone (tibia), the large bone in the front of your lower leg. Shin splints can be excruciatingly painful to the point that you may struggle to walk or run. They are typically caused by inflammation in the anterior muscle of the lower leg known as the anterior tibialis muscle. This is the primary muscle needed to lift your foot. Shin splints are often considered an over use injury and unfortunately, are relatively common in runners. Discover the common causes for shin splints and implement these strategies to prevent and self-treat shin splints. Continue Reading

How to Self-Treat Plantar Fasciitis

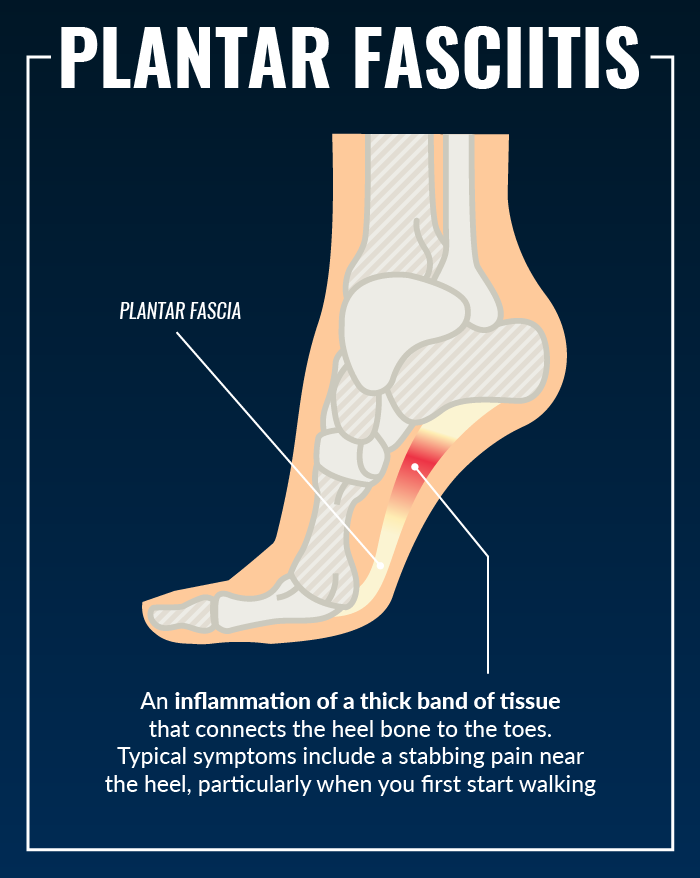
Plantar fasciitis is a very painful and potentially very debilitating condition.  It’s one of the most common causes for heel and bottom of the foot pain.  The plantar fascia is essentially a band of connective tissue (a ligament) which runs the length of your foot from your heel to your toes.  It helps to support the arch of your foot by using “windlass mechanism” to make the foot more rigid and aid in the foot’s ability to transfer force and push off when walking or running.   In the case of plantar fasciitis, the fascia on the bottom of the foot becomes swollen and irritated and may cause pain when you stand and/or walk.  It’s typically at its worst in the morning with your first several steps after sleeping.  Plantar fasciitis is also more common the older a person becomes.

Image courtesy of www.runnersgoal.com

Risk factors for developing plantar fasciitis include:

  • Excessive foot pronation. Your feet tend to roll inward as you stand, walk, and/or run.
  • Either excessively high arches or overly flat feet.
  • Spending long periods of time standing or walking.
  • Spending long periods of time on hard surfaces, such as concrete.
  • Obesity
  • Your shoes don’t fit well or the shoe is worn out.
  • You have transitioned too quickly from a more built up running shoe into a minimalistic style.
  • Poor ankle mobility, particularly excessive tightness in the Achilles tendon or calf muscles.
  • Poor foot muscle strength, particularly the foot intrinsic muscles which help to support the arch of the foot.

Plantar fasciitis typically begins as a mild discomfort which grows steadily and quickly to the point that a person may struggle to walk, stand, or run.  Plantar fasciitis may occur after a specific event.  The plantar fascia could be over stretched due to a slip.  It could occur after an overzealous training day in unfamiliar circumstances, such as running barefoot in the sand.

Fortunately, plantar fasciitis doesn’t always require formal medical treatment.  The key is to intervene quickly to identify the actual cause or causes that led to the inflammation and irritation.  The recommended treatment is the same whether or not the plantar fasciitis developed over time or due to a specific event.

How to Self-Treat Plantar Fasciitis:

  • Begin your rehabilitation. Start with these Plantar Fasciitis Rehabilitation Exercises. Complete with instructions and photos, this guide outlines how to safely self-treat your plantar fasciitis. Stretch your calves as tight Achilles tendons and calf muscles can cause excessive strain on the plantar fascia, which increases your risk of pain. Stretch your plantar fascia by performing stretches prior to standing or walking upon morning waking and after any prolonged sitting.
  • Mobilize the tissue. Depending on how aggressive you want to be, a tennis ball, lacrosse ball, or golf ball can be used to mobilize the tissue. I recommend mobilizing once or twice per day for 2-3 minutes. Then perform additional stretching of the plantar fascia and calves.
  • Use ice. My favorite technique for icing this area is to use a frozen water bottle. Roll your foot over the bottle for 3-4 minutes until your foot starts to feel numb and the pain subsides. It’s possible to frost bite your foot, so be mindful of the length of time you’re icing.
  • Strengthen your foot and ankle complex. Weakness in the foot and ankle muscles (as well as the smaller foot intrinsic muscles) can lead to excessive strain on the plantar fasciitis. I recommend initiating a complete ankle/foot strengthening protocol. Please refer to Ankle Resistance Exercises.
  • Improve your balance. Poor balance is often associated with muscle weakness in the foot and ankle as well as the knee and hip musculature. Weakness and balance deficits can lead to poor foot mechanics, which can lead to excessive strain on the plantar fascia. Improving your balance can help reduce the risk of plantar fasciitis and is an important part of the rehabilitation. Please refer to Improving Balance by Using a Water Noodle.
  • Start a supplement. I am a supporter of natural supplements and remedies. Many supplements include herbs which are designed to help reduce inflammation. Phenocane Natural Pain Management combines the following: Curcumin, an herb that reduces pain and inflammation; boswellia, a natural COX2 inhibitor that also reduces pain and inflammation; DLPA, an amino acid that helps to increase and uphold serotonin levels in the brain; and nattokinase, an enzyme that assists with blood clotting and reduces pain and inflammation. If you are taking blood thinner medication, please consult with your physician prior to taking Phenocane Natural Pain Management.
  • Use a plantar fasciitis night splint. Although a little cumbersome and annoying, night splints can be helpful. While lying, the natural tendency is to flex the foot to point your toes (plantarflex). This position causes the plantar fascia to shorten and tighten, which explains the pain you might experience during the first few steps after sleeping or resting. The night splint helps you to heal by maintaining a neutral position which doesn’t allow the fibers to shorten.

While you’re self-treating your plantar fasciitis, you’ll likely need to modify your exercise or running program.  It’s an excellent time to focus on cross training activities.  I recommend following this protocol for two to three weeks.

If you’re not experiencing significant relief upon progressing into your exercise program, please consult a medical professional.  I recommend a physical therapist who specializes in feet or who works with athletes for the treatment of plantar fasciitis.  The American Physical Therapy Association offers a wonderful resource to help find a physical therapist in your area.

Has a specific treatment for plantar fasciitis helped you? Which treatments haven’t worked for you?   Additional discussion can help others to manage this condition more effectively.  Please leave your comments below.

Looking for that exercise or book I mentioned in a post?  Forgot the name of a product or supplement that you’re interested in?  It’s all listed in the new Resource Guide.  Check it out today!

If you have a question that you would like featured in an upcoming blog post, please comment below or submit your question to contact@thePhysicalTherapyAdvisor.com. Be sure to join our growing community on Facebook by liking The Physical Therapy Advisor!

Ankle Sprains – Rehabilitation (Part III of III)

As a physical therapist, I find that the most exciting part of a person’s rehabilitation is the full return to function, activity, or sport.  Countless variations of exercises and activities are performed while working toward restoring the full functional use of the ankle.  Concluding the three part series, the final stage in rehabilitation is centered on improving ankle and foot strength, stability, as well as addressing any balance deficits.

How rehabilitation progresses will vary greatly for each individual.  Therefore, no treatment plan will be alike.  For discussion purposes, I will address a generic treatment plan, which should be modified for your personal needs and activity level.  In this final stage of rehabilitation, you will progress to normal daily activities, including any athletic endeavors.  This is also when you work toward limiting any future re-occurrence of the sprain.

At this stage in recovering from a lateral ankle sprain, you should be walking relatively normally and mostly pain-free.  Running and more active side-to-side movements likely still cause pain.  Although not contra-indicated, these types of activities should be limited (unless you’re wearing a good lace up brace or are being regularly taped by a professional).

The initial portion of the rehabilitation is centered on improving ankle and foot strength, stability, as well as addressing any balance deficits.  This process begins with statically based exercises and activities.  Ultimately, it progresses into dynamic strength, balance, and mobility activities.  How rapidly a person progresses in this phase is wildly variable.  The key is to progress at your own pace.  If you start experiencing increasing pain, feelings of ankle instability, and sensations that it may “roll” or sprain again, then you need to taper down your activity level.  After the pain subsides, continue to focus on the activities that that didn’t cause pain or discomfort previously.

The following treatment plan includes exercises for strength and balance as well as mobility drills and full athletic simulation drills.  Each category is listed in an easiest to most challenging format.  You shouldn’t progress to the next exercise until the first one is mastered.

Strength

  • Continue with the Ankle Resistance Exercises, but progress to a stiffer Thera-Band Exercise Band (http://amzn.to/USkOeo).
  • Heel/Toe Raises – A person should be able to perform 25 heel raises in a row with only minimal fingertip assistance on a counter top. A normal amount of calf strength would be considered once you can perform 25 heel raises. 

HeelToeRaisesCollage

  • One Leg Squat – Perform a one leg squat without using your hands for balance to increase the difficulty level. The one leg squat on your tip toes is a harder variation which involves more calf muscle activation. Start with two sets of 10 repetitions, then progress to three sets of 10 repetitions.

OneLegSquat_Collage

  • Clock Exercise – Stand on your affected (injured) foot and attempt to touch your tip toe of the non-affected side as far out as you can reach. Bring your foot back to the center or starting point according to the hands on a clock. For example, 1 o’clock to 6 o’clock (clock-wise) or 12 ‘o clock to 6 o’ clock (counter clock-wise) depending on which foot is affected. Perform the routine between three to five times slowly.

ClockExercise

Balance

  • Stand on one foot – A 30 second hold with eyes open during the first time, then closed during the second time, is considered normal.
  • Stand on one foot on a pillow – A 30 second hold for two to three repetitions. As you progress, stand on the pillow and perform the Clock Exercise as described above.
  • Stand on one foot on a water noodle – This exercise challenges your balance due to the softer surface and narrow water noodle. It also challenges the side-to-side stability of the ankle, which is the weakest area, yet the most critical, with a lateral ankle sprain. A 30 second hold for two to three repetitions.

AnkleBalanceCollage

  • Stand on one foot and bounce a ball against a wall.
  • Stand on a Wobble Board, Bosu Balance Trainer, or other unstable surface.

Mobility Drills

  • Initially, start with forward and backward movements and progress from a walk, to a jog, to a sprint.
  • Jump Rope
  • Side Stepping – Progress the speed as pain allows and if you’re not experiencing the feeling of instability.
  • Karaoke or Grapevine – Walk or run sideways while alternating the placement of the foot either in front or behind the other.
  • Sprint Ladder – A number of agility drills can be performed with the sprint ladder. Search YouTube and pick your favorite video which closely mimics the footwork desired for your particular sport or activity.
  • Short side-to-side Wind Sprints – While sprinting, touch your hand to the ground at each change of direction.

Full Athletic Simulation Drills

  • Depending on your sport of choice, return to your sport specific training drills. You may still require additional support. I recommend wearing a good lace up brace or being taped by a professional for support. Additional support should only be used temporarily and with the intention of progressing from using them as your ankle can tolerate.

Depending on your time table for recovery and the severity of your injury, the information provided in this three part series on ankle sprains will likely be very helpful in your recovery.  For some, it won’t fully meet your needs for a full and speedy recovery.  Each person and injury is different.  If you continue to experience pain and swelling, and/or require an accelerated time table for recovery (or return to competition), then I recommend the services of a sports medicine physical therapist or athletic trainer.  Many modalities, such as electrical stimulation, manual techniques and taping methods can assist in recovery when properly utilized.  To find a qualified physical therapist in your area, search at American Physical Therapy Association (APTA).

If you have additional questions or comments regarding this series, please comment below or submit your question to contact@thePhysicalTherapyAdvisor.com.  Be sure to join our growing community on Facebook by liking The Physical Therapy Advisor!

Disclaimer:  The Physical Therapy Advisor blog is for general informational purposes only and does not constitute the practice of medicine or other professional health care services, including the giving of medical advice.  No health care provider/patient relationship is formed.  The use of information on this blog or materials linked from this blog is at your own risk.  The content of this blog is not intended to be a substitute for professional medical advice, diagnosis, or treatment.  Do not disregard, or delay in obtaining, medical advice for any medical condition you may have.  Please seek the assistance of your health care professionals for any such conditions.

Ankle Sprains – Intermediate Phase (Part II of III)

Ankle sprains are one of the most common and prevalent musculoskeletal injuries.  Although more likely to occur in children, ankle sprains can happen to anyone anytime.  In my last post, Ankle Sprains – Acute Phase (Part I of III), I addressed how to handle the initial acute phase of an ankle sprain.  I will continue to guide you through the treatment plan on how to rehabilitate your ankle in this three part series by addressing the progression from the acute phase into the intermediate phase.

Sprains are categorized as Grade I, II, or III.  A Grade I sprain is the most common.  It’s typically associated with only mild damage to the ligament, and instability doesn’t affect the joint.  A Grade II sprain is a partial tear to the ligament and is usually associated with some laxity (hypermobility).  If this occurs, it’s best to wear a brace for several weeks.  Ideally, scar tissue will form and compensate for the lax ligament, so the joint doesn’t become hypermobile.  Good muscle strength and proprioception of the lower foot is important to limit future sprains.  In Grade III sprains, a full tear of the ligament occurred.  One typically consults with an orthopaedic surgeon for possible repair.  After surgery, a guided physical therapy program is recommended.

For discussion purposes, I will only address a Grade I sprain.  Initially, one may wear an air splint, ACE wrap, or some other lace-up or slip-on style brace to help with stability, inflammation, and pain control of the ankle.  In most cases, a person will want to transition from wearing the brace as soon as the initial pain subsides.  (If one had a Grade II sprain, he/she would wear a splint for several weeks so that the ankle would initially stiffen.)

At this point in your recovery, you are likely three to seven days since the initial injury.  This phase of rehabilitation can last from seven days to several weeks before progressing into the final phase of rehabilitation (and ultimately, back to full function).  Progression out of the intermediate phase is always symptom dependent.  You should be able to stand with equal weight on your feet and not experience an increase in ankle pain.  The ankle is likely stiff at this time, but it is time to start walking, progress range of motion (ROM), and start gentle resistive exercises.

  • Walking – If you have been using a crutch to unweight the foot, then start the progression to weight bearing during walking. If you have been walking, then increase the amount of weight you have been putting on the ankle and foot. At this time, the focus will be to normalize your walking pattern. This means having a good heel strike, rolling onto the foot into full weight bearing on the leg, and then propelling forward with a good toe off. You will continue to use the crutch as long as needed until you can walk nearly normal without limping. Until then, utilize the crutch to unweight the leg and foot as much as necessary to perform a nearly normal walk or gait sequence.
  • Range of Motion (ROM) – Start to increase the range of motion of the ankle. Initially, work to progress the plantarflexion and dorsiflexion movement (the forward and backward movement of the ankle). As pain subsides, progress the side to side motion as well as all other motions.
  • Recommended Exercises:
    • Ankle Pumps – A very easy exercise. Just pump your ankle forward and backward into plantarflexion and dorsiflexion movement. Perform 10-15 repetitions several times a day on both feet

Ankle_Combined

    •  Ankle Alphabet – Move the foot and ankle only by pretending your big toe is a pen, and draw the alphabet using capital letters.  Perform 1-2 times a day.
    • Calf Stretching – Hold each stretch for at least 30 seconds, three times on each leg, 2-3 times a day. This stretch shouldn’t cause more than a mild increase in pain or discomfort.

Calves

  • Gentle Resistive Exercises:
    • Perform plantarflexion and dorsiflexion movement by initially using an exercise band. I recommend using a Thera-Band Exercise Band (http://amzn.to/USkOeo). As your pain improves, you can progress to standing heel and toe raises as long as you don’t experience more than a mild increase in pain levels.
    • As pain and range of motion improve, progress to inversion and eversion with the exercise band. Stop if you experience more than a mild increase in pain levels.
    • For further instruction and photos, please refer to Ankle Resistance Exercises.
  • Initial Balance and Proprioception Exercises. For a complete discussion on the specifics of balance, please refer to How Do I Improve Balance? (Part I) and How Do I Improve Balance? Part II.
    • Standing on one foot. Initially, you may need to use your hand (or a finger) on a counter top for added support. As the pain subsides and your balance improves, you may need to increase the difficulty level. As you progress, balance will become of greater importance (to be addressed in Part III).

IMG_4793_RGB_4x6

Toward the end of the intermediate phase, you should be walking fairly normally.  There will likely be some swelling.  It is typical for some amount of swelling to come and go.  It will be directly related to how long you are on your feet and your general lower extremity circulation.  I highly recommend you continue to wear compression stockings during this time.  You may also continue to experience soreness and pain–particularly after a long day or a lot of upright activity.  Continue to utilize a regular icing protocol as needed for pain and swelling.  Also, continue to supplement with Capra Flex by Mt. Capra (http://amzn.to/1pF936I).

It’s time to progress into the final stage of rehabilitation once you have returned to near normal walking, your pain levels are relatively low, and you are able to complete the basic exercises listed above.  The final stage of rehabilitation includes a full return to daily activities and eventually, all sport or athletic activities.  I will address the specifics of the final stage of rehabilitation in Part III.

Join our growing community on Facebook by liking The Physical Therapy Advisor!  If you have a question that you would like featured in an upcoming blog post, please e-mail contact@thephysicaltherapyadvisor.com.

Disclaimer:  The Physical Therapy Advisor blog is for general informational purposes only and does not constitute the practice of medicine or other professional health care services, including the giving of medical advice.  No health care provider/patient relationship is formed.  The use of information on this blog or materials linked from this blog is at your own risk.  The content of this blog is not intended to be a substitute for professional medical advice, diagnosis, or treatment.  Do not disregard, or delay in obtaining, medical advice for any medical condition you may have.  Please seek the assistance of your health care professionals for any such conditions.