Taping for Posterior Tibialis Tendon Dysfunction (PTTD)

Pain along the inside (medial) portion of your ankle is often due to Posterior Tibialis Tendon Dysfunction (PTTD), also known as posterior tibial tendon syndrome or tibialis posterior syndrome, and it can be very difficult to treat.

The posterior tibialis muscle is a particularly important muscle in runners as it is used in plantar flexing the ankle (pointing the ankle/toes downward) and inverting the ankle (rolling it inward).  More importantly, its role is to support the arch of the foot. Injury to this muscle is common in runners as well as those who play sports involving high foot impact such as basketball. It can be associated with a fall or can generally develop overtime depending on your risk factors and the strain your foot has taken. (Please refer to 9 Tips to Self-Treat Posterior Tibialis Pain.)

In this video, I demonstrate a taping technique for supporting the arch and the bottom of the foot for those suffering from PTTD. (I recommend using KT TAPE.)

CLICK HERE TO WATCH NOW

PTTD most commonly starts out as an over use injury. Although more common in runners and those who are involved in high impact sports, this condition can affect anyone. If the condition is left untreated, the end result is usually a falling of the arch which causes adult acquired flatfoot. When this condition is caught early, it can be self-treated. Once the arch has fallen, surgery would most likely be indicated.

If you’re interested in more thorough guide along with other videos on how to self-treat lower extremity injuries and pain like PTTD, check out the Resilient Runner Program. This is the perfect guide to help you take control of your health and fitness as well as self-manage common aches, pains, and injuries. Even if you’re not a runner, this program is appropriate for those who love to stay active and want to enjoy a healthy lifestyle.

In case you haven’t already, be sure to subscribe to my e-mail list and YouTube channel as well as join our community on Facebook by following The Physical Therapy Advisor!

Does Kinesiological Tape Really Work?

I was first introduced to Kinesiological (Kinesio) style taping during a continuing education class in 2005.  Since then, this style of taping has exploded in the mainstream with athletes and celebrities alike wearing it.  Research on this modality was initially scant.  Today there are over 540 published studies with even more antidotal testimony!  Although the research is ongoing and published regularly, I get asked all the time about what can you use Kinesiological tape for and how exactly it works.  I will review three theories on how Kinesiological tape actually works and the different reasons for using it.

Kinesiological Taping For Achilles Tendinitis

How does Kinesiological Tape Work?

  • Sensory Theory (also known as the Gate Control Theory) – The basic premise of this theory is that the Kinesiological tape, when applied to the skin, activates sensory receptors present on the skin. These receptors relay information to/from the brain.  Since the sensory receptors are faster than other types of receptors (such as pain) the brain reacts to the sensory information first.  This can lead to altered movement patterns and awareness to the area.  It can also allow for decreased sensations of pain.  This theory is similar as to why we think topical analgesics (such as Biofreeze) work as well as why transcutaneous electrical nerve stimulation (TENS units) can reduce pain.
  • Circulatory Theory – The basic premise of this theory is that the when the Kinesiological tape is applied with little tension it forms convolutions in the skin. These convolutions create channels and reduce pressure within the tissues, lymph system, and circulatory system which aids in blood and lymphatic flow.
  • Muscle Activation Theory – The premise of this theory is that when the Kinesiological tape is applied at different levels of tension on the skin over the muscles and tissues, the Kinesiological tape can either mechanically or neurological increase or decrease muscle activation via a nervous system response.

Presently the truth behind Kinesiological taping is that we really don’t know exactly how or why it works.  Based on my clinical experience, I believe that the Kinesiological tape interacts with the body’s tissues in different ways depending on how and where the Kinesiological tape is applied.  Depending on how the Kinesiological tape is utilized, any one or combination of the three theories is likely correct.

Research states that Kinesiological style taping is at least as effective as other minimal interventions for musculoskeletal pain which may include topical analgesics like Arnica montana (Arnica Rub) or Biofreeze.

Research has also shown that taping can reduce pain acutely within first week of injury and possibly even in cases of pain which has been present for as long as three to four weeks (or longer).

Research concludes that there are some improvements in muscle and joint range of motion (ROM) and a reduction of pain.  However, because the improvement isn’t significant or long standing it shouldn’t be used as a standalone intervention.  Kinesiological taping is best used in combination with other interventions (such as manual therapy based techniques and exercise) which have been proven to affect outcomes over the long-term.

When Kinesiological tape is used in conjunction with other treatments, it may help speed up the recovery as the Kinesiological tape can allow for other techniques to be utilized more effectively due to the loss of pain, swelling or easing of movements.

Although there have been hundreds of research studies performed, the effectiveness of Kinesiological tape is still questioned primarily due to issues with research design.  Many of the taping applications are based on theory and not science.  Since there isn’t a consistent application pattern, the research studies aren’t comparing the same techniques over large enough patient populations to show a true effect.  In addition, researchers still need to quantify how much tension is actually being used and the actual Kinesiological taping technique being used versus other types of techniques or interventions.

Unfortunately, without better quality research it’s unclear if the results shown in many of the studies are due to an actual effect or through placebo.  For now, none of the studies show significant benefits regarding long-term pain alleviation or improved strength or range of motion (ROM).  So for now, the main conclusion is that Kinesiological taping should be used only as a short-term treatment in combination with other treatments.  I personally use Kinesiological tape, and I often find that my clients experience success with specific tape applications for different conditions.

What do you use Kinesiological Tape for?

  • Reduce pain
  • Reduce swelling and edema
  • Support muscles and joints
  • Reduce muscle tension
  • Increase strength
  • Improve performance
  • Enhance or correct movement patterns through stimulation of sensory receptors
  • Provide compression
  • Enhance healing by slightly lifting skin away from sore or injured tissues to improve blood flow and lymphatic drainage
  • Support injured joints and muscles without impeding range of motion (ROM)

There are dozens of companies’ now manufacturing Kinesiological style tape.  There are many high quality tapes being manufactured with all kinds of colors, designs, and variations in adhesive quality and elasticity.  Personally, my favorite brands are based on price point and actual use.  This includes ease of application and how long the Kinesiological tape actual stays on.  The brands I use most include:  Kinesio Tape, RockTape, Thera-Band Kinesiology tape, Spider tape, and KT TAPE.  Although there are many more brands available, I have not personally used them.

There are many different applications Kinesiological taping can be used for.  Like any treatment modality, it can work wonders for one person and do nothing for another, but should we really be surprised?  Many of our most popular pharmaceuticals are no different.  Kinesiological taping has the benefit of rarely having significant side effects.  There are rarely side effects to utilizing this style of tape as the products utilized tend to be very hypoallergenic.  Occasional skin irritation has been the only noted side effect I have known of in my clinical experience.  In order to avoid skin related issues (including application and removal tips), please refer to Skin Care with Taping.

I have found success with utilizing Kinesiological taping as an adjunct treatment strategy and as part of a complete treatment approach.  If you are interested in specific applications for different conditions, please see the following in which I demonstrate different taping techniques.

Step-by-step guides:

Kinesiological Taping for Osgood-Schlatter Disease

Kinesiological Taping for Patellar Femoral Pain Syndrome

Kinesiological Taping for Shin Splints

Video:

How to Apply Kinesiological Tape When Treating Achilles Tendinitis

Books with step-by-step guides specific for ankle sprains and low back pain:

The Physical Therapy Advisor’s Guide to Treating Ankle Sprains and Strains

The Physical Therapy Advisor’s Guide to Treating Low Back Pain During Activity and Exercise

Have you tried using Kinesiological taping before?  If so, what was your experience like, and did it help you?  Please leave your comments below.

If you have a question that you would like featured in an upcoming blog post, please comment below or submit your question to contact@thePhysicalTherapyAdvisor.com.  Be sure to join our growing community on Facebook by liking The Physical Therapy Advisor!

How to Recover Quickly from a Quadriceps Strain

mta_quadstrain

http://marathontrainingacademy.com/quadriceps-strain

Marathon Training Academy

November 15, 2016

After straining your quadriceps, you remain at a higher risk of injury. In this guest post for Marathon Training Academy, you will learn which strategies to implement as you work through your rehabilitation and your return to activity.

Muscle injury. Man with sprain thigh muscles

A quadriceps strain, also known as a quad pull or thigh strain, is a relatively common running injury.

Strains can range from a mild discomfort to a full blown tear of most of the muscle which can result in severe pain and the inability to run or walk. The injury typically happens when one or more of the quadriceps muscles become overloaded.

In this pose you will discover the factors that increase your risk of straining your quadriceps, and learn specific strategies to implement during your rehabilitation and return to activity. Continue Reading

How to Avoid Upper Back Pain when Running

MTA_UpperBackPain

http://marathontrainingacademy.com/upper-back-pain

Marathon Training Academy

January 24, 2016

In this guest post for Marathon Training Academy, you will learn how to improve your posture and thoracic (upper back) mobility while strengthening your upper back postural muscles in order to eliminate pain when running.

Young woman out jogging suffers a muscle injuryImagine how much the average person actually slouches during a day. Slouching during breakfast, then hunched over the kitchen sink to wash dishes, slouching while driving a car, and then slouching while sitting at work or at a school desk. Don’t forget about slouching while texting, watching TV or using the computer. When you are not slouching, you’re bending over to clean or pick up children and/or pets. The list of slouching possibilities is endless!

Now envision your running posture. Does it look any different? Many of us run in a forward head and rounded shoulders position–a slouched posture! Runners experience many of the same aches and pains as their sedentary counter parts. Upper back and neck pain is a common occurrence. The most typical cause is almost always poor posture.  Continue Reading

Q & A: My Top 5 Tips on How to Self-Treat Osgood-Schlatter Disease

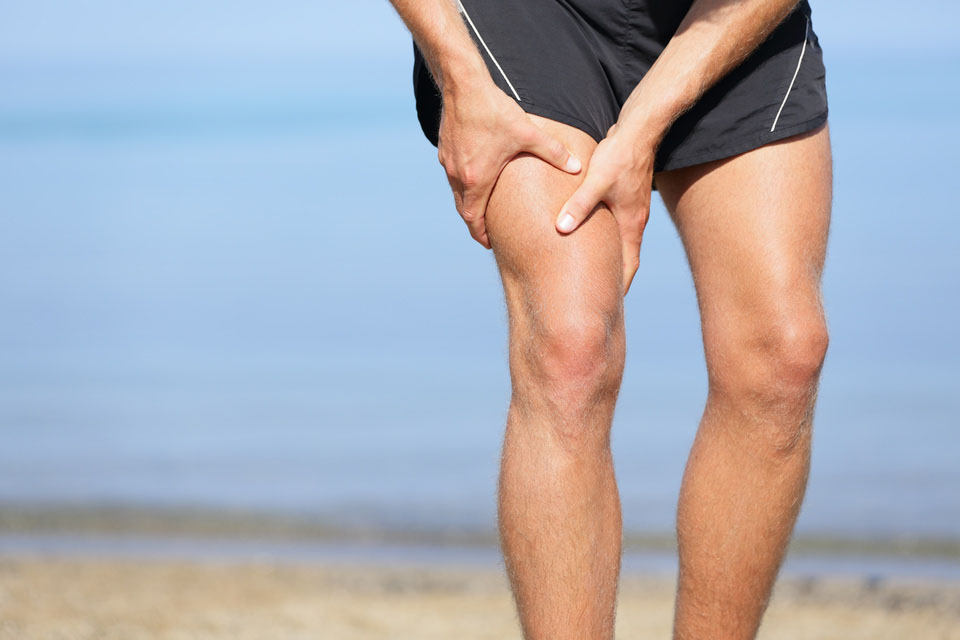
Q.  For the past several months, my 12 year old son has been experiencing pain below his knee cap just to the top of his shinbone. He typically experiences pain when playing soccer or other sports.  The pain goes away when he rests.  It’s getting to the point that it’s hard for him to participate in sports.  He hasn’t had any injuries.  What do you recommend? -Chandra

A.  Thanks for your question, Chandra. I’m sorry to hear about your son’s knee pain.  Unfortunately, it’s a common problem in children (particularly, boys).  The symptoms that you are describing sound like Osgood-Schlatter disease although other potential causes could be Patellar Tendinitis or Patellar Femoral Pain Syndrome. Due to his age, gender, and activity level, it’s most likely Osgood-Schlatter disease.

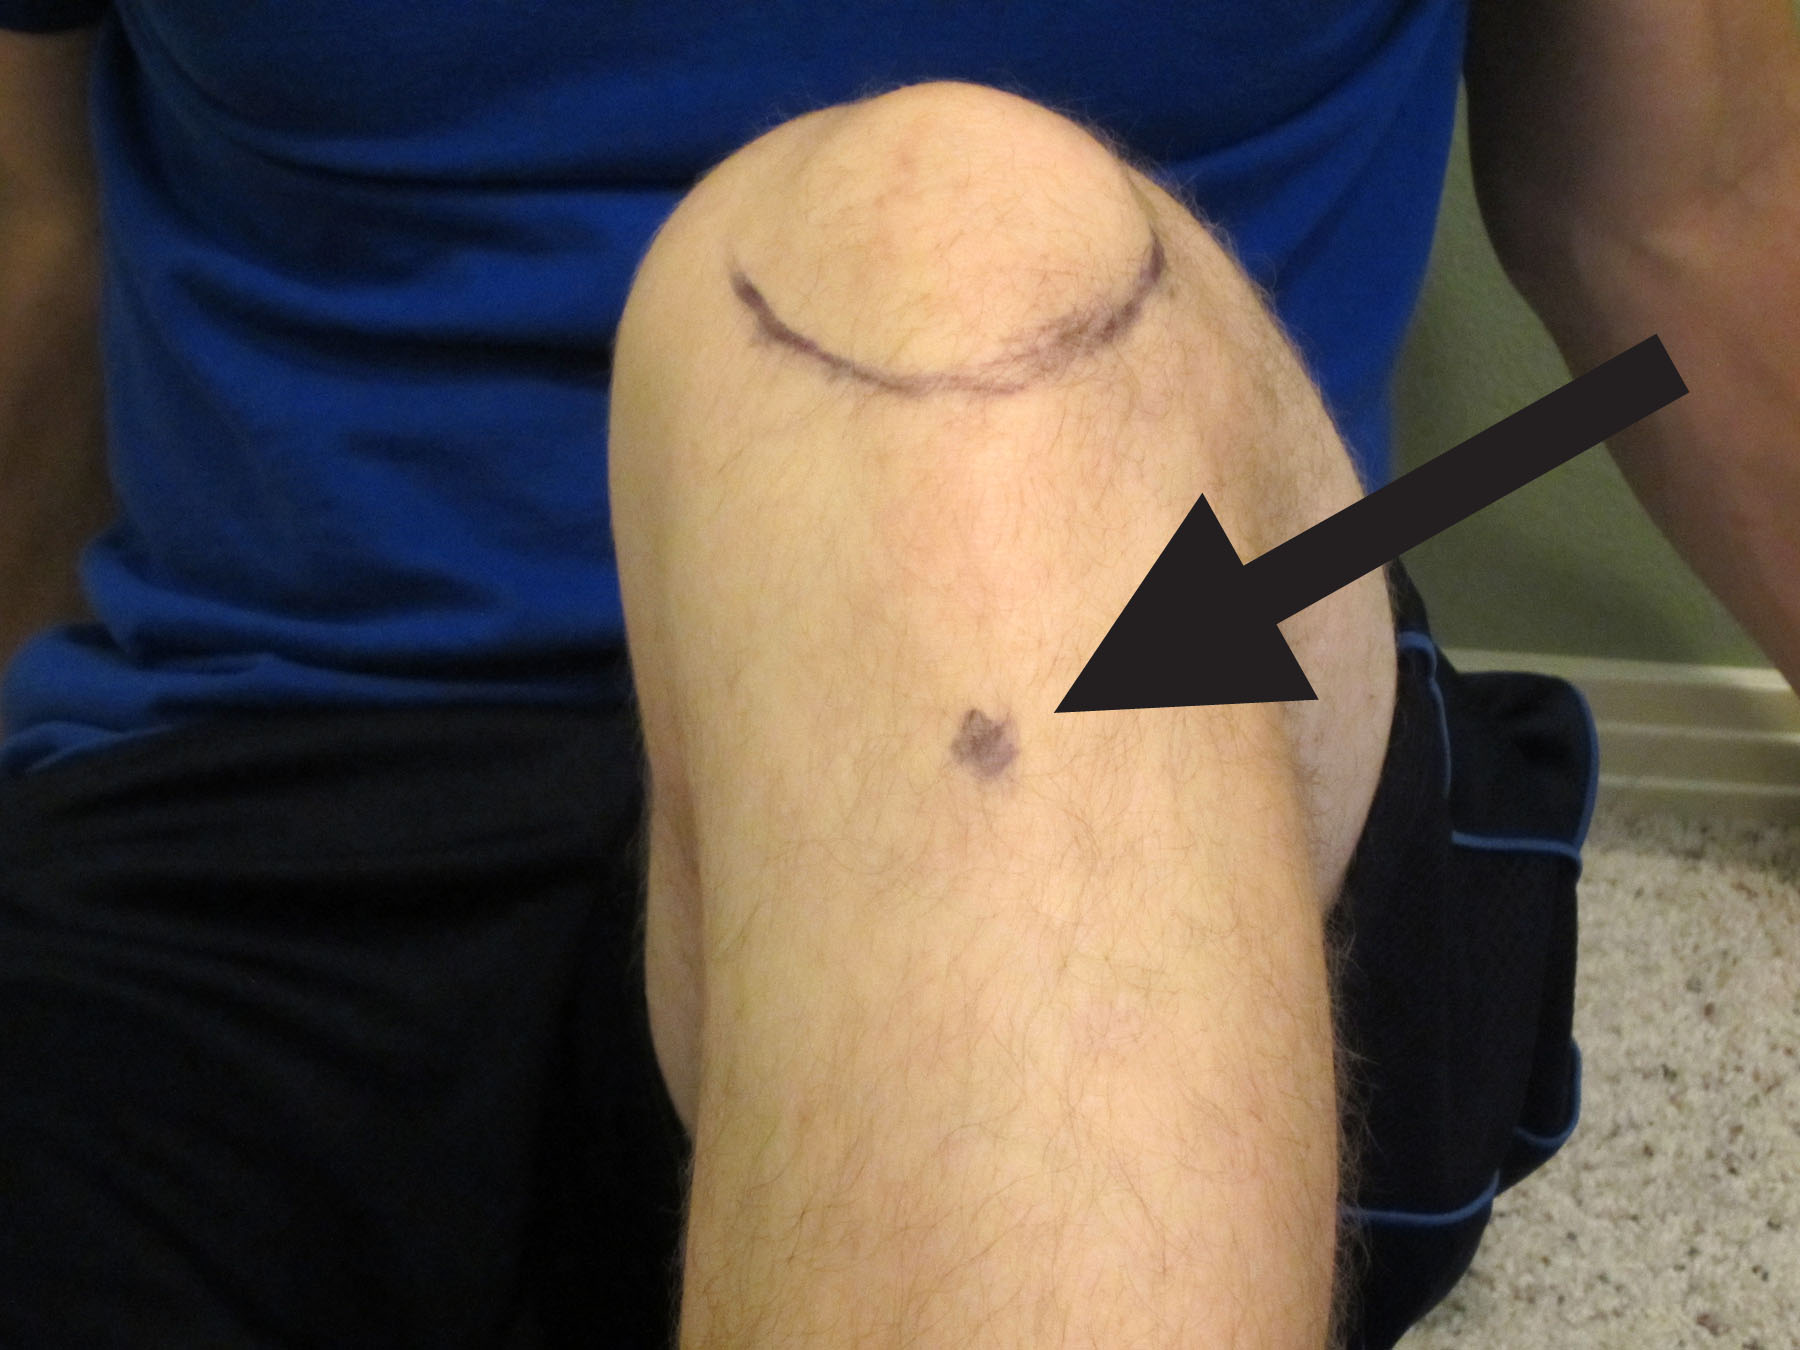
Osgood-Schlatter disease (OS) is an overuse injury with pain located just below the knee where the patellar tendon ends (inserts) on the Tibial tuberosity. A boney nob may start to develop in this area and usually occurs as the condition progresses.  This occurs due to the excessive stress on the skeletal system during a period of rapid growing combined with stress from activity of the quadriceps muscle pulling on the patellar tendon at its insertion site on the bone.  If a bump forms, don’t worry as it is benign with OS.  It will likely continue to be there as your child ages.  There are typically no long term effects for this condition except for pain over the raised area of bone when kneeling on a hard surface.

OsgoodSchlatter_TibialTuberosity

Risk Factors for Osgood-Schlatter disease include:

  • Boys who are 11-13 years old.
  • Period of rapid skeletal growth.
  • Adolescents who regularly participate in running, jumping, and sports with many cutting or rapid changes in direction.

Symptoms for Osgood-Schlatter disease include:

  • Pain and possible swelling below the knee located near the top of the shinbone.
  • A bump or boney growth on the front of the upper shin at the Tibial tuberosity that is typically painful to touch.
  • Pain with running, jumping, and cutting sports.
  • Decreased pain or no pain at rest.
  • Possible loss of knee range of motion, typically flexion.
  • Possible pain and tightness with quadriceps stretching due to the pull on the patellar tendon.
  • Loss of quadriceps strength which mostly due to pain inhibiting its use.
  • Painful kneeling.

OS typically begins with mild soreness. The condition is typically self-limiting because of pain.  Continuing to push through the pain can cause significant long-lasting pain resulting in limited function.  Early intervention is usually very helpful.

My Top 5 Tips on How to Self-Treat Osgood-Schlatter Disease:

RICE

RICE, which stands for Rest, Ice, Compression, and Elevation.

Rest. In this case, rest would indicate tapering down from your regular exercise activity or any activity that involves running and jumping or that is causing knee pain.

Ice. Apply ice to the painful area–typically the sooner, the better. The rule for icing is to apply ice no more than twenty minutes per hour. Do not place the ice directly against the skin, especially if you are using a gel pack style.  A bag of frozen peas can be ideal.  Individuals with poor circulation or impaired sensation should take particular care when icing.

Compression helps to prevent and decrease swelling. Swelling can cause increased pain and slow the healing response, so limit it as much as possible.  You can utilize a common ACE wrap.  If you have a friend who is medically trained, many different taping techniques can also assist in decreasing swelling.  You may also consider a compression sleeve or garment.

Elevation. If there is swelling, then elevating the leg may be helpful.

If it hurts, don’t do it!

Modify the activity or discontinue it completely. If your knee is hurting when performing your sport or activity whether you are running, jumping or even weight lifting, then discontinue the activity temporarily.  If you are able to modify and perform the exercise or activity pain free, it would be okay to continue in most cases.

Improve your range of motion (ROM).

The primary goal of a rehabilitation program is to regain full pain free ROM for knee flexion (bending) and extension (straightening). This can be accomplished in many ways.  Perform heel slides by lying on your back and sliding your heel toward your buttocks.  Consider using a pole to assist in performing deeps squats.  Another stretch would be to hang onto a pole or a doorframe, and bring your heel toward your buttocks as you perform a quadriceps stretch.

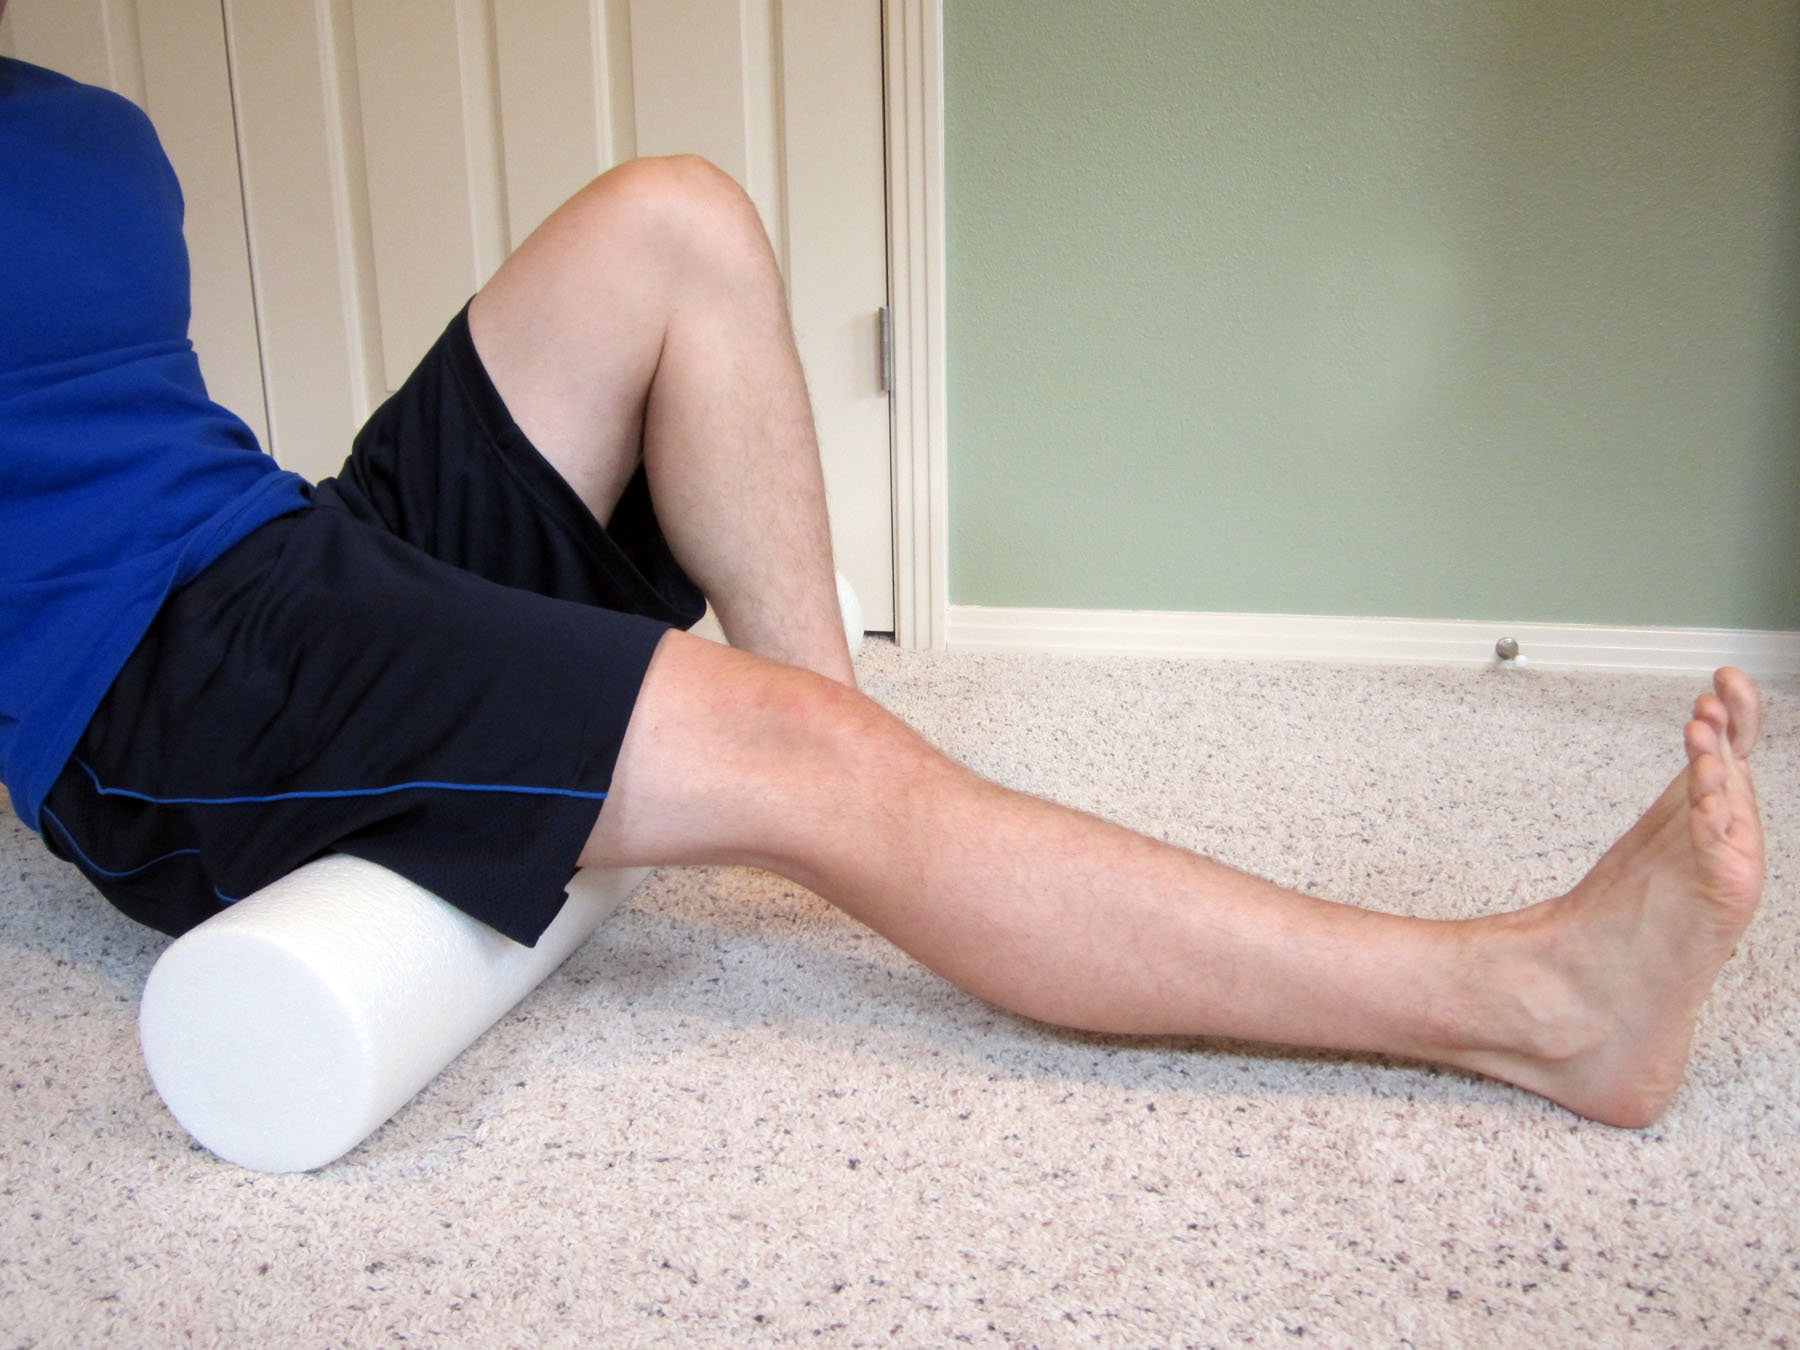
These exercises should only be performed within a mild to moderate amount of discomfort in order to regain full pain free ROM. If you experience muscle tightness and soreness, I recommend using a foam roller to assist with any myofascial symptoms.  To learn how to use a foam roller, please refer to Foam Rolling for Rehabilitation.

Work on strengthening.

The primary goal of a strengthening program is to work on the quadriceps and glutes medius (hip abduction). Weight lifting is an appropriate choice, but you may have to initially limit your range of motion (ROM).  Most of my clients begin on a non-weight bearing program, then progress to partial weight bearing, and eventually, full weight bearing.  The more severe the symptoms, the longer it will take for an individual to progress to more difficult exercises or to increase the resistance (load).

To initiate a physical therapy program, please refer to Osgood-Schlatter Disease Rehabilitation Exercises.  This exercise guide is designed to address the muscles that I find to be the weakest in most individuals.  The exercises are listed from easiest to most challenging and are designed to primarily improve quadriceps and hip strengthening.  Initially, focus on full ROM.

Weight training exercises (with machine weights or free weights) should be geared toward general leg strengthening and may include: squats; leg press; hip abduction machine; step ups; dead lifts; and straight leg dead lifts. If further instruction is needed, search YouTube to watch the proper technique for a specific exercise.  Do not perform any seated knee extension exercises.

Kinesiological taping.

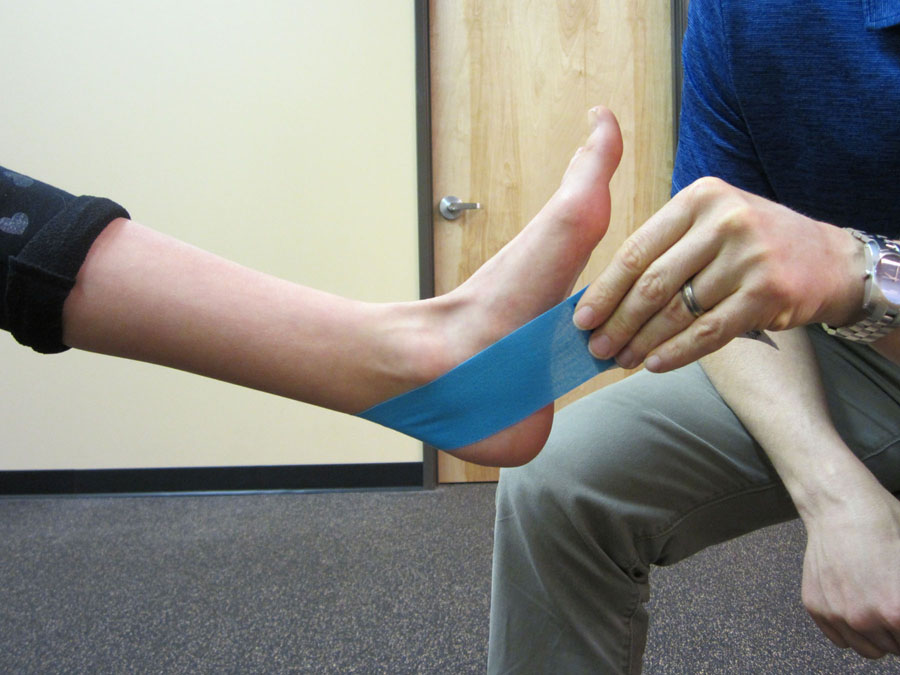
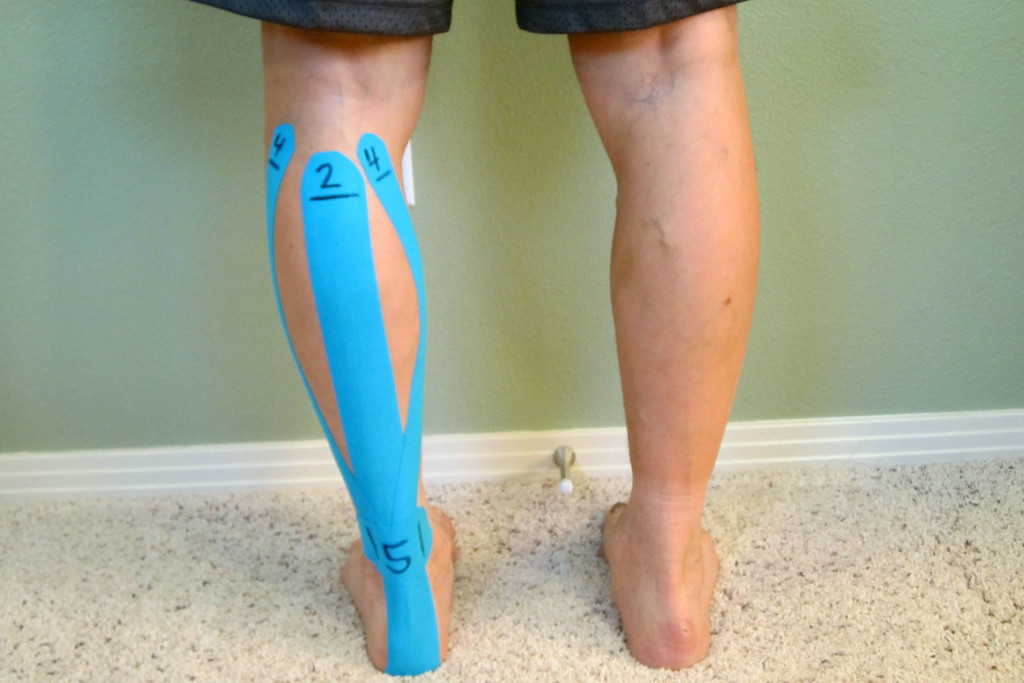
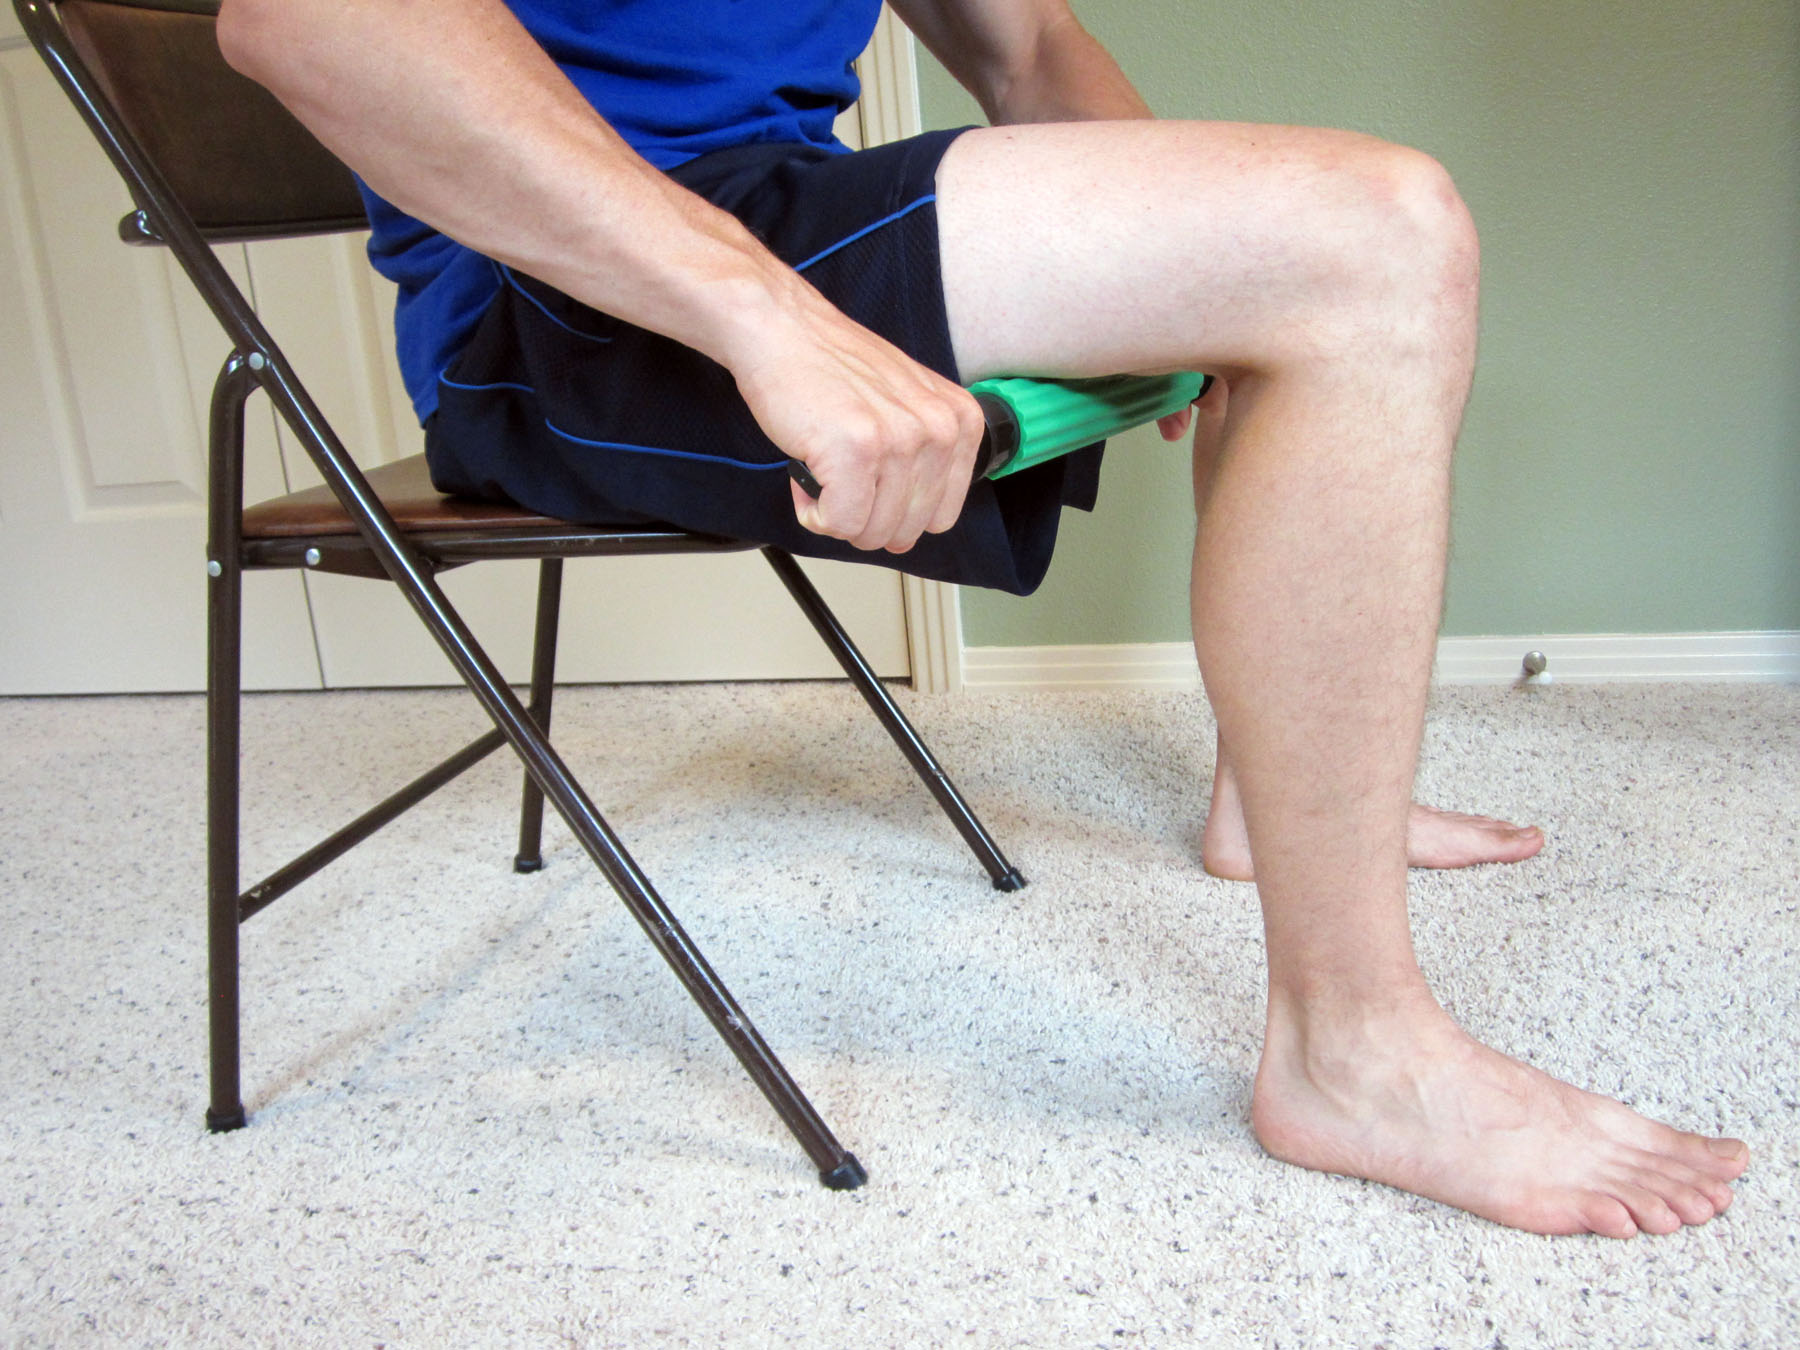
Besides pain relief, the purpose of Kinesiological tape is to provide compression over the Tibial tuberosity and to facilitate additional blood flow to the area. It also provides proprioceptive input which can help the knee during activity.  I have had luck using Kinesio Tape, Rock Tape, and Mummy Tape brands. There are many other useful taping techniques which utilize different forms of tape.  (You could also utilize Spider tape or KT TAPE.) To visually learn how to apply the tape, please refer to Kinesiological Taping for Osgood-Schlatter Disease.  For application and removal tips, please refer to Skin Care with Taping.

How to Prevent Osgood-Schlatter Disease:

Be sure to schedule rest between athletic seasons, athletic events, and higher volume training periods. Rest is a critical factor as an adolescent’s body undergoes physical changes.  OS is typically associated with overtraining/overuse in combination with a rapidly growing skeletal system.  There are times when an adolescent needs to rest.  It’s important not to encourage an adolescent to play sports through the pain without adequate recovery, rest, and if necessary, an evaluation by a qualified physical therapist or physician.

As part of a prevention and cross training strategy, implement the exercises demonstrated in the Osgood-Schlatter Disease Rehabilitation Exercises.  A proper warm up and cool down is critical when performing in an athletic event or a significant training session.

  • Warm up prior to exercise. I recommend that you increase your normal warm up time by at least 10 minutes in order to increase blood flow to the area. This allows better mobility and also promotes healing as movement is necessary to bring in the nutrients. Use a stationary bike or the rower machine initially to get the muscles warm and the knee joint more lubricated. Then work on moving into a deep squat position multiple times as part of the warm up. You may need to hang onto a beam or a pole to take some pressure off of your knee as you move in and out of the squat.
  • Cool down. After performing your exercises, take extra time to cool down and stretch. Use either a stationary bike (at a causal/slower pace) or the rower machine. Both are reduced weight bearing exercises that promote movement and circulation to the knee as well as increasing ROM. This is the perfect time to work through my recommended rehabilitation exercises.

Thank you, Chandra, for your question! I hope these tips will help you assist your son in his recovery and get him back to playing sports as quickly as he is able to without pain!  If the pain continues, please seek additional assistance from a qualified physical therapist or physician.  The American Physical Therapy Association offers a wonderful resource to help find a physical therapist in your area.

Do you know an adolescent who may be suffering from Osgood-Schlatter disease? If so, please share my recommendations on how to address this common and treatable condition.

If you have a question that you would like featured in an upcoming blog post, please comment below or submit your question to contact@thePhysicalTherapyAdvisor.com. Be sure to join our growing community on Facebook by liking The Physical Therapy Advisor!

Disclaimer:  The Physical Therapy Advisor blog is for general informational purposes only and does not constitute the practice of medicine or other professional health care services, including the giving of medical advice. No health care provider/patient relationship is formed.  The use of information on this blog or materials linked from this blog is at your own risk.  The content of this blog is not intended to be a substitute for professional medical advice, diagnosis, or treatment.  Do not disregard, or delay in obtaining, medical advice for any medical condition you may have.  Please seek the assistance of your health care professionals for any such conditions.

How to Apply Kinesiological Tape When Treating Achilles Tendinitis

In this video, I demonstrate one method I use to tape when treating Achilles tendinitis. I recommend following these step by step instructions for Kinesiological Taping for Achilles Tendinitis. For application and removal tips, please refer to Skin Care with Taping.

For specific strategies on how to rehabilitate Achilles tendinitis, please refer to https://www.thephysicaltherapyadvisor.com/MTA. For more tips, check out my guest post, 15 Tips to Self-Treat Achilles Tendinitis, for the Marathon Training Academy.

Have you used Kinesiological tape to treat Achilles tendinitis? If so, how did it work for you? Please leave your comments below.

If you have a question that you would like featured in an upcoming blog post, please comment below or submit your question to contact@thePhysicalTherapyAdvisor.com. Be sure to join our growing community on Facebook by liking The Physical Therapy Advisor!

How to Rehabilitate Achilles Tendinitis

MTA_TheMarathonThatGotAway

http://marathontrainingacademy.com/the-marathon-that-got-away

Marathon Training Academy

September 20, 2015

In this podcast, Trevor discusses the difficult decision to not run a race. He chose to avoid risking further injury as he prepares for a more important race in a couple of months. His particular injury and decision provided an opportunity for us to identify the cause of his Achilles tendinitis pain and the different methods he could utilize during his rehabilitation. Listen to the podcast

KinesiologicalTapingForAchillesTendinitisIn this particular episode, I mention several rehabilitation strategies, including utilizing mobility bands and Kinesiological tape.

For specific strategies on how to rehabilitate Achilles tendinitis, please refer to https://www.thephysicaltherapyadvisor.com/MTA.

How to Prevent and Self-Treat Shin Splints

MTA_ShinSplints

http://marathontrainingacademy.com/self-treat-shin-splints

Marathon Training Academy

September 12, 2015

In this guest post for Marathon Training Academy, you will discover the common causes for shin splints and learn simple prevention strategies and treatment options to quickly help aid in your recovery.

ShinSplints_Arrows_LandscapeThe term shin splints, also known as an anterior compartment syndrome, refers to pain along the shinbone (tibia), the large bone in the front of your lower leg. Shin splints can be excruciatingly painful to the point that you may struggle to walk or run. They are typically caused by inflammation in the anterior muscle of the lower leg known as the anterior tibialis muscle. This is the primary muscle needed to lift your foot. Shin splints are often considered an over use injury and unfortunately, are relatively common in runners. Discover the common causes for shin splints and implement these strategies to prevent and self-treat shin splints. Continue Reading

How to Self-Treat Runner’s Knee

MTA_RunnersKnee

http://marathontrainingacademy.com/how-to-self-treat-runners-knee

Marathon Training Academy

August 16, 2015

In this guest post for Marathon Training Academy, you will discover the common symptoms and causes for Patellar Femoral Pain Syndrome (PFPS), also known as runner’s knee, and learn how to effectively self-treat and manage this condition.

LacrosseBallForQuadPatellar Femoral Pain Syndrome (PFPS), also known as runner’s knee, is a common running related issue. The sooner you can manage this condition, the easier it will be to recover and eliminate future problems. As part of a quick and thorough method of treatment, first address the biomechanical causes for the pain. Then utilize the following strategies to quickly recover from the pain in order to keep training and running at a high level.  Continue Reading

How to Recover Quickly from a Hamstring Strain/Pull

A hamstring strain, also known as a hamstring pull, is a relatively common injury that can occur in almost any sport: running, CrossFit, ice skating, and weightlifting. The injury typically happens when one of the hamstring muscles (which are located in the posterior or back of the thigh) become overloaded. This causes a strain or small tear of the muscle and a complete tear in severe cases. The pain is typically located in the back of the thigh near the site of injury. This area can range from the back of the knee to the buttock area (specifically near the bones of the pelvis you sit on called the ischium). Discover the factors that increase your risk of straining your hamstring and learn how to self-treat this condition.

HamstringSelfMobilizationUsingaMassageTool

The strain most commonly occurs during running or jumping (in particular during sudden movements or when quickly starting and stopping). However, you could just as easily pull your hamstring while weightlifting or working in the yard. The following factors increase your risk of straining your hamstring:

  • Not warming up prior to exercise
  • Tightness in the hip flexors or quadriceps muscles
  • Weakness in the glutes/buttock muscles

Although hamstring strains are relatively common, they can be very debilitating. Depending on the severity of the sprain, you may have to discontinue your sport. A minor strain is classified as Grade I. Grade I injuries tend to be mild. With proper care and rehabilitation, the healing time can be shortened.

Grade II tears are partial ruptures. Grade II tears can often be rehabilitated, but the time frame for healing is longer.

A complete rupture is classified as a Grade III tear. Grade III tears may require surgical intervention. Severe Grade II and Grade III tears cause impaired muscle function and usually have associated bruising that occurs near the site of injury.

The course of treatment is dependent on the severity of the pain and the location of the injury. I recommend that you seek competent advice from a medical doctor, physical therapist or athletic trainer if you’re experiencing severe pain. A professional can assess the severity of the strain and address how to handle the injury.

Initial Treatment

For the purpose of this discussion, I will address a Grade I or minor Grade II injury. The initial course of treatment following the sprain includes RICE, which stands for Rest, Ice, Compression, and Elevation.

  • Rest. In this case, rest would indicate tapering down from your regular exercise activity or any activity that involves using your hamstrings (bending over, walking uphill, squatting or activities involving hip extension or bending your knee).
  • Ice. Apply ice to the painful area–typically the sooner, the better. The rule for icing is to apply ice no more than twenty minutes per hour. Do not place the ice directly against the skin, especially if you are using a gel pack style. A bag of frozen peas can be ideal. Individuals with poor circulation or impaired sensation should take particular care when icing.
  • Compression helps to prevent and decrease swelling. Swelling can cause increased pain and slow the healing response, so limit it as much as possible. You can utilize a common ACE wrap. If you have a friend who is medically trained, many different taping techniques can also assist in decreasing swelling. Many physical therapists or athletic trainers can apply KT Tape, Rock Tape or Mummy Tape for you or you can find application techniques online.
  • Elevation. Compression and elevation may not be fully possible if the injury is located higher into the buttock region. If there is swelling in the lower leg, then elevating the leg may be helpful.

Gentle Movement

During the acute phase, gently move the leg as you can tolerate. Don’t be aggressive with the movement. Walking is usually the best way to keep the area moving. Be sure to keep your steps shorter if you are experiencing pain. You may also try gently floating or walking in a pool as long as the pain does not worsen.

HamstringMobilizationUsingtheFoamRoller

How to Self-Treat a Hamstring Strain/Pull:

  • Mobilize the fascia and muscle tissue. As you progress through the initial acute phase (typically 10 to 14 days), work on restoring normal pain free movement of the leg. Mobility issues and myofascial restrictions are very likely to occur following a hamstring injury. Along with tightness in the hamstring, you are likely to have tightness throughout the lower leg including the buttocks, quadriceps, IT Band or in the deep hip internal or external rotators. You may also have more spine tightness or pain due to altered movement patterns in the lower extremity. I recommend using a foam roller to address tightness in the lower leg. Care should be taken, and don’t roll too aggressively on the site of the injury. To learn how to use a foam roller, please refer to Foam Rolling for Rehabilitation. I also recommend using a Thera-Band Standard Roller Massager, which is very firm and allows for a deep amount of pressure. You may also utilize a tennis or lacrosse ball to mobilize the deeper hip and buttock muscles or to more deeply and aggressively mobilize the restricted areas appropriately. 
  • Stretch. As you progress through your rehabilitation, care should be taken when stretching the hamstring. I tend to utilize both mobilization and gentle stretching to help maintain hamstring and lower leg motion. Don’t let the hamstring become tight and restricted. Hamstring Rehabilitation Exercises demonstrate my recommended stretches, foam rolling, and self-mobilization techniques.
  • Strengthen your glutes, hamstrings, and hip muscles. Weakness in the glutes, hamstrings, and hip muscles is common after injury and was likely a contributing factor to the injury itself. Strengthening of these muscle groups can help avoid future hamstring and even low back pain issues as well as reduce your risk of re-injury. Please refer to Hamstring Rehabilitation Exercises for additional exercises.
  • Hydrate. The human body is primarily made of water, which is critical for all body functions. I highly encourage you to hydrate more frequently during recovery. Adequate water intake is critical as your body attempts to heal and flush out metabolic wastes. Dehydrated tissues are prone to injury as they struggle to gain needed nutrients to heal and repair. Dehydrated tissues are less flexible and tend to accumulate waste products. Keep steady supplies of nutrients going to/from the site of the injury. Try to avoid beverages that contain artificial sweeteners or chemicals with names you can’t spell or pronounce. Water is best.
  • Start a supplement. A hamstring strain is typically associated with a specific event and an active inflammatory process typically occurs. I am a supporter of natural supplements and remedies. Many supplements include herbs which are designed to help reduce inflammation and support the healing response. My most recommended supplement to help recover from injury is CapraFlex by Mt. Capra. Essentially, it combines an organic glucosamine and chondroitin supplement with other natural herbs which are designed to reduce inflammation and support healing. CapraFlex can be taken long term or intermittently. Phenocane Natural Pain Management combines the following: Curcumin, an herb that reduces pain and inflammation; boswellia, a natural COX2 inhibitor that also reduces pain and inflammation; DLPA, an amino acid that helps to increase and uphold serotonin levels in the brain; and nattokinase, an enzyme that assists with blood clotting and reduces pain and inflammation. If you are taking blood thinner medication, please consult with your physician prior to taking these supplements.

Return to Activity

As your pain decreases and after your hip and hamstring range of motion has returned to normal, slowly start tapering back into your training routine. During this time, you remain at a higher risk of injury. As you continue working through your rehabilitation and your return to activity, implement the following strategies:

  • Warm up prior to exercise. I recommend that you increase your normal warm up time. You should warm up at least 10 minutes in order to increase blood flow to the area. This allows for better mobility and also prepares the tissues for exercise. You can use a self-massage tool or a foam roller to roll up and down the hamstring as part of your warm up. If you perform hamstring stretches, be mindful that prolonged static stretching before exercise may worsen performance. Warm up exercises may include light jogging, bicycling, rowing or any activity to get the heart rate up and the blood flowing in the lower legs. Be careful when performing any movement that puts the hamstring in a stretched positon with speed or force.
  • Cool down. After performing your exercise or activity, take the extra time to cool down and stretch. Focus on hamstring stretching as well as general lower extremity mobility stretches. Use the same self-massage tools as you did during your warm up.
  • Initially avoid potential high risk activities. As your recovery progresses and you return to activity, initially avoid high risk activities that put the hamstring muscle under heavy load or a very quick load. Progress slowly. If an activity begins to cause pain in the hamstring, don’t push through it. Instead, stop and give your hamstring more time to heal prior to trying it again. You should be pain free before you progress the intensity of the activity or sport. Hamstring pulls have a high likelihood of re-injury if you rush the process.
  • Regain full strength and motion before returning to sport. Before a full return to sport or activity is initiated, you should have full lower leg and hamstring mobility and strength without pain. If you continue to experience soreness or restriction, continue to work on your rehabilitation until the leg and hamstring have returned to normal. Then initiate a full return to activity.

If you’re not experiencing relief after two to three weeks of aggressively managing the symptoms, contact your medical doctor, physical therapist or athletic trainer for an assessment and help in managing the injury. The American Physical Therapy Association offers a wonderful resource to help find a physical therapist in your area.

Has a hamstring strain/pull ever sidelined you? Which treatment was the most effective for you? Additional discussion can help others to manage this condition more effectively. Please leave your comments below.

Looking for that exercise or book I mentioned in a post? Forgot the name of a product or supplement that you’re interested in? It’s all listed in the Resource Guide. Check it out today!

If you have a question that you would like featured in an upcoming blog post, please comment below or submit your question to contact@thePhysicalTherapyAdvisor.com. Be sure to join our growing community on Facebook by liking The Physical Therapy Advisor!

Disclaimer:  The Physical Therapy Advisor Blog and its information is for general informational purposes only and does not constitute the practice of medicine or other professional health care services, including the giving of medical advice. No health care provider/patient relationship is formed. The use of information on this blog or materials linked from this blog is at your own risk. The content of this blog is not intended to be a substitute for professional medical advice, diagnosis, or treatment. Do not disregard, or delay in obtaining, medical advice for any medical condition you may have. Please seek the assistance of your health care professionals for any such conditions.