3 Easy Exercises to eliminate Wrist and Elbow Pain

Hand, wrist, and elbow pain is all too common (particularly, with computer, tablet, and phone use). Pain in any one of these locations affects all of us from time to time. The two most likely reasons for developing hand, wrist, and elbow pain are from overuse and poor posture.

Poor wrist, shoulder or thoracic mobility is also commonly related to hand, wrist and/or elbow pain. If the wrist cannot flex or extend properly, it not only causes wrist pain, but excessive stretching of the forearm muscles and strain on the elbow (possibly leading to pain). Poor shoulder or thoracic spine mobility can also cause excessive strain on the elbow, wrist and/or hand.

In this video post, I describe three easy exercises to help you quickly eliminate pain in your hand, wrist, and elbow. I demonstrate two simple stretches with an easy variation to improve their efficacy and teach you how to easily improve your hand and wrist strength using a simple rubber band.

CLICK HERE TO WATCH NOW

Posture plays a critical role in the positioning of your extremities with movement and even when sitting (including office and/or computer work). Improper posture combined with poor ergonomics is a top reason to develop not only elbow pain, but also neck, upper back, shoulder, and wrist pain. Regardless if the activity is weightlifting or typing, your posture matters!

For additional ways to easily improve your posture and reduce pain in the arm/hand as well as the neck and shoulder, be sure to subscribe to my e-mail list to gain immediate access to My Top 8 Stretches to Eliminate Neck, Upper Back, and Shoulder Pain for step-by-step exercise instructions and photos.

Hand, wrist, and/or elbow pain can be debilitating and limit your ability to exercise, work on the computer or even use your phone. Be proactive in your care and management. If the pain persists, seek additional help. Don’t let the pain linger. The longer it’s left untreated, the more potential for harm and damage which potentially could lead to a longer recovery. The American Physical Therapy Association (APTA) is an excellent resource for learning more about physical therapy as well as locating a physical therapist in your area.

Do you have any other favorite exercises or stretches to reduce hand, wrist or elbow pain? Please leave your comments below.

If you have a question that you would like featured in an upcoming blog post, please comment below or submit your question to contact@thePhysicalTherapyAdvisor.com. In case you haven’t already, be sure to subscribe to my e-mail list and YouTube channel as well as join our community on Facebook by liking The Physical Therapy Advisor!

How to Self-Treat Tarsal Tunnel Syndrome

Tarsal tunnel syndrome (TTS), sometimes called jogger’s foot, is a relatively common cause of pain along the inside (medial) portion of your ankle.  TTS can be a repetitive strain injury or an entrapment (compression) type injury.

The tarsal tunnel is a fibrous tunnel that is not structurally flexible.  There is limited room for swelling inside the tunnel.  This can cause nerves and blood vessels to be “entrapped” and lead to pain and other symptoms.

TTS is often caused by repeated pressure that results in damage on the posterior tibial nerve.  Similar to carpel tunnel in the hand, the tarsal tunnel is located just below the medial malleolus (the large bump to the inside of the ankle).  Basically, the tibial nerve branches off of the sciatic nerve and travels down the inside of the leg.  It eventually runs through the tarsal tunnel, which is a narrow passageway inside your ankle that is bound by bone and soft tissue called a retinaculum.  Continue Reading

5 Tips on How to Self-Treat Tennis Elbow

Elbow pain is a common issue that can affect a wide range of people including CrossFitters, weightlifters, weekend warriors, and office workers.  One common type of elbow pain is tennis elbow (lateral epicondylitis) which affects the extensor muscles and tendons of the wrist.

There are many possible reasons for developing elbow pain.  Typically the cause of pain is either from an acute onset or due to repetitive motion and/or muscle imbalance issues.  Examples of an acute onset include over doing yard work or a specific injury such as a trauma.  A repetitive motion and/or muscle imbalance issue can arise from chronic poor posture while sitting at work or from performing a job that requires repeating a task to the point that the tendons are overloaded.

5 Tips on How to Self-Treat Tennis Elbow:

1. RICE

As with many injuries, the initial treatment is RICE (Rest, Ice, Compression, and Elevation).

  • Rest.  Limit any activities that cause pain.
  • Ice.  Use ice as needed for pain and edema control.  The rule for icing is to apply ice no more than twenty minutes per hour.  Do not place the ice directly against the skin, especially if you are using a gel pack style.  A bag of frozen peas can be ideal.  Individuals with poor circulation or impaired sensation should take particular care when icing.
  • Compression.  Consider wearing an elbow compression sleeve.
  • Elevation.  Although it’s not too useful for this specific condition, it would be an excellent time to apply ice.

2. Identify the Offending Movement

If you’re experiencing elbow pain, try to identify which specific movement aggravates the elbow.  Once you have identified the movement, initially avoid it until the pain subsides.  Consider any issues with your technique that may have led to the pain, and address any long term muscle imbalances that may have developed.

3. Work on your Elbow Mobility

Addressing any tissue mobility issues and promoting increased blood flow can help to improve the healing response and reduce the pain.  In this video, I demonstrate how to utilize a mobility/compression band as a self-treatment method for tennis elbow.

Mobility/compression bands, such as the Rogue Fitness VooDoo X Bands or EDGE Mobility Bands, are a novel way to self-mobilize tissue.  The use of a mobility band not only helps to mobilize the tissue, but it affects blood flow to the area and speeds up healing.  A mobility band also helps to reset some of the receptor cells in the muscle tissue which cause excessive muscle tightness as a means to work on tissue mobility.  This will work to directly affect the painful tissues.  (If you suffer from any form of blood clotting disorder or are on blood thinning medications, I would advise against utilizing mobility bands for any type of aggressive, deep compression.)

4. Work on your Upper Thoracic and Shoulder Mobility

Posture plays a critical role in the positioning of your extremities with movement and activity.  Improper posture combined with poor ergonomics is a top reason to develop not only elbow pain, but also neck, upper back, shoulder, and wrist pain.  Regardless if the activity is weightlifting or typing, your posture matters!  Please refer to How to Improve Posture and Eliminate Pain.

If your elbow pain has developed from poor sitting postures or chronic repetitive stresses, then I highly encourage you to also work on upper body mobility by focusing on shoulder and thoracic mobility as well as lower body and spinal mobility.  Subscribe to my e-mail list to gain immediate access to My Top 8 Stretches to Eliminate Neck, Upper Back, and Shoulder Pain for step-by-step exercise instructions and photos.

5. Trial other Methods of Self-Mobilization

Once you start to experience pain, be aggressive with your management and self-treatment.  I like to use either a tennis ball or roll PVC pipe over the forearm area which can be an effective self-mobilization for tennis elbow.  For more ideas on how to self-mobilize, please refer to My Top 3 Household Items for Self-Mobilization.

Cupping is another form of muscle tissue and fascia self-mobilization.  There are many different methods and techniques you can use.  In this video, I demonstrate how to use cupping to treat elbow pain affecting the wrist extensor muscles and tendons.

Elbow pain can be debilitating by limiting your ability to exercise and perform daily tasks.  Be proactive in your care and management.  If the pain persists, seek additional help.  Don’t let the pain linger.  The longer it’s left untreated, the more potential for harm and damage which potentially could lead to a longer recovery.  The American Physical Therapy Association (APTA) is an excellent resource for learning more about physical therapy as well as locating a physical therapist in your area.

Have you tried using a mobility/compression band as a self-treatment method for tennis elbow?  What was your experience like?  Please leave your comments below.

If you have a question that you would like featured in an upcoming blog post, please comment below or submit your question to contact@thePhysicalTherapyAdvisor.com.  Be sure to join our growing community on Facebook by liking The Physical Therapy Advisor!

How to alleviate Elbow Pain

Elbow pain is a common issue that can affect a wide range of people.  Two of the most common types of elbow pain include:  tennis elbow (lateral epicondylitis) which affects the extensor muscles and tendons of the wrist and golfer’s elbow (medial epicondylitis) which affects the flexor muscles and tendons of the wrist.

Possible reasons for developing elbow pain include:

  • Poor grip strength.
  • Muscle imbalances between wrist flexion and extension strength.
  • Improper weight lifting technique.
  • Overuse/overload/overtraining.
  • Mobility related issues in the wrist, shoulder or thoracic spine.
  • Excessive mobility or hypermobility may also be an issue.  It tends to be more common in females than in males, and it’s usually associated with the shoulders or elbows.
  • Repetitive motion injury.
  • Poor posture.
  • Tackling an activity you don’t often do (such as digging holes for a new fence or trimming hedges).

Poor wrist, shoulder or thoracic mobility is also commonly related to elbow pain associated with exercise.  If the wrist cannot flex or extend properly, it not only causes wrist pain, but excessive stretching of the forearm muscles and strain on the elbow (possibly leading to pain).  Elbow pain can be very debilitating.  It can limit your ability to exercise as well as limit your ability to perform daily tasks.

Poor shoulder or thoracic spine mobility can also cause excessive strain on the elbow.  Consider exercises like the overhead lift or pull ups or even the squat.  If the shoulder cannot fully flex or the thoracic cannot fully extend (allowing proper shoulder flexion), then the elbows will absorb more of the load.  The lack of shoulder or thoracic mobility also affects proper alignment of the upper extremity during the movement.  Over time and with multiple repetitions, this overloading can cause pain and injury to the elbow.

Whenever one part of the body doesn’t have adequate mobility, another part will do more to allow for the movement to take place.  When an exercise is performed at a high speed, high relative weight or high repetitions, a lack of mobility can make you more susceptible to pain and injury.

Posture plays a critical role in the positioning of your extremities with movement and even when sitting (including office and/or computer work).  Improper posture combined with poor ergonomics is a top reason to develop not only elbow pain, but also neck, upper back, shoulder, and wrist pain.  Regardless if the activity is weightlifting or typing, your posture matters!  Please refer to How to Improve Posture and Eliminate Pain.

Excessive mobility can have a similar effect.  For example, if you’re performing an overhead lift, but your shoulders flex past 180 degrees, then the bar is too far behind your head.  This causes excessive force to be placed on the shoulders and elbows.  Again, this can lead to injury and pain particularly when performed at a high speed, high relative weight or high repetitions.

How to alleviate Elbow Pain:

RICE

As with many injuries, the initial treatment is RICE (Rest, Ice, Compression, and Elevation).

  • Rest.  Limit any activities that cause pain.
  • Ice.  Use ice as needed for pain and edema control.  The rule for icing is to apply ice no more than twenty minutes per hour.  Do not place the ice directly against the skin, especially if you are using a gel pack style.  A bag of frozen peas can be ideal.  Individuals with poor circulation or impaired sensation should take particular care when icing.
  • Compression.  Consider wearing an elbow compression sleeve.
  • Elevation.  Although it’s not too useful for this specific condition, it would be an excellent time to apply ice.

Self-Mobilization

Cupping is a form of muscle tissue and fascia self-mobilization.  There are many different methods and techniques you can use.  In this video, I demonstrate how to use cupping to treat elbow pain affecting the wrist extensor muscles and tendons.

Cupping can be used to treat elbow pain, elbow tendinitis, and tennis elbow.  These CupEDGE Massage Tools are easy to use and helpful for self-treating tight and restricted areas (on other parts of the body, too).  Another option would be to use a Mini Plunger.  This technique should not cause bruising or discoloration.

Work on your Grip Strength

Developing proper grip strength is important in order to avoid elbow pain.  Easy exercises to train grip strength include:  dead lift; pull ups, and farmers carries.  You can even work on hanging from a pull up bar for time as a way to judge your fitness while gaining strength and endurance in your grip.

A common mistake when training grip strength is to under estimate the importance of improving finger and wrist extensor strength.  It’s critical to keep the appropriate balance between wrist flexors and wrist and finger extensors strength to lessen the risk of wrist and elbow overuse injuries such as tennis elbow or golfer’s elbow.

Your grip strength will improve more rapidly as your wrist and hand muscles find their optimal length tension relationship (which allows for maximum strength production).  I often recommend using a thick rubber band as a way to improve finger extension strength (as demonstrated below).  Work on extending each finger equally when performing two sets of 10-15 repetitions multiple times per week.

Elbow pain can be debilitating by limiting your ability to exercise and perform daily tasks.  Be proactive in your care and management.  If the pain persists, seek additional help.  Don’t let the pain linger.  The longer it’s left untreated, the more potential for harm and damage which potentially could lead to a longer recovery.  The American Physical Therapy Association (APTA) is an excellent resource for learning more about physical therapy as well as locating a physical therapist in your area.

Have you tried cupping as a form of self-mobilization in order to alleviate elbow pain?  What was your experience like?  Please leave your comments below.

If you have a question that you would like featured in an upcoming blog post, please comment below or submit your question to contact@thePhysicalTherapyAdvisor.com.  Be sure to join our growing community on Facebook by liking The Physical Therapy Advisor!

Q & A: Do I have Carpal Tunnel Syndrome?

Q.  My hand grip has been feeling weak, and I have noticed some tingling in my first two fingers.  Do I have Carpal Tunnel Syndrome?  I use my hands all day long, and I can’t miss work for surgery.  Is there anything I can do?  -Jared

A.  Thanks, Jared, for the great question!  Carpal Tunnel Syndrome (CTS) is a very common cause of hand pain and weakness.  It’s also often associated with numbness and tingling particularly in the thumb and first (index) and second (middle) finger.  It’s often accompanied with associated motor control issues within these fingers.  The symptoms tend to start gradually and typically worsen over time.  The pain can get to a point that is unbearable.  One can lose functional use of their hands because of the pain, numbness, and associated lack of motor control.

Symptoms of Carpal Tunnel Syndrome:

  • Pain in the wrist, palm of your hand, and/or fingers.
  • Numbness and tingling in the thumb and first (index) and second (middle) finger.  The median nerve is affected.  The fourth (ring) finger and pinky finger are not directly affected because it’s a different nerve (ulnar).  Along with numbness and tingling, many people will describe an electric shock type feeling in these same fingers.  Initially, the numbness and tingling is intermittent, but it can progress into a constant sensation.
  • People describe the lack of hand control and the tendency to drop objects.

Symptoms tend to worsen when gripping or performing hard manual labor, including repetitive motions with the hands that involve flexion (closing) of the hand.  Symptoms are often worse at night and may even wake you up.

Causes and Risk Factors for Carpal Tunnel Syndrome:

  • Pressure over the median nerve near the palm of the hand in the “Carpal Tunnel” which is a type of passageway from your forearm to your wrist.
  • Repetitive motion.  CTS is typically viewed as a repetitive motion or overuse injury.  Repetitive gripping and heavy use of the hands can lead to irritation of the median nerve.  This means that professions involving heavy use or repetitive use of hands (particularly, if there is vibration) are at higher risk of developing CTS.  This can range from manual laborers to pianists or typists.
  • Scar tissue build up and/or fascial restrictions in or around the carpal tunnel from repetitive use or trauma such as repeated compression.  Chronic vibration of the hands and arms is a risk factor.  Examples include heavy use of power tools (such as a jack hammer) or motocross racing.
  • A wrist fracture can narrow the tunnel space from swelling and inflammation or cause deformation of the bones in the wrist.
  • Swelling and inflammation from other pathologies such as Rheumatoid arthritis or cysts.
  • Any injury or pathology that causes deformation of the bones in the wrist that places additional pressure on the median nerve.  This would include obesity as fat deposits can reduce the space within the carpal tunnel.
  • Females are more likely than men to develop CTS.  This is likely due to anatomical variations where the carpal tunnel is typically smaller in women versus men.  This allows the area to be more easily compromised or affected from other causes.
  • Fluid retention may increase the pressure within your carpal tunnel and be irritating the median nerve.  This is common during pregnancy and menopause.  CTS associated with pregnancy will typically resolve on its own after pregnancy.
  • Muscle imbalances between wrist flexion and extension strength.
  • Mobility related issues in the wrist, shoulder, thoracic, and cervical spine.

CTS can be straightforward with a very typical mechanism of injury or can be very difficult to treat because of multiple factors leading to the syndrome.  Often it’s a multitude of risk factors that cause the symptoms in addition to anatomical variations from person to person.  Other compounding factors include:  diabetes; thyroid disease; kidney failure; other forms of inflammatory arthritis; poor posture; and cervical and thoracic derangements.

Poor wrist, shoulder, cervical, and/or thoracic mobility is often associated with CTS and other spine and/or upper extremity pain syndromes.  I find that even in the clearest cut of cases it’s always best to screen for other potential causative factors by starting with the cervical spine and working down the chain into the hand.  Whenever one part of the body doesn’t have adequate mobility, another part will do more to allow for the movement to take place.

My Top Recommendations to Alleviate Pain associated with Carpal Tunnel Syndrome:

Identify the offending movement.

If you’re experiencing CTS pain, try to identify which specific movement aggravates the symptoms.  Once you identify the movement, find ways to either avoid the motion or to change how you perform the activity as to not cause the symptoms.  This may mean adjusting your posture or body position or using an adaptive device to help your body compensate for the activity.  Eliminate as many of the noted risk factors from your daily activities as you can.

Work on your grip strength through extension movements.

Don’t just work on wrist flexion or gripping exercises.  Also work on finger and wrist extension in order to improve your grip strength.  Often in the case of CTS, there is a muscle imbalance between your ability to flex your fingers and wrist versus extending your fingers or wrist.  Work on extension biased exercises.  Your grip strength will improve more rapidly as your wrist and hand muscles find their optimal length tension relationship (which allows for maximum strength production).

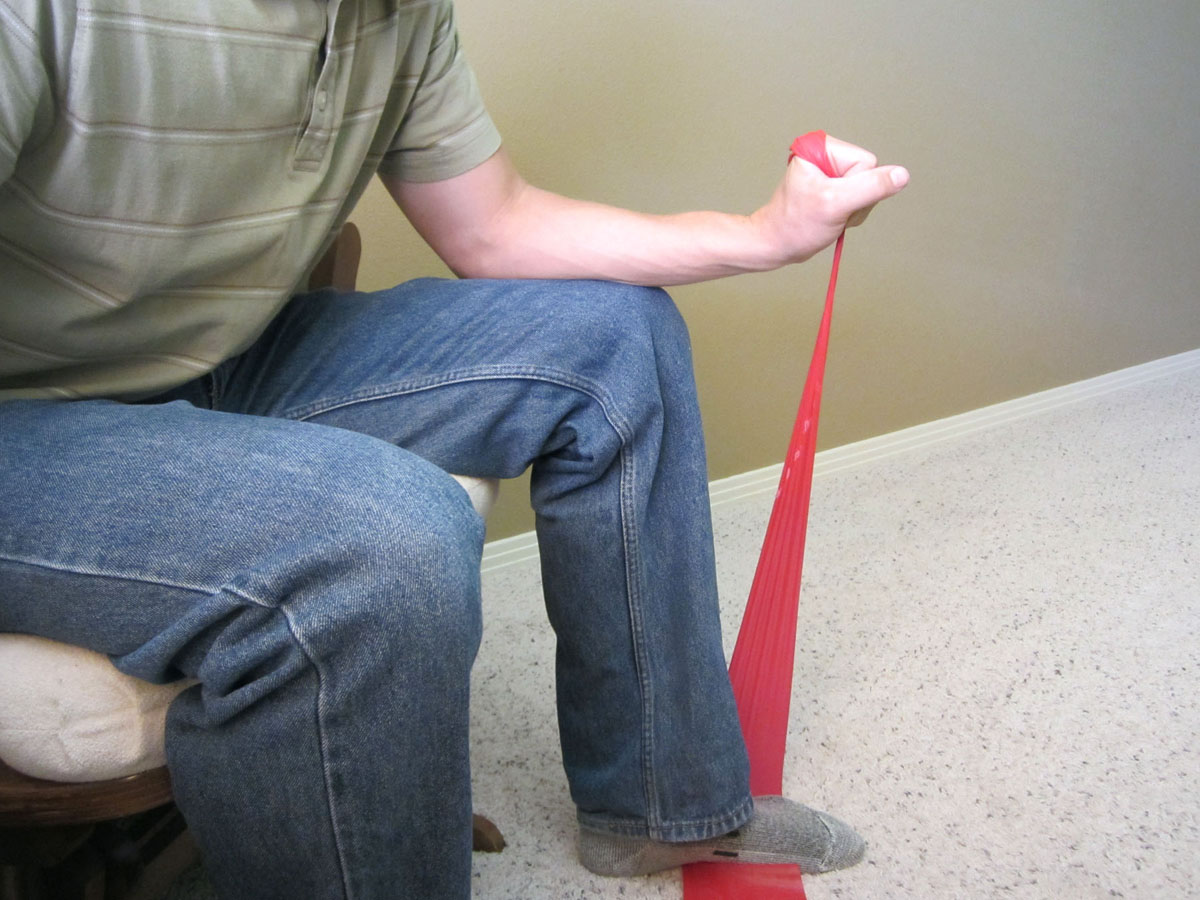
For wrist extension, use an exercise band (as demonstrated below) to perform two to three sets of 20 repetitions.  Extend the wrist up, and then slowly back down toward the floor.  Be sure to move very slowly during the eccentric/muscle lengthening position (when your hand returns to the floor).

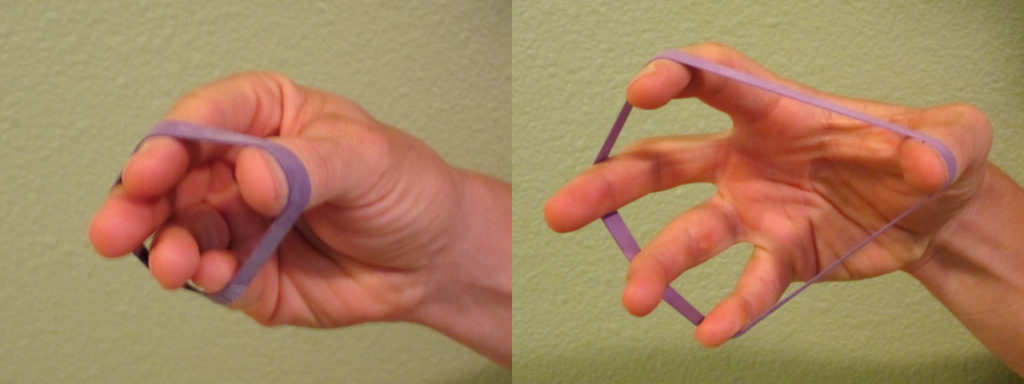
To improve finger extension strength, I often recommend using a thick rubber band as a way to improve finger extension strength (as demonstrated below).  Work on extending each finger equally when performing two sets of 10-15 repetitions multiple times per week.

If you want to be more precise and have the ability to exercise one finger at a time, try a device such as the CanDo® Digi-Extend® Hand Exerciser.  This is an excellent tool to improve finger extension strength.  It allows you to work the fingers in multiple ways including individually for rehabilitation purposes and as an important hack to improve overall grip strength (as described above).  It also allows for customization of resistance so you can track progress.
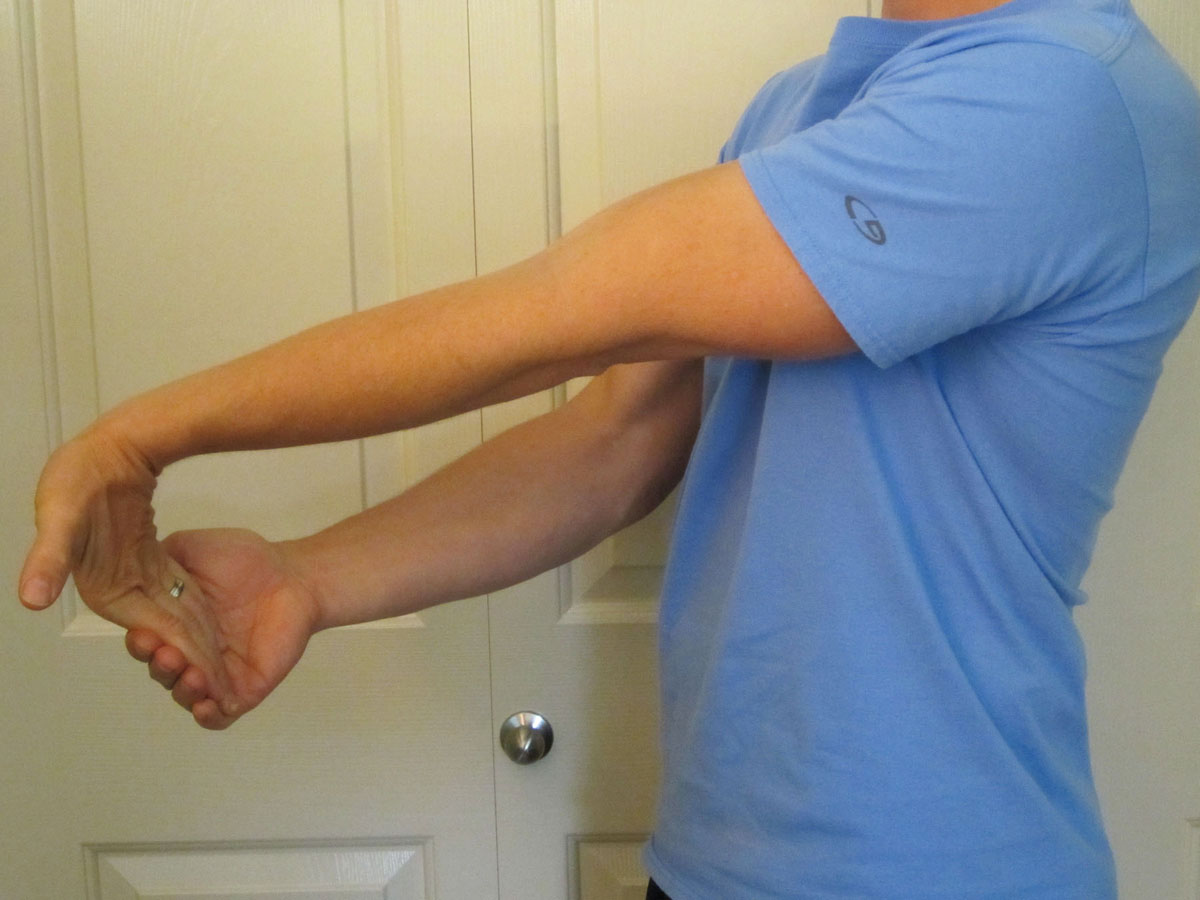
Stretch.

I suggest stretching the fingers and wrist multiple times a day.  Your fingers and wrist should have mobility in all directions.  Particularly focus on wrist extension (as demonstrated below).  Perform two to three sets of a 30 second stretch three to five times per day as long as you do not reproduce your CTS symptoms.

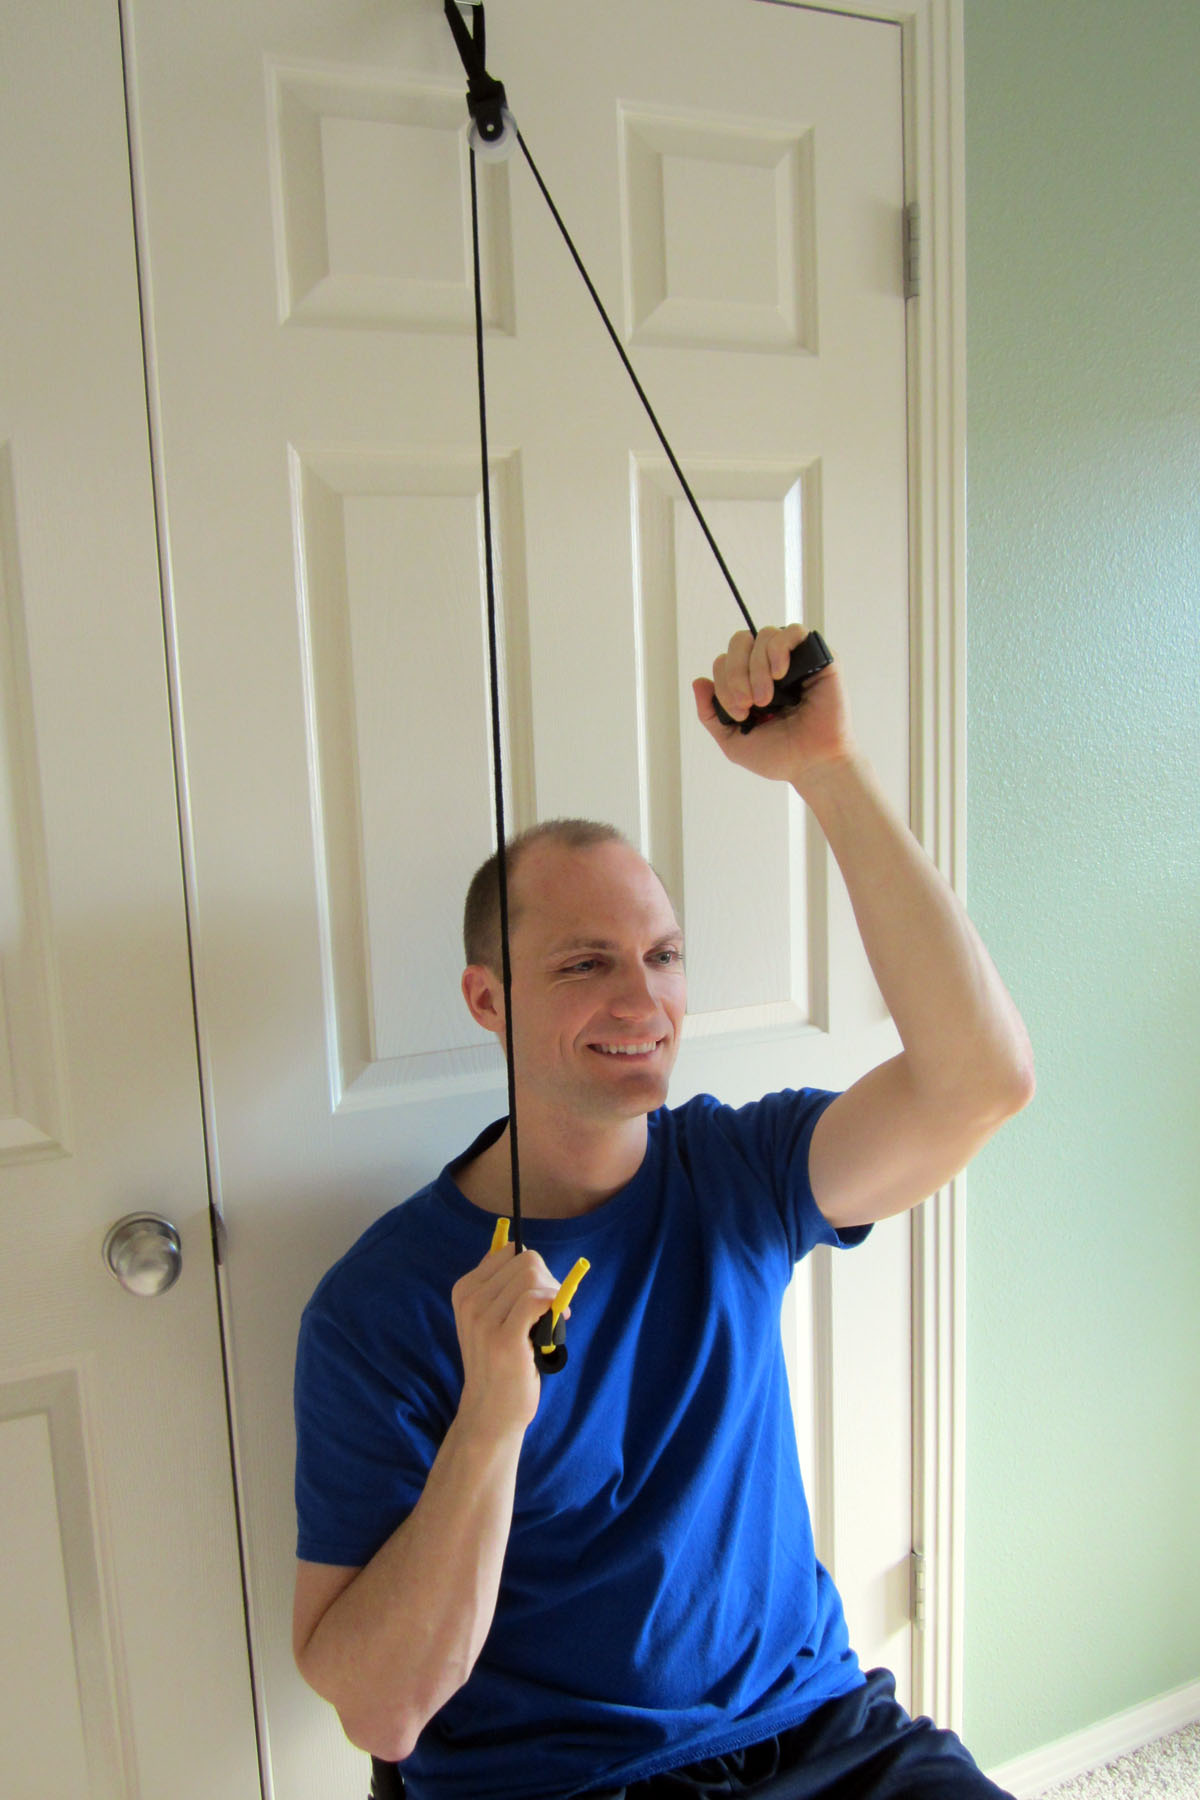
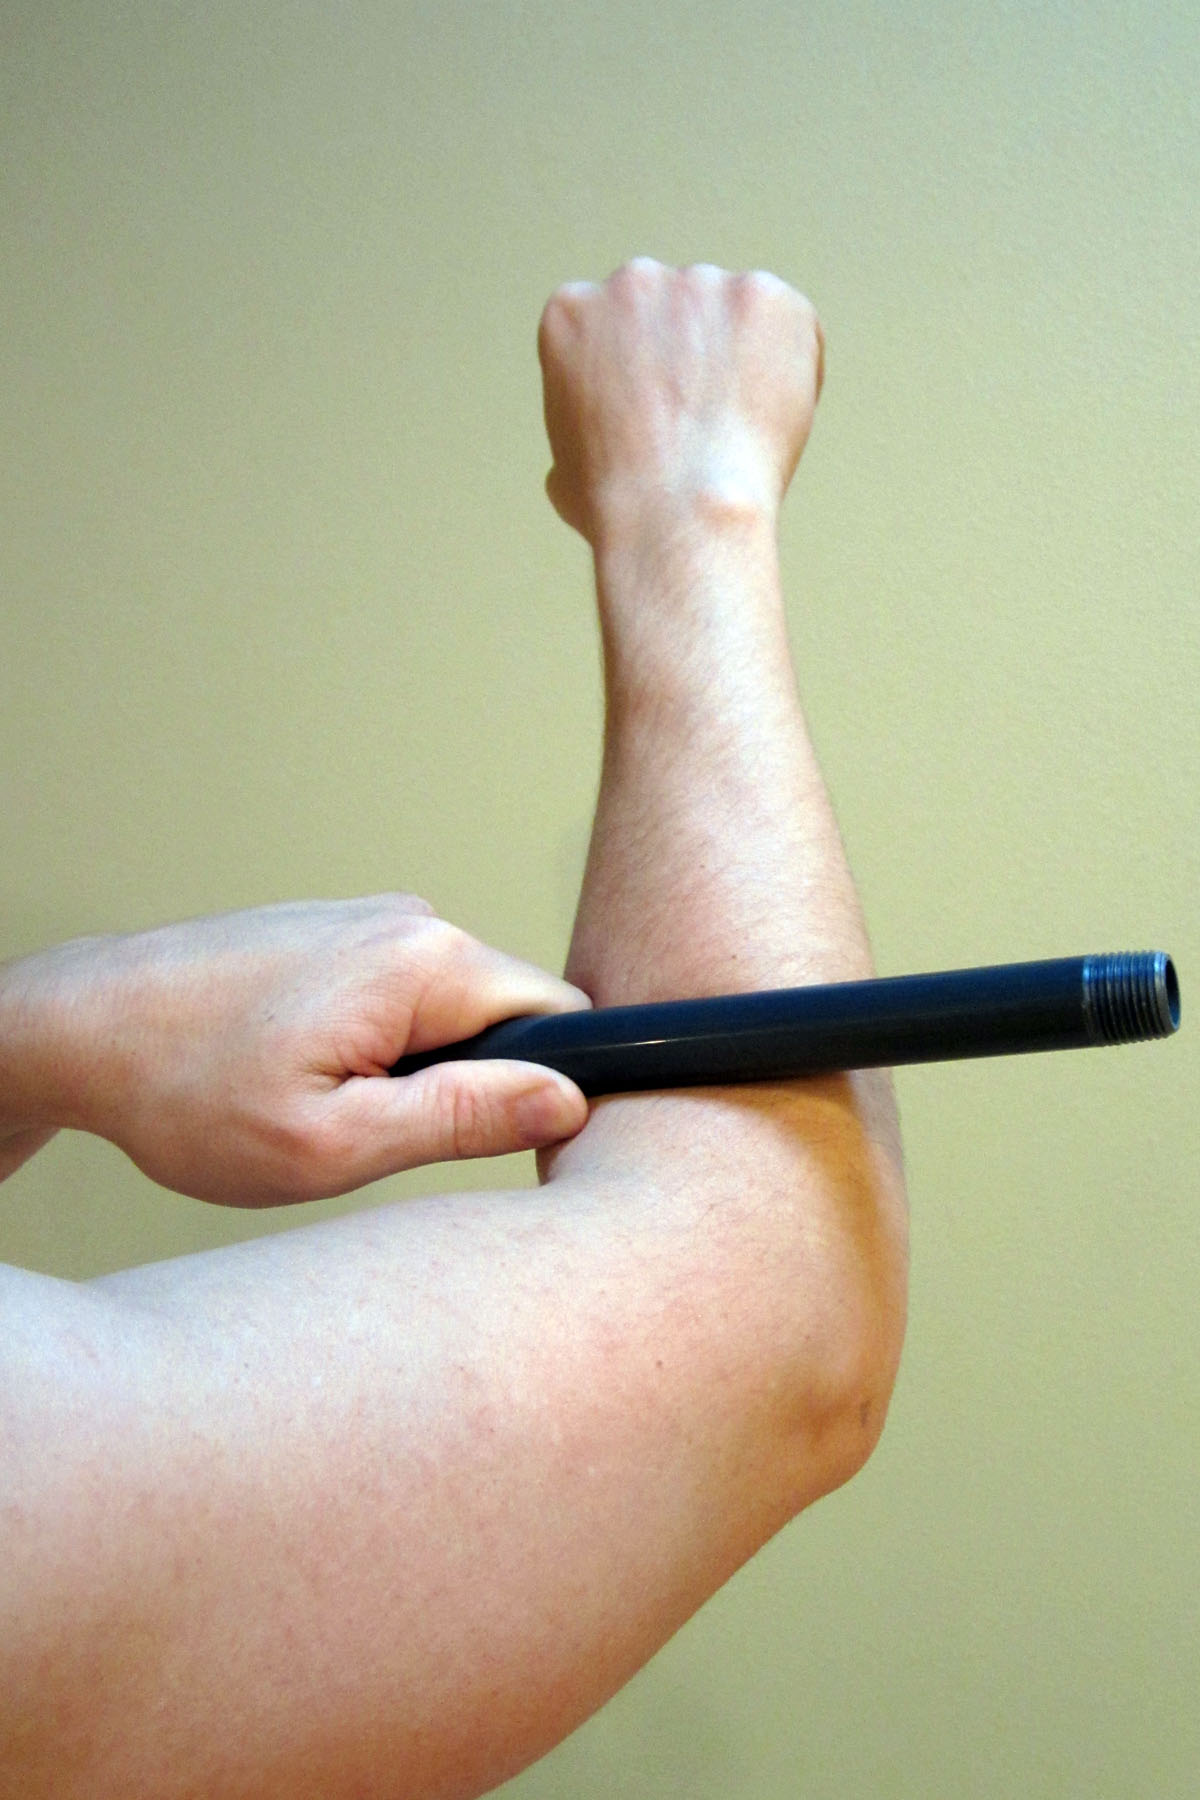
Work on your mobility.

Restrictions in mobility typically don’t just occur in the fingers and wrist, but also up the arm and into the thoracic and cervical spine.  I like to use items, such a PVC pipe, that you might already have at home.  This works great for forearm mobilization.  You could also use a golf ball.  You can use one hand to press or rub the PVC pipe over sore or tender areas.  The amount of pressure shouldn’t be painful.  Avoid pressing on especially boney areas.

Poor mobility elsewhere in the kinetic chain can and will affect hand and wrist symptoms.  Work on upper body mobility by focusing on shoulder and thoracic mobility.  You can automatically download my FREE resource for shoulder and thoracic mobility, My Top 8 Stretches to Eliminate Neck, Upper Back, and Shoulder Pain, when you subscribe to my e-mail list.

Be proactive.

Once you start to feel pain, be aggressive with your management and self-treatment.  Implement these recommended exercises, stretches, and mobilizations quickly so you can stop the pain from progressing.  It’s always easier to intervene early.  Take your rehabilitation seriously and perform the exercises diligently while you work to eliminate risk factors that may be affecting the condition.

Contact your Physical Therapist (PT).

If the pain persists, seek additional help.  Don’t let the pain linger.  The longer it’s left untreated, the more potential for harm and damage (which potentially could lead to a longer recovery).  The American Physical Therapy Association (APTA) is an excellent resource for learning more about physical therapy as well as locating a physical therapist in your area.

Thanks for the question, Jared!  Carpal Tunnel Syndrome (CTS) can be debilitating by limiting your ability to exercise, work, and perform daily tasks.  Be proactive in your care and management.  Most importantly, don’t let the pain and symptoms linger.  The longer you have the symptoms, the harder they can be to eliminate and recuperate from.

Have you ever dealt with Carpal Tunnel Syndrome (CTS) pain?  Which treatments have you found to be the most effective?  Additional discussion can help others to manage their pain.  Please leave your comments below. 

If you have a question that you would like featured in an upcoming blog post, please comment below or submit your question to contact@thePhysicalTherapyAdvisor.com.  Be sure to join our growing community on Facebook by liking The Physical Therapy Advisor!

How to Recover Quickly from a Quadriceps Strain

mta_quadstrain

http://marathontrainingacademy.com/quadriceps-strain

Marathon Training Academy

November 15, 2016

After straining your quadriceps, you remain at a higher risk of injury. In this guest post for Marathon Training Academy, you will learn which strategies to implement as you work through your rehabilitation and your return to activity.

Muscle injury. Man with sprain thigh muscles

A quadriceps strain, also known as a quad pull or thigh strain, is a relatively common running injury.

Strains can range from a mild discomfort to a full blown tear of most of the muscle which can result in severe pain and the inability to run or walk. The injury typically happens when one or more of the quadriceps muscles become overloaded.

In this pose you will discover the factors that increase your risk of straining your quadriceps, and learn specific strategies to implement during your rehabilitation and return to activity. Continue Reading

How to Self-Treat IT Band Pain with a Mini Plunger

Pain in the lateral (outside) leg or knee is commonly associated with a condition known as Iliotibial Band Syndrome (ITBS).  (Iliotibial Band Syndrome is also known as IT Band Syndrome, ITB Syndrome, or IT Band Friction Syndrome.)  Pain can range from the lateral side of the leg up toward the hip area to just below the lateral side of the knee joint (where the head of the fibula bone begins).  The pain can be very debilitating to the point that running or hiking activities have to be stopped.  Even walking can be difficult.

Although ITBS can be very painful, it can be easily self-treated if you handle your pain and symptoms quickly.  For many years, I have taught people how to use a mini plunger as a method to provide a suction force for self-treatment.  In this video, I demonstrate how to utilize a mini plunger as a “cupping” technique to self-treat IT Band Syndrome.

Cupping is a method or technique to massage and mobilize tissues such as muscles, skin, fascia, and tendons.  The exact treatment effect is unclear, but presently the research indicates that it helps to reset neural pain receptors and stretch receptors.  Thus, reducing pain and allowing for improved movement.

Cupping has been around as a treatment technique for thousands of years.  The research on cupping is interesting and for the most part, concludes that cupping is helpful in pain management.  There are some indications that the “suction” may lead to improved blood flow to an injured area which could speed up healing times.  Other health claims of the benefits of cupping haven’t been adequately proven in current research.

Traditionally, cupping has been performed with glass cups by using a flammable paper to quickly “burn” the oxygen in the cup which causes a suction force.  There are now many types of plastic or silicon cups that can easily be purchased online.  CupEDGE Massage Tools are what I use and recommend.  Fancy cups are not necessary.  The cups can be more convenient, but even a small sink plunger will do.

Have you tried cupping to treat ITBS?  If so, what was your experience like?  Additional discussion can help others to manage this condition more effectively.  Please leave your comments below.

For more information on how to self-treat ITBS, please refer to the following:

Looking for that exercise or book I mentioned in a post?  Forgot the name of a product or supplement that you’re interested in?  It’s all listed in the Resource Guide.  Check it out today!

If you have a question that you would like featured in an upcoming blog post, please comment below or submit your question to contact@thePhysicalTherapyAdvisor.com.  Be sure to join our growing community on Facebook by liking The Physical Therapy Advisor!

How to Self-Treat Patellar Tendon Pain with a Mobility Band

Patellar tendon pain (often called patellar tendinitis or patellar tendinosis) occurs when the tendon connecting your knee cap (patella) to your shinbone becomes inflamed and irritated. Patellar tendinitis is often called “jumper’s knee” because it occurs so frequently in sports like basketball and volleyball.  It also affects runners due to poor lower extremity biomechanics during running.

Patellar Tendinitis symptoms include:

  • Pain directly over the patellar tendon.
  • The tendon is usually tender and swollen.
  • Knee motion can cause “crepitus” (when you hear and feel a crunching or grinding sensation). This may or may not be painful. It’s usually felt under the tendon or the lowest part of the knee cap.
  • Pain with jumping.
  • Pain with kneeling.
  • Pain when walking downstairs.

PatellarTendonPain

The initial course of treatment should include RICE, which stands for Rest, Ice, Compression, and Elevation.

  • Rest. In this case, rest would indicate tapering down from your regular exercise activity and discontinuing running (for the short term).
  • Ice. Apply ice to the painful area. The rule for icing is to apply ice no more than twenty minutes per hour. Do not place the ice directly against the skin, especially if you are using a gel pack style. A bag of frozen peas can be ideal. Individuals with poor circulation or impaired sensation should take particular care when icing.
  • Compression helps to prevent and decrease swelling. Swelling can cause increased pain and slow the healing response, so limit it as much as possible.
  • Elevation. Depending on your pain level and the amount of swelling present, this step may be more or less beneficial.

In this video, I demonstrate how to utilize a mobility/compression band as a self-treatment method for patellar tendinitis. Mobility/compression bands, such as the Rogue Fitness VooDoo X Bands or EDGE Mobility Bands, are a novel way to self-mobilize tissue either of the quadriceps or the patellar tendon. The use of a mobility band not only helps to mobilize the tissue, but it affects blood flow to the area and speeds up healing.  A mobility band also helps to reset some of the receptor cells in the muscle tissue which cause excessive muscle tightness.

As demonstrated in the video, start by applying the mobility band just below the tibial tuberosity, and then over the patellar tendon to the base of the patella. Next, perform the seated knee extension and then the squats.  Typically, the mobility band will only be in place for one to two minutes.  If you experience numbness or tingling, please discontinue the treatment.  (If you suffer from any form of blood clotting disorder or are on blood thinning medications, I would advise against utilizing mobility bands for any type of deep compression.)

In addition to utilizing the mobility band, I often find that it’s critical to improve general tissue mobility. I recommend stretching and mobilizing the tissues of the lower legs.  Myofascial release of the quadriceps muscle is an important component in order to relieve the pain while reducing the pressure and tension through the patellar femoral tendon and joint.  This is typically a very effective and important step as most will find pain relief from improving quadriceps mobility.  I tend to utilize the foam roller for the larger part of the quadriceps.

LacrosseBallForQuad

I also use a tennis or lacrosse ball to aggressively work the tissue above the patella. You can use your hand to press the ball in and work it around the tissue.  To use the weight of your leg for a more aggressive mobilization, place the ball on the ground and mobilize the tissue with your leg on top of the ball.

For additional helpful tips and tricks on treating knee pain, please refer to my guest post for the Marathon Training Academy, How to Self-Treat Runner’s Knee.  Much of the advice and training recommendations are also relevant to treating patellar tendinitis.

Have you tried using a mobility band before to treat patellar tendinitis? If so, what was your experience like?  Please leave your comments below.

Looking for that exercise or book I mentioned in a post?  Forgot the name of a product or supplement that you’re interested in?  It’s all listed in the Resource Guide.  Check it out today!

If you have a question that you would like featured in an upcoming blog post, please comment below or submit your question to contact@thePhysicalTherapyAdvisor.com.  Be sure to join our growing community on Facebook by liking The Physical Therapy Advisor!

How to Self-Treat IT Band Syndrome with a Mobility Band

Pain in the lateral (outside) leg or knee is commonly associated with a condition known as Iliotibial Band Syndrome (ITBS). (Iliotibial Band Syndrome is also known as IT Band Syndrome, ITB Syndrome, or IT Band Friction Syndrome.) Pain can range from the lateral side of the leg up toward the hip area to just below the lateral side of the knee joint (where the head of the fibula bone begins).

The IT Band is a very thick fibrous band of tissue that spans from the hip’s origin point at a muscle known as the Tensor fasciae latae (TFL). The TFL transitions into the IT band and progresses down the lateral thigh and ends at the head of the fibula.  The IT Band’s primary function is to provide additional lateral support for the knee joint (particularly when standing or landing on one leg).

IT Band Syndrome is often associated with an over use injury. Runners will often develop ITBS after running on uneven terrain or downhill.  Gait or running abnormalities can increase your risk of developing ITBS.  Although it can be very painful, it can be easily self-treated if you handle your pain and symptoms quickly.

A simple and effective method to self-treat ITBS is through the use of a mobility/compression band (such as an EDGE Mobility Band). In this video, I demonstrate how to use a mobility/compression band to mobilize the iliotibial band (also known as the IT Band) as a self-treatment method for ITBS.

Have you tried using a mobility band before to treat ITBS? If so, what was your experience like?  Additional discussion can help others to manage this condition more effectively.  Please leave your comments below.

For more information on how to self-treat ITBS, please refer to the following:

Looking for that exercise or book I mentioned in a post?  Forgot the name of a product or supplement that you’re interested in?  It’s all listed in the Resource Guide. Check it out today!

If you have a question that you would like featured in an upcoming blog post, please comment below or submit your question to contact@thePhysicalTherapyAdvisor.com. Be sure to join our growing community on Facebook by liking The Physical Therapy Advisor!

How to Maintain Healthy Joint Motion

Healthy aging could be defined as having the physical, mental, social, emotional, and spiritual capacity to live life on your terms. Maintaining adequate health is a combination of physical strength, cardiovascular endurance, joint motion, and balance in order to perform activities of daily living (ADLs).  This includes any or all desired tasks, such as picking up your grandchildren, to playing golf or running.

The ability to move a joint through its full range of motion (ROM) is critical in maintaining the ability to perform many important functional tasks. Imagine trying to lift a box overhead with a shoulder that only has half its motion.  That makes for a very difficult task.  There are many reasons for loss of joint motion:  muscle or tendon tears; generalized muscle weakness; paralysis; and severe arthritis.

Typically, osteoarthritis (OA) will occur in a joint that has previously been injured or one that doesn’t adequately move. Movement allows the proper nutrients to be circulated through the blood and synovial fluid that coats and lubricates the joint.  There are also genetic factors that may predispose a person to developing OA, which is one of 171 different types of arthritis.

How can you best maintain joint mobility throughout the aging process? What is the minimum effective dose to help insure joint mobility as you age well? The key to maintaining mobility is to take each joint of the body through its full range of motion (ROM) at least once per day.

ShoulderPulleyExercise

A crucial component to joint health and mobility is to insure that the joint surfaces remain coated with the body’s natural lubricant known as synovial fluid. Synovial fluid is best circulated in joints through mobility.  To insure that the entire joint surface is coated, a full arc of motion needs to be performed.

By performing a full arc of motion for each joint, you also insure that the associated ligaments, tendons, and musculature can accommodate for this motion and won’t shorten over time due to lack of use. Moving each joint through a full ROM daily is the key to maintaining motion.  In order to insure optimized healthy aging, it’s best to move that joint frequently.

The latest research indicates that sitting for more than two hours at a time can significantly lessen your life span. The real headline should read, “Even if you are a regular exerciser, sitting for more than two hours a day will still lower your life span.”

Frequent movement throughout the entire day is critical for health.  This includes frequent mobility as it is important for joint health as well as critical for cardiovascular health. Ideally, you should choose movements and exercises that are functional and address multiple joints at the same time.

How to Maintain Healthy Joint Motion:

  • The Squat. The squat activates nearly all of the muscles in the lower leg. It also takes the hips and knees into end range flexion as well as the ankles into near end range dorsiflexion. The squat is particularly effective at activating the muscles in the legs referred to as the posterior chain, which includes the hamstrings, the glutes (or buttock muscles), and the hip adductors (or the groin muscles). It also activates muscles in the hips, the calves, the stabilizing muscles in the ankles, the quadriceps, and as well as the core (the abdominals and lumbar extensor muscles). These muscles are critical for all functional mobility related movements, including walking; getting up from a chair or a toilet; or picking up someone or something. For more information on squatting, please refer to 7 Reasons Why the Squat is Fundamental to Life.
  • Tai Chi and Yoga. Tai Chi, yoga, and Qigong all implement slow simple movements into a full body exercise that can help you to maintain your mobility, balance, strength, and general health as you age.
  • Stretching and Self-Mobilization. There are generally 5 Ways to Improve Range of Motion when utilizing different stretching methods or self-mobilization. Using a foam roller is an excellent method to decrease pain and improve mobility throughout the hip and pelvis. For more information on how to use a foam roller, please refer to Foam Rolling for Rehabilitation.
  • Shoulder Pulley. A simple, yet popular, method to maintain shoulder motion is through a shoulder pulley. Shoulder pulleys are an excellent way to use active assistive motion to regain motion in the shoulder post injury or surgery. I also instruct many of my clients to utilize shoulder pulleys for pain management as well as a prevention strategy for arthritis and loss of shoulder motion and function.

Maintaining adequate joint mobility and range of motion is an important component in healthy aging and can be a critical strategy in order to avoid many orthopaedic or arthritic conditions. Be proactive now, so you can save yourself from experiencing pain and debility in the future. It’s never too early or too late to implement strategies to help you age well!

Which strategy do you use to maintain your joint range of motion and mobility? It could be as simple as using the foam roller or a shoulder pulley.  Please leave your comments below.

Looking for that exercise or book I mentioned in a post?  Forgot the name of a product or supplement that you’re interested in?  It’s all listed in the Resource Guide. Check it out today!

If you have a question that you would like featured in an upcoming blog post, please comment below or submit your question to contact@thePhysicalTherapyAdvisor.com. Be sure to join our growing community on Facebook by liking The Physical Therapy Advisor!