Q & A: What to Expect after Breaking a Collarbone

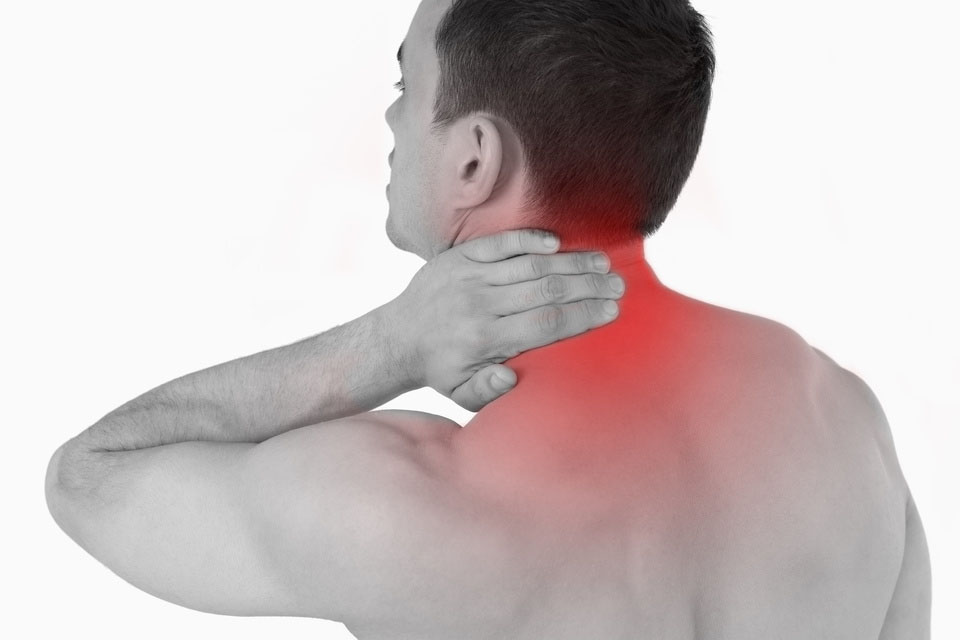
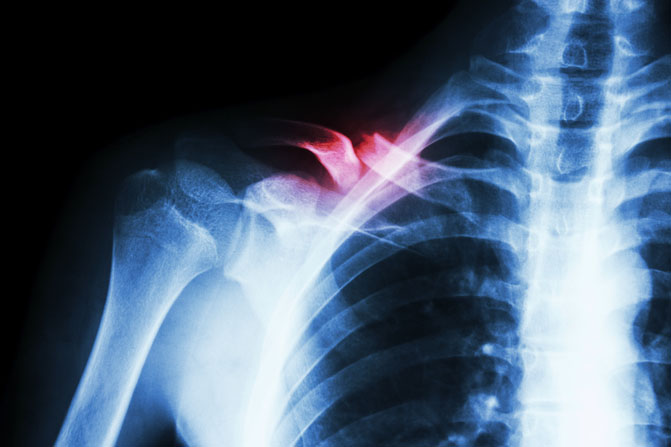
Q.  I fell snowboarding last weekend, and I broke my collarbone. My doctor says that I don’t need surgery and that I will be fine in a couple of months.  I want to be more proactive than that.  What should I do? -Shawn

A.  Thanks for the question, Shawn. I’m sorry to hear about your snowboarding accident.  Fractures of the collarbone (clavicle) are actually fairly common and typically result from falling on the shoulder, the collarbone or an outstretched hand.  Collarbone injuries are also very common in toddlers, typically due to a fall out of bed or tripping when running.

The collarbone attaches the sternum to the scapula (shoulder blade). Many important structures, such as nerves and blood vessels, lie just below the clavicle. However, these vital structures are rarely injured when the clavicle breaks.  Diagnosing a clavicle fracture is typically performed via X-ray. In certain circumstances, a CT Scan may be performed for a more thorough image of the injury.

RightClavicleFracture

Symptoms of a Collarbone Fracture include:

  • Pain in the shoulder or over the collarbone.
  • Difficulty raising your arm due to pain.
  • Slumping or sagging of the shoulder, typically downward and forward.
  • A grinding sensation in the collarbone area when attempting to raise the arm.
  • A “bump” forms over the collarbone. In severe cases, the bump will be similar to a piano key sticking up and will be mobile.
  • Bruising and swelling over the collarbone area.

Surgical Intervention

Depending on the severity of the injury, surgery may or may not be indicated. In most cases, a simple fracture (where the bones are still aligned) will not require surgery.  Even in cases of minor malalignment, most people will not undergo surgery.

Surgical fixation is most common when there is a significant displacement or malalignment present. The purpose of surgical fixation is to hold the bones in place while they heal.  The physician will either utilize a metal plate and screws or small pins to hold the bones in place.  Although the surgical hardware can be removed once the bones have sufficiently healed, often it will remain throughout a person’s lifetime.

Rehabilitation post-surgery is fairly straight forward and is similar to the following nonsurgical treatment recommendations. Please follow your physician’s recommendations after surgery as each procedure can be different.  Variations in recovery and rehabilitation can occur and are dependent on: the area that was fixed; the severity of the fracture; and the stability of the bone and fixation.  These factors will determine how quickly you can progress through the rehabilitation.

Nonsurgical Treatment Recommendations

Most collarbone fractures do not require surgery (particularly, if the fractured area retains its alignment). Your physician will assess the severity of the fracture.  This will determine how quickly you can progress through the stages of treatment.

A general time frame for healing (with an initial return to function) is on average 6 weeks for adults and about 4 weeks for children. Complete bone healing, remodeling, and a full return to all activities will take longer.  This will depend on your age, health status, and the severity of the injury.

PRICE (Protect, Rest, Ice, Compression, and Elevation)

  • Protect. In many cases, you will be advised to wear a sling (particularly, during your daily activities). This will help to protect the area from too much motion and activity while allowing the bone to heal in its proper place. It will also indicate to others that you have an injury, so that they may avoid knocking into you.
  • Rest. Allow the arm and shoulder time to rest and recover. Do not utilize the arm for activities that cause pain. Avoid excessive motions and use. As the pain subsides, you can slowly taper up the use of the arm by starting with simple daily activities.
  • Ice. Apply ice to the painful area–typically the sooner, the better. The rule for icing is to apply ice no more than twenty minutes per hour. Do not place the ice directly against the skin, especially if you are using a gel pack style. A bag of frozen peas can be ideal. Individuals with poor circulation or impaired sensation should take particular care when icing.
  • Compression. It’s not easy to apply compression in this area. In most cases, it’s not necessary. In some cases, a simple ACE wrap can be used around the shoulder and collarbone area to help reduce the pain. The wrap is typically applied to help hold the shoulder in a backward and slightly downward direction.
  • Elevation. Elevation is typically not necessary unless you are experiencing excessive swelling in the affected arm and hand. You can position the arm in a slightly elevated position by using pillows while lying on your back or on the non-affected side. This would be an excellent time to apply ice, too.

Sleeping

When sleeping, try not to lie on the affected side. Hug a small pillow for comfort.  This also promotes optimal blood flow to the shoulder area.

Pain Management

Initially begin with PRICE (Protect, Rest, Ice, Compression, and Elevation).  Pain medication, such as acetaminophen, is always an option if recommended by your physician.  You may also want to consider utilizing topical agents, which can help to decrease pain and muscle spasms. The method of action varies greatly according to the product used. You may find that one product works better than another. Some of my favorite products in my medicine cabinet include: Biofreeze Pain Relieving Gel; Arnica Rub (Arnica Montana, an herbal rub); and topical magnesium.

Another option is oral magnesium. You can take Mag Glycinate in pill form or by eating foods higher in magnesium such as spinach, artichokes, and dates. Taking additional magnesium (particularly at night) can help to reduce muscle cramps and spasming. It is also very helpful in reducing overall muscle soreness and aiding in a better night’s rest. Most people are deficient in the amount of magnesium they consume on a regular basis. I recommend beginning with a dose of 200 mg (before bedtime) and increasing the dose as needed. I would caution you that taking too much magnesium can lead to diarrhea. Mag Glycinate in its oral form is the most highly absorbable. Although not as absorbable, Thorne Research Magnesium Citrate and magnesium oxide can also be beneficial.

Supplements

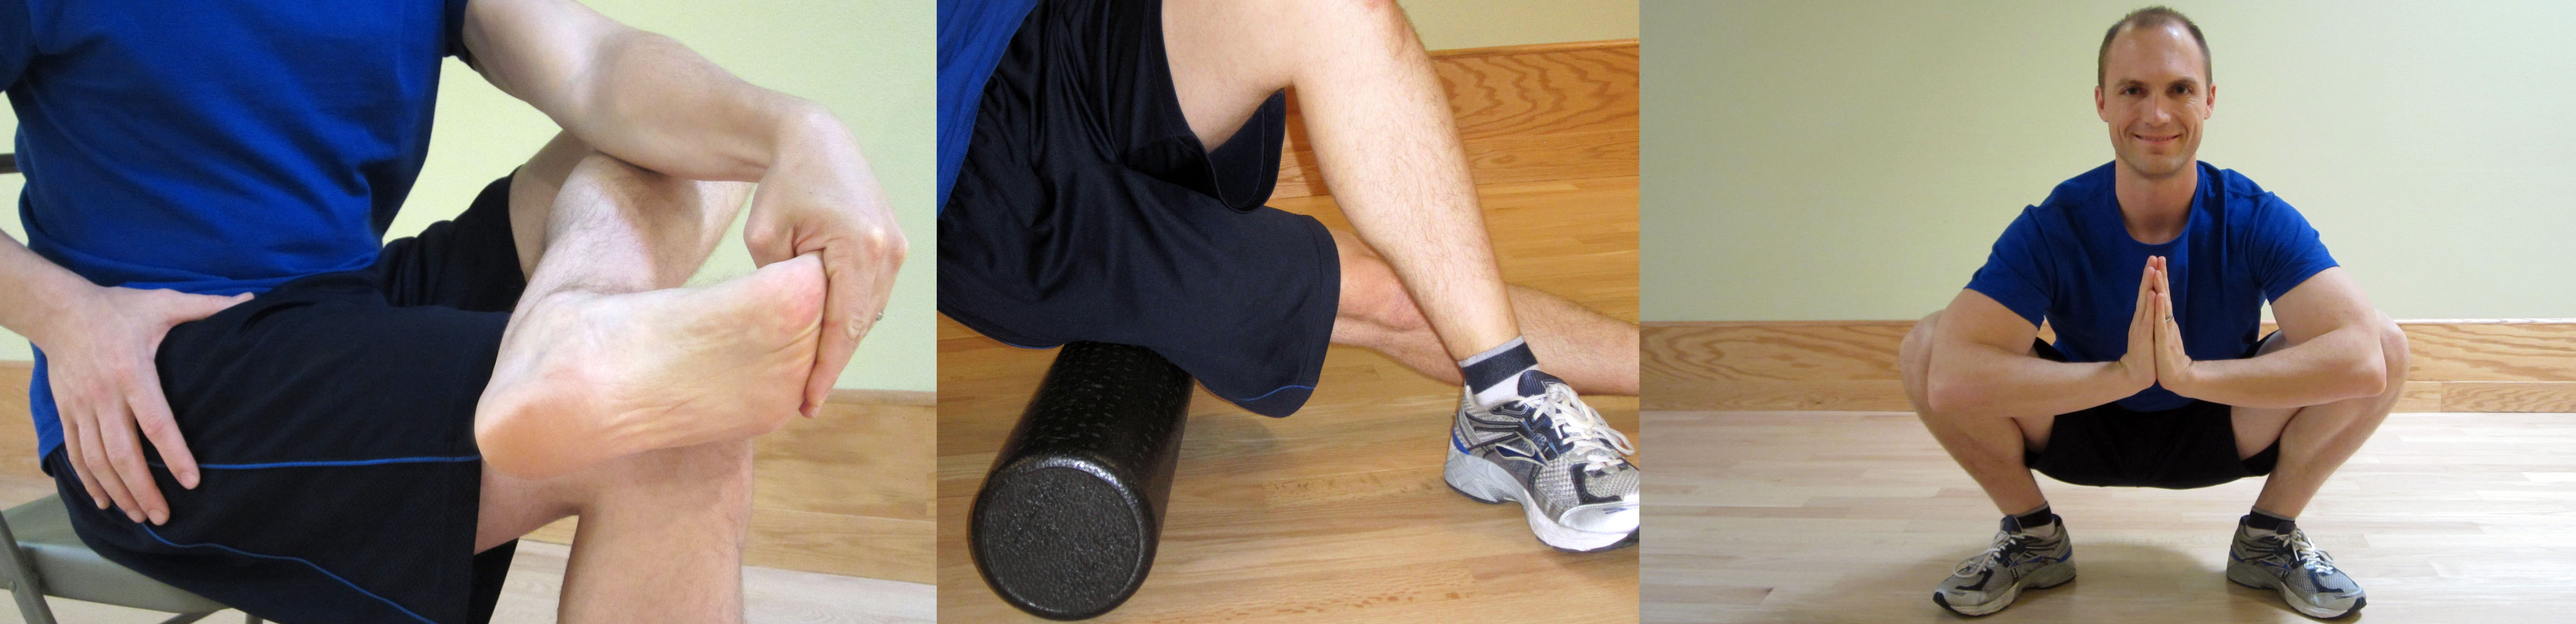
Mt. Capra, an organic goat farm in eastern Washington State, offers superior quality products primarily utilizing goat based products. CapraFlex by Mt. Capra is the best bone and joint supplement I have found. It is a blend of natural herbs and spices along with glucosamine and chondroitin.  The herbal and spice formulation is designed to naturally decrease inflammation and support healing.  I recommend it to anyone recovering from an injury or attempting to prevent injury when performing at a very high level.  I personally use it, and in my practice, it has helped clients recover faster and prevent injury.  It can interfere with some blood thinning medication, so if you are on this type of medication, please check with your physician.

Vitamin D3, such as Viva Labs Vitamin D3, is critical to the absorption of calcium through the intestinal wall which is important for bone health.  Although calcium is a critical component of bone health, I cannot recommend extra supplementation because of the potential cardiac risks to over supplementation.  A healthy varied diet will typically supply adequate calcium levels (assuming that adequate Vitamin D3 levels are present for absorption and that you are avoiding drinking soda).  Vitamin D3 is also a critical nutrient in maintaining a healthy immune system.

Be sure to maintain a generally healthy diet. Give your body the needed nutrients to heal and recover quickly.

Range of Motion

Depending on the severity of the fracture, you will likely have to limit the range of motion (ROM) of the shoulder to less than 70-80 degrees of flexion (forward) and abduction (sideways) motion. You will also have to limit reaching behind your back. A person may typically wear a sling for 2-4 weeks while limiting the motion.

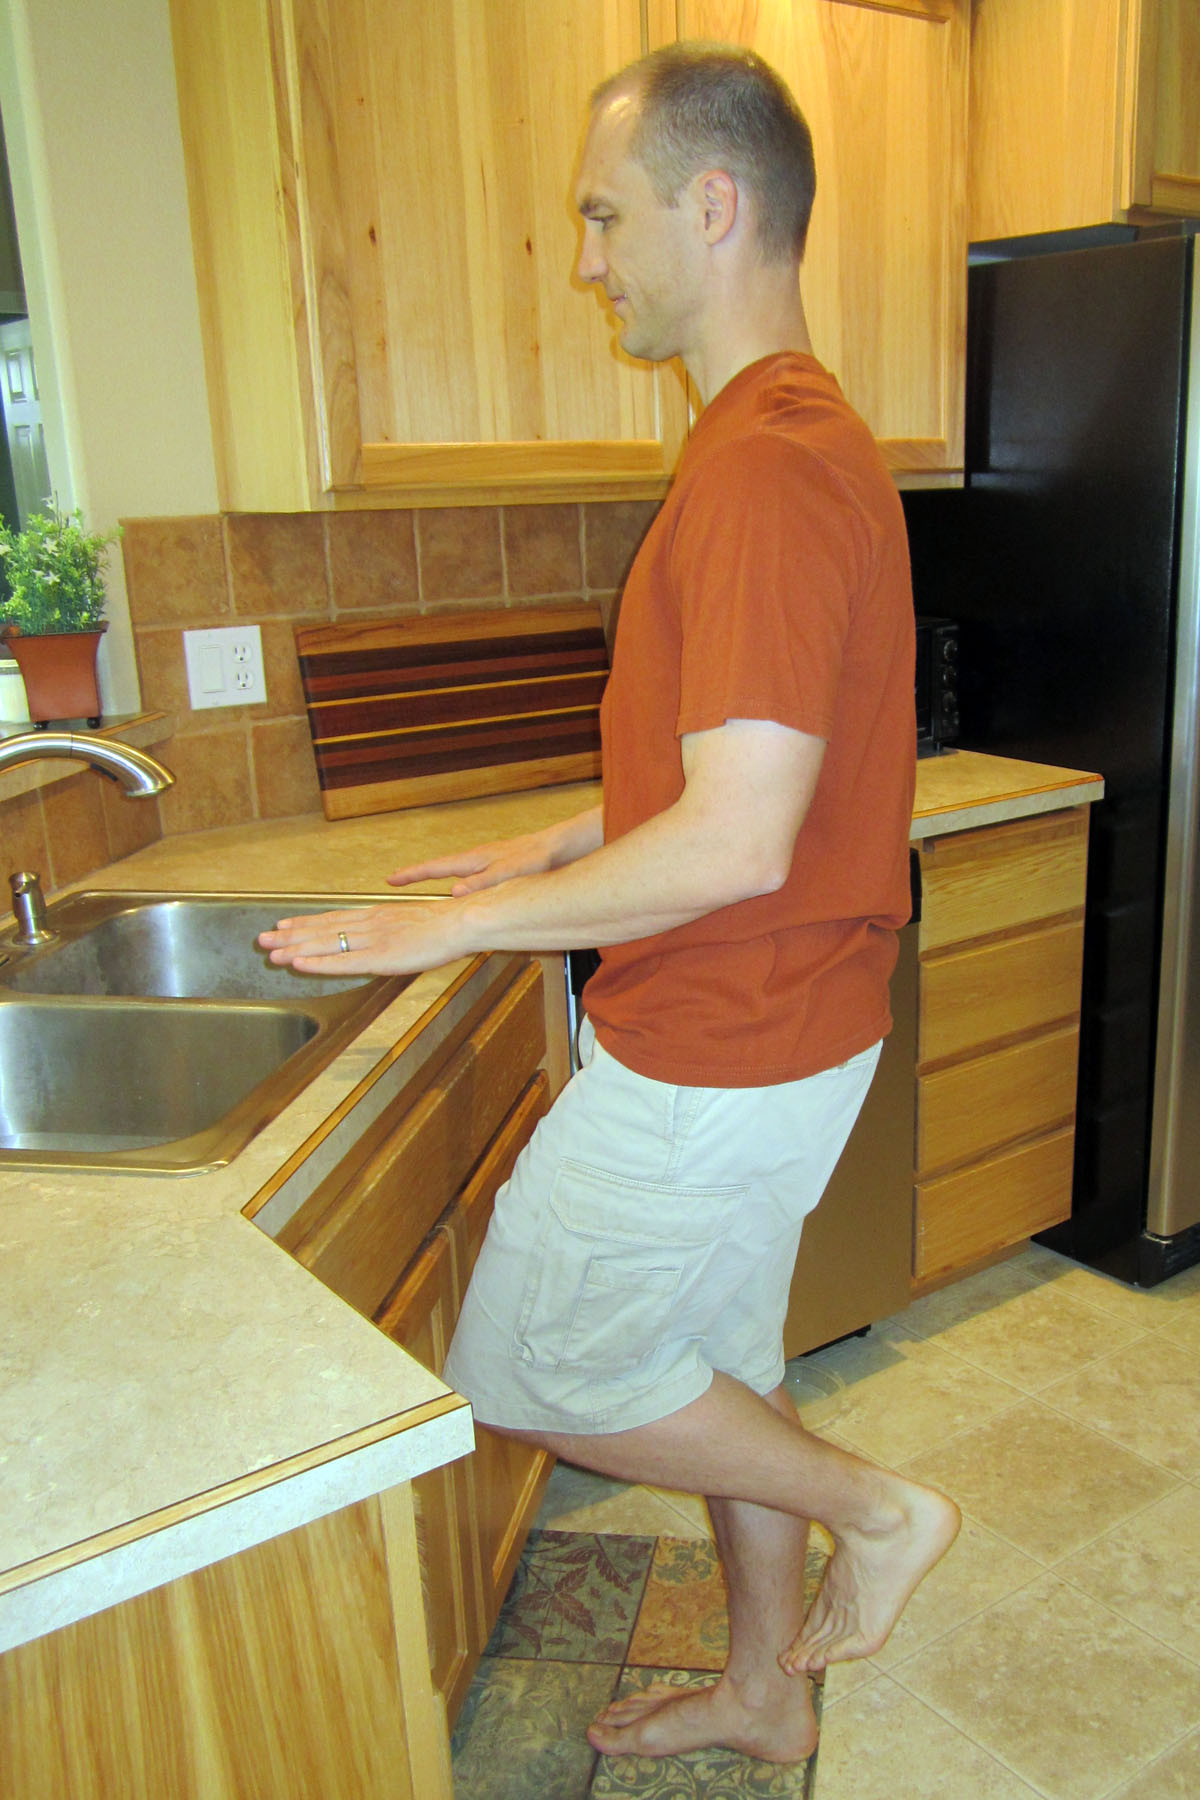
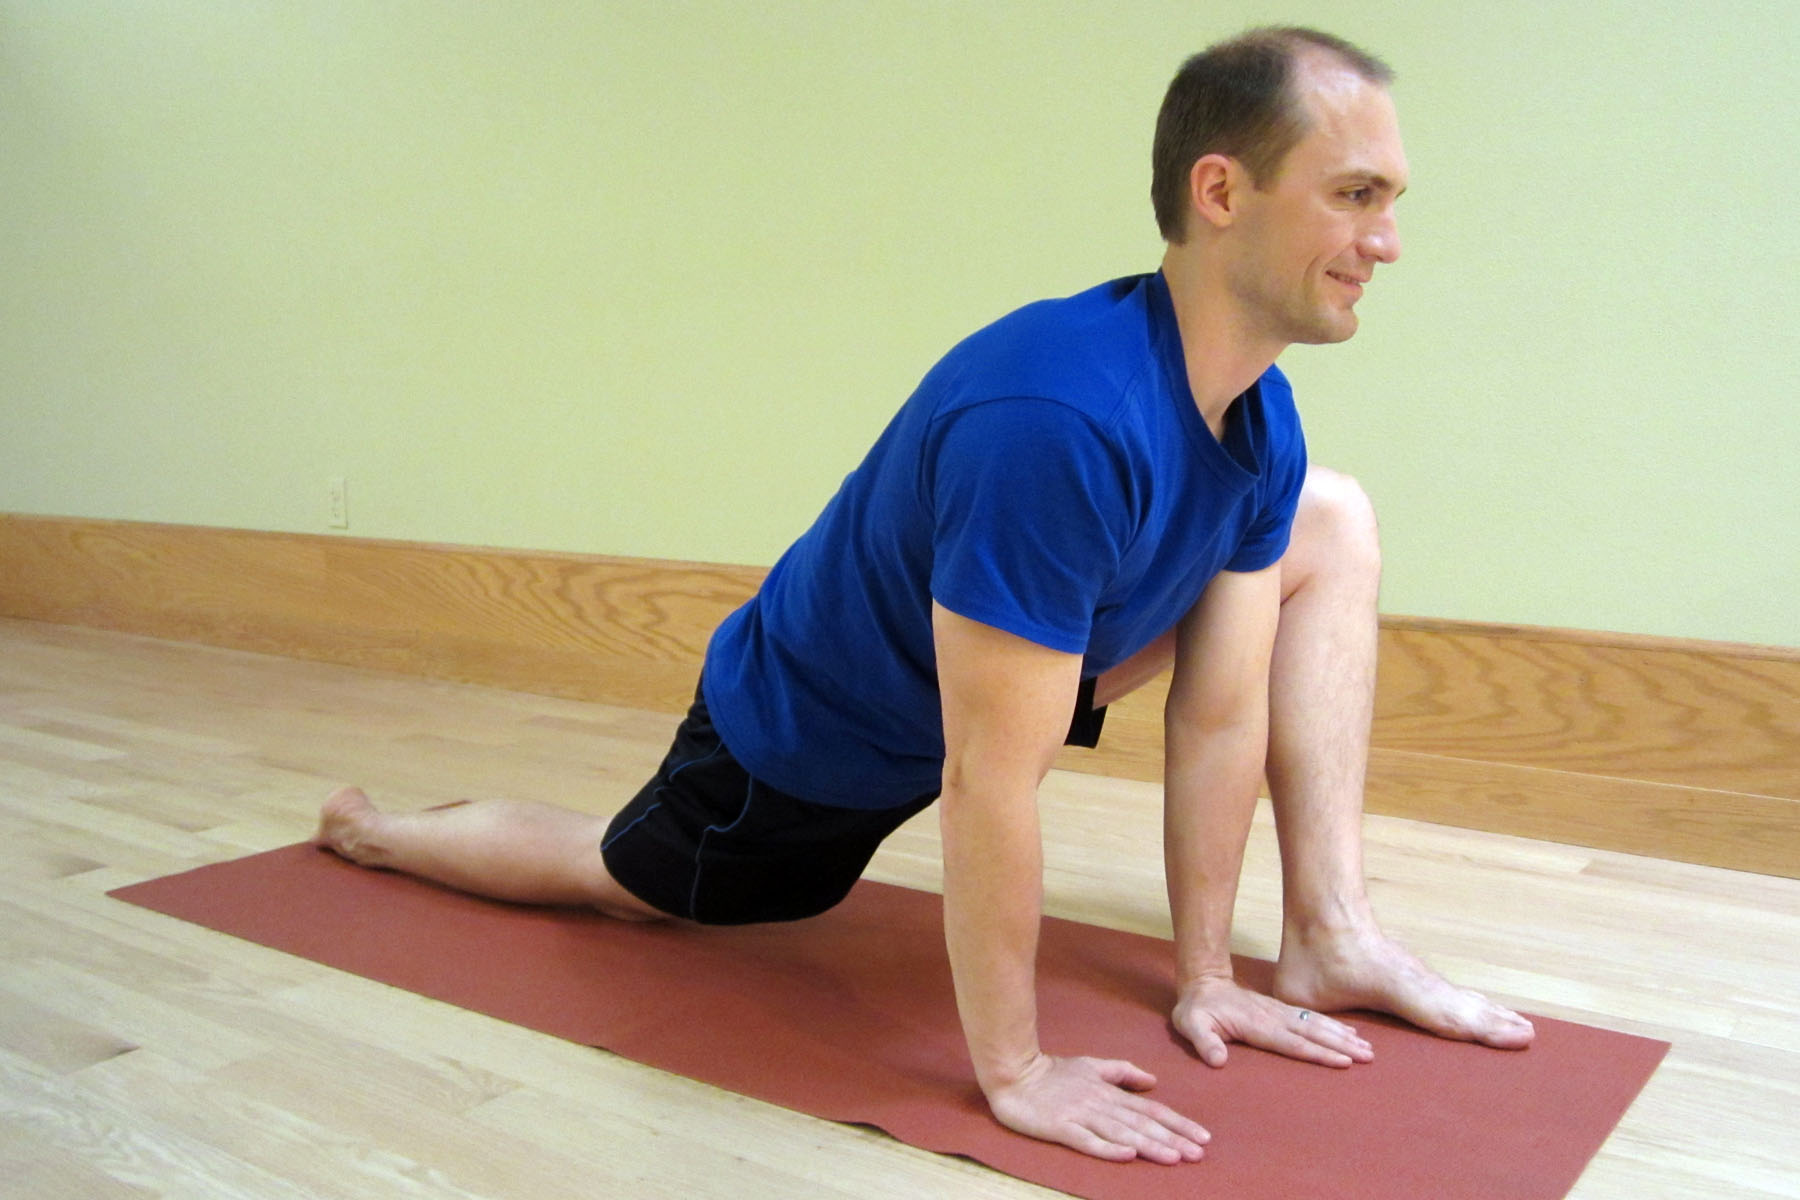
The initial treatment to maintain ROM is to perform the pendulum exercise (as demonstrated in the picture on the left down below). Bend forward at the waist, and let your injured arm hang down toward the ground. Make small circles with your hand, and let the momentum move your arm around effortlessly.  Try to make both clockwise and counterclockwise circles. For more instruction, please watch How to Properly Perform Pendulum Exercises.

PendulumExercise_ShoulderPulleyExercise

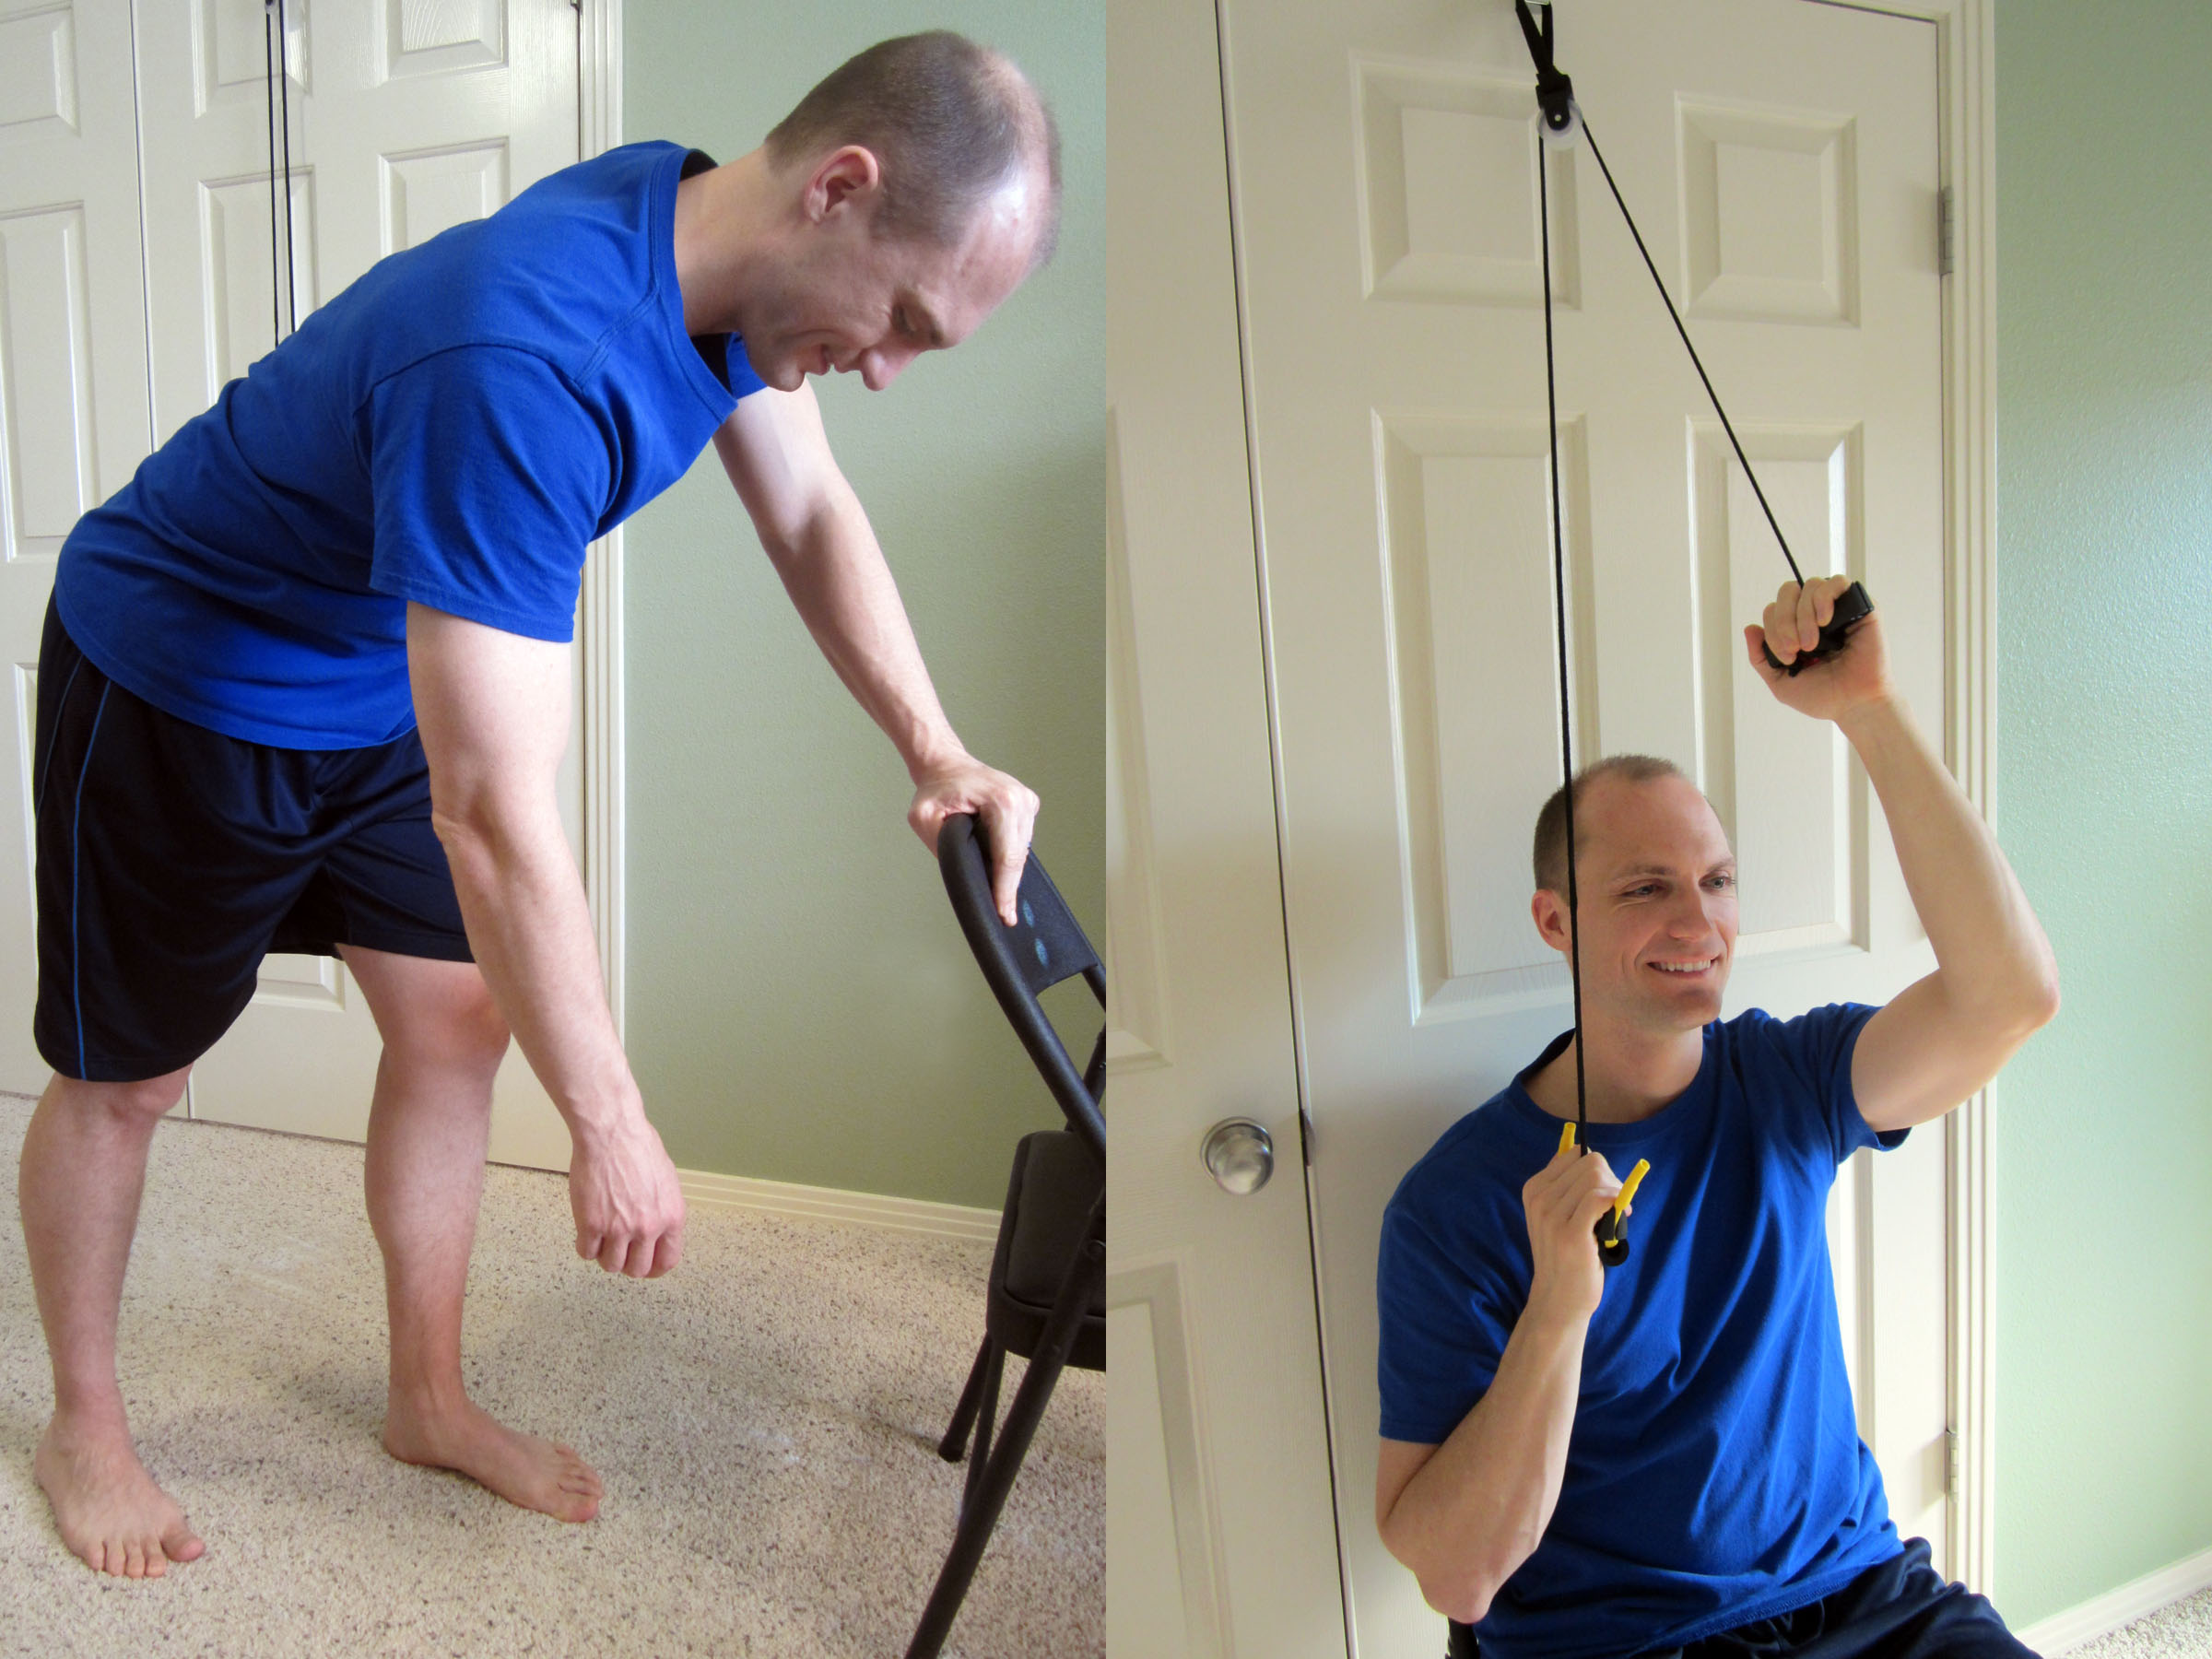
Around the 2-4 weeks mark, you can begin to work on regaining full forward flexion by using an over-the-door shoulder pulley (as demonstrated in the picture on the above right). Work slowly on motion for 5-10 minutes at a time. You may push though minor discomfort, but you should never experience significant pain during this process. For more instruction, please watch How to Use Shoulder Pulleys to Regain Shoulder Motion.

As flexion improves (typically after the 4 weeks mark), then you can begin to work on all other motions of the shoulder. This includes motion out to your side (abduction) and behind your back (internal rotation). The shoulder pulley can be utilized to regain these motions as well. Otherwise, you could walk your fingers up the wall when facing forward to regain flexion and sideways to regain abduction. You could use a towel to regain the motion behind your back.

Strengthening

Initially avoid lifting anything over 5 pounds. Typically around the 4-6 weeks mark (depending on severity of injury), you can begin a gentle rotator cuff strengthening program. These exercises should always be performed pain free and initially, the resistance will be very light. For specific exercises, please refer to Rotator Cuff Exercises.

The rotator cuff is a critical component to shoulder mobility. It is made up of four different muscles whose job is to make sure that the ball of the humerus (arm bone) rotates and slides properly in the socket, which is made up of the scapula. The rotator cuff allows the other major muscles of the arm, such as the deltoid and Latissimus dorsi (lats), to properly move the arm.

When there is weakness or dysfunction, it will cause rubbing of the muscle tendon on the bone. This can lead to impingement or eventually fraying and tearing. Insuring proper strength in the rotator cuff after a collarbone injury is an important component in avoiding shoulder impingement syndrome.

Return to Full Activity

Around the 8-12 weeks mark, you will likely consult with your physician to have another X-ray taken.  Once you’re cleared by your physician, you can slowly taper back into more strenuous exercises and a return to full activity.

If your injury was severe or required surgery, it may be closer to the 16 weeks mark before you can return to full activity and be cleared to lift heavier weights.  I recommend that you slowly taper back into your prior activities.  If you are experiencing pain, then back off that particular activity and try it again at a later date.

Help from a Physical Therapist (PT)

Every injury is different. If you’re experiencing pain or difficulty regaining your strength and shoulder range of motion, please consult with a physical therapist that is an orthopaedic certified specialist (OCS). The American Physical Therapy Association (APTA) offers a wonderful resource to help find a physical therapist in your area. In most states, you can seek physical therapy advice without a medical doctor’s referral (although it may be a good idea to hear your physician’s opinion as well).

Good luck, Shawn! I hope you find this information to be helpful and provide some relief from the pain you’re experiencing.

Have you broken your collarbone? What was your experience like?  Please share your best tips for recovery.

If you have a question that you would like featured in an upcoming blog post, please email contact@thephysicaltherapyadvisor.com. For additional health and lifestyle information, join our growing community on Facebook by liking The Physical Therapy Advisor!

Disclaimer:  The Physical Therapy Advisor blog is for general informational purposes only and does not constitute the practice of medicine or other professional health care services, including the giving of medical advice. No health care provider/patient relationship is formed.  The use of information on this blog or materials linked from this blog is at your own risk.  The content of this blog is not intended to be a substitute for professional medical advice, diagnosis, or treatment.  Do not disregard, or delay in obtaining, medical advice for any medical condition you may have.  Please seek the assistance of your health care professionals for any such conditions.

Q & A: Rehabilitation for a Total Knee Replacement

Q.  I’m going in for a total knee replacement. I wondered what type of advice you could give me so that I’m better prepared.  Thanks!  -Judy

A.  Great question, Judy! A total knee replacement is often referred to as a total knee arthroplasty (TKA).  It’s really more like a resurfacing of the knee joint.  TKA is most often used as a treatment for those suffering from moderate to severe osteoarthritis in the knee.  Other common causes for the procedure include Rheumatoid arthritis and injury.  Knee replacement is more common among women and the likelihood of replacement increases with age.

The following information on total knee arthroplasty (TKA) and rehabilitation is not meant to be all inclusive, but to serve as a starting point as to what you will likely experience during rehabilitation. Each person’s rehabilitation process is likely to vary depending on his/her particular needs.

Four basic steps are performed in a Total Knee Arthroplasty (TKA):

  1. Prepare the bone. The damaged cartilage surfaces at the ends of the femur and tibia are removed along with a small amount of underlying bone.
  2. Position the metal implants. The removed cartilage and bone is replaced with metal components that recreate the surface of the joint.
  3. Resurface the patella. The undersurface of the patella (kneecap) is cut and resurfaced with a plastic button. This is not performed with every procedure unless necessary.
  4. Insert a spacer. A medical-grade plastic spacer is inserted between the metal components to create a smooth gliding surface.

Proper rehabilitation is a critical component to overall success with this procedure.  In most cases, a physical therapist and possibly an occupational therapist will be involved in the rehabilitation process.  I tend to classify the rehabilitation into the following four major stages.

Stage I Rehabilitation

This is the initial post-surgical recovery stage in the hospital with physical therapy (typically the same day).  The goal is for you (the patient) to be upright and walking with an assistive device, such as a walker, in order to initiate very basic motion in the knee.

Although same day procedures can be performed, you will typically spend two to three days in the hospital following this procedure.  With the new surgical techniques utilized, most patients will not have any weight bearing or other mobility precautions.

There are risks of complications with any medical procedure.  The biggest risk initially is falling either from the newly operated knee giving way or complications from medication (which can cause dizziness, lightheadedness or other symptoms).  Other possible unlikely complications include: loosening of the prosthetic within the bone; blood clots; and infection.

Prior to leaving the hospital, pain management is a priority.  In addition, you need to be able to walk at least to a bathroom (typically with some assistance to maintain safety).

Four typical options for discharge:

  1. Discharge home and continue rehabilitation with in-home care.
  2. Discharge home and initiate physical therapy in an outpatient clinic.
  3. Discharge to a skilled nursing facility. This is typically reserved for those who are expected to need an extended recovery.
  4. Discharge to a sub-acute rehabilitation facility. This is typically reserved for those who may need additional medical care, but who can tolerate a more intensive rehabilitation program.

Regardless of the discharge location, the initial treatment is very similar.  Focus on pain management.  Improve your ability to ambulate.  Initiate RICE (Rest, Ice, Compression, and Elevation).  Start with basic range of motion (ROM) exercises (as described in Stage II).  Also, please refer to Total Knee Replacement Rehabilitation Exercises for many of the most common exercises you may perform depending on your individual need.

Medication Management

A major component of the rehabilitation will be to insure proper pain management.  This is typically through pain medication (both narcotic based and/or acetaminophen).  It is important to maintain proper pain management because it allows you to perform necessary activities of daily living (ADLs) as you progress through your rehabilitation.  Additional medication management may be necessary if you’re taking blood thinning medications in order to decrease the risk of blood clots.

RICE 

  • Rest. Your body has just undergone a major surgery. It will require more rest initially to properly heal and recover. Although exercise and movement will be critical to your recovery, additional rest will be needed. Limit walking on any hard surfaces, such as the flooring in grocery stores, for at least the first three to four weeks in order to minimize pain and swelling.
  • Ice. Apply ice to the painful areas especially in and around the knee. The rule for icing is to apply ice no more than twenty minutes per hour. Do not place the ice directly against the skin, especially if you are using a gel style Cold Pack. A bag of frozen peas can be ideal. Individuals with poor circulation or impaired sensation should take particular care when icing. Often, your physician will prescribe a machine known as an IceMan (or something comparable) to help with cryotherapy to reduce pain and inflammation.
  • Compression helps to prevent and decrease swelling. Swelling can cause increased pain and slow the healing response, so limit it as much as possible. You may utilize a common ACE wrap or your physician may recommend wearing TED hose which helps with swelling and decreases the risk of blood clots.
  • Elevation. When resting, keep the leg as straight as possible and elevated above the level of your heart to help reduce swelling (edema). Try not to prop anything under the knee because it would cause flexion (bending). You want the knee to move straight into full extension.

Stage II Rehabilitation

Stage II typically starts on about day three to five.  It can last up to six to eight weeks depending on your recovery.  Continue to progress with pain management, edema management, gait/ambulation training, RICE, and range of motion as initiated in Stage I.

Movement 

Regaining range of motion (ROM) is one of the primary goals with TKA rehabilitation.  Knee extension (straightening) and knee flexion (bending) must be regained as quickly as possible.  There is a limited window of time that ROM must be restored.  Aim for full recovery of ROM within the first six to eight weeks (if not sooner).

SeatedKneeExtensionStretch

Regaining both full knee extension and flexion are critical to long term success.  Once you regain full ROM, you must maintain it throughout the process.  Movement helps tissues receive the needed nutrients and can help with pain management.  Movement, including frequent toe tapping and ankle motion along with knee ROM, can also help to reduce swelling and prevents blood clots.

If the patient doesn’t regain adequate motion through the rehabilitation process, I find that knee pain usually remains a long term issue along with poor mobility.  The goal for TKA ROM is usually 0-120 degrees of motion.  (Zero meaning that the knee is perfectly straight.  The 120 degrees is how far backward you can bend the knee.)  For a point of reference, touching your heel to your buttock is usually about 150 degrees of motion.  Your knee will not have the same available ROM as a healthy knee joint, but it will be functional for most tasks.

Restoring full ROM can be accomplished in many ways.  The gentlest way is to perform heel slides by lying on your back and sliding your heel toward your buttock (as demonstrated in Total Knee Replacement Rehabilitation Exercises).  A stationary bicycle is also very helpful.  These exercises should be performed within a mild to moderate amount of pain and discomfort.  Although ROM exercises can be a little painful, they don’t damage the new joint and ultimately, the ROM will help to decrease pain.

Ambulation

In most cases, your initial ambulation will require an assistive device such as a front wheeled walker (FWW), crutches or a cane for safety and pain relief. Initially, the knee motion will be limited. Pain and swelling will affect the strength of the leg. This means that the leg could have a tendency to give way or be unsteady. This should improve quickly over the first several days, but I always recommend an assistive device initially.

Son with Elderly Father

Walking with an assistive device also gives you the opportunity to walk with a normal gait pattern which will help improve your knee’s range of motion and aid in your recovery. Your physical therapist will work with you to help restore as normal and safe a gait pattern as possible. It is common to feel or even hear clicking during ambulation and movement due to the plastic and metal components. This is normal (particularly, early in your rehabilitation when the knee is swollen and ROM remains restricted).

Strengthening

Increasing your leg strength is an important part of your recovery, but it will not necessarily be an initial focus of your recovery. The primary goals for rehabilitation initially involve proper ambulation, reducing the swelling, pain relief, and range of motion for your knee.   Adequate strength throughout the lower extremity is important. The primary focus will be on quadriceps strengthening and hip abduction (gluteus medius) strengthening. These two muscle groups tend to be the most important in regaining full functional mobility after TKA.

Stage III Rehabilitation

Similar to Stage II, rehabilitation in Stage III continues to focus on range of motion (ROM).  At this point, you would typically ride a stationary bike regularly while working to maintain full ROM (0-120 degrees).  Movement helps tissues receive the needed nutrients and can help with pain management.  Movement also reduces swelling and prevents blood clots.  This stage is typically eight to twelve weeks after the operation.

The Stage III exercise program (as demonstrated in Total Knee Replacement Rehabilitation Exercises) is designed to improve strength of the entire lower extremity while still focusing on quadriceps and gluteus medius (hip abduction) strength.  Balance and gait drills are typically introduced.  The goal is to ambulate without any noticeable abnormalities from the TKA and to reduce the risk of falls (particularly if you’re no longer using an assistive device).

During Stage III rehabilitation, I would generally expect that you have proper pain management without the use of narcotic medications.  Mobility for basic daily tasks is usually quite good and the intensity of the rehabilitation has increased.  In this stage, you’re working hard on self-rehabilitation and may be continuing formal rehabilitation in an outpatient physical therapy clinic.

Stage IV Rehabilitation

Stage IV usually occurs four to nine months after the operation.  Exercises should be designed to help maximize your mobility and desired mobility outcome/goal.  Increased exercise intensity and more dynamic balance training are introduced.  A return to full functional mobility is the desired outcome.  In this stage, a majority of the exercises are performed independently.  You may intermittently consult with a physical therapist to progress in rehabilitation to insure that you’re meeting your goals.

Each person’s rehabilitation process is likely to vary depending on his/her particular needs. Always be open and honest with the medical professionals who are assisting you. If you feel as though something is not quite right, don’t hesitate in discussing the issue.

During your recovery, don’t forget the basics! Proper hydration and consuming nutrient dense food is critical to providing your body with the necessary building blocks to optimize your recovery. Proper hydration is critical in reducing your risk of blood clots.  It also helps the body to deliver much needed hydration and nutrients to your healing tissues.

Physical therapy will be an important component to your recovery and rehabilitation.  If you don’t already have a physical therapist that you are comfortable working with, The American Physical Therapy Association offers a wonderful resource to help find one in your area.  Depending on how you progress during your rehabilitation, you will likely work with multiple physical therapists while at the acute care or rehabilitation hospital, during in-home care, and/or at an outpatient clinic.

Thank you, Judy, for your question.  Good luck with your procedure!  I hope your rehabilitation for your knee goes smoothly and that you recover quickly!

Have you undergone a total knee arthroplasty (TKA)?  What was your experience like?  Please share your best tips for recovery.

If you have a question that you would like featured in an upcoming blog post, please comment below or submit your question to contact@thePhysicalTherapyAdvisor.com.  Be sure to join our growing community on Facebook by liking The Physical Therapy Advisor!

Disclaimer:  The Physical Therapy Advisor blog is for general informational purposes only and does not constitute the practice of medicine or other professional health care services, including the giving of medical advice.  No health care provider/patient relationship is formed.  The use of information on this blog or materials linked from this blog is at your own risk.  The content of this blog is not intended to be a substitute for professional medical advice, diagnosis, or treatment.  Do not disregard, or delay in obtaining, medical advice for any medical condition you may have.  Please seek the assistance of your health care professionals for any such conditions.

Q & A: My Top 5 Tips on How to Self-Treat Osgood-Schlatter Disease

Q.  For the past several months, my 12 year old son has been experiencing pain below his knee cap just to the top of his shinbone. He typically experiences pain when playing soccer or other sports.  The pain goes away when he rests.  It’s getting to the point that it’s hard for him to participate in sports.  He hasn’t had any injuries.  What do you recommend? -Chandra

A.  Thanks for your question, Chandra. I’m sorry to hear about your son’s knee pain.  Unfortunately, it’s a common problem in children (particularly, boys).  The symptoms that you are describing sound like Osgood-Schlatter disease although other potential causes could be Patellar Tendinitis or Patellar Femoral Pain Syndrome. Due to his age, gender, and activity level, it’s most likely Osgood-Schlatter disease.

Osgood-Schlatter disease (OS) is an overuse injury with pain located just below the knee where the patellar tendon ends (inserts) on the Tibial tuberosity. A boney nob may start to develop in this area and usually occurs as the condition progresses.  This occurs due to the excessive stress on the skeletal system during a period of rapid growing combined with stress from activity of the quadriceps muscle pulling on the patellar tendon at its insertion site on the bone.  If a bump forms, don’t worry as it is benign with OS.  It will likely continue to be there as your child ages.  There are typically no long term effects for this condition except for pain over the raised area of bone when kneeling on a hard surface.

OsgoodSchlatter_TibialTuberosity

Risk Factors for Osgood-Schlatter disease include:

  • Boys who are 11-13 years old.
  • Period of rapid skeletal growth.
  • Adolescents who regularly participate in running, jumping, and sports with many cutting or rapid changes in direction.

Symptoms for Osgood-Schlatter disease include:

  • Pain and possible swelling below the knee located near the top of the shinbone.
  • A bump or boney growth on the front of the upper shin at the Tibial tuberosity that is typically painful to touch.
  • Pain with running, jumping, and cutting sports.
  • Decreased pain or no pain at rest.
  • Possible loss of knee range of motion, typically flexion.
  • Possible pain and tightness with quadriceps stretching due to the pull on the patellar tendon.
  • Loss of quadriceps strength which mostly due to pain inhibiting its use.
  • Painful kneeling.

OS typically begins with mild soreness. The condition is typically self-limiting because of pain.  Continuing to push through the pain can cause significant long-lasting pain resulting in limited function.  Early intervention is usually very helpful.

My Top 5 Tips on How to Self-Treat Osgood-Schlatter Disease:

RICE

RICE, which stands for Rest, Ice, Compression, and Elevation.

Rest. In this case, rest would indicate tapering down from your regular exercise activity or any activity that involves running and jumping or that is causing knee pain.

Ice. Apply ice to the painful area–typically the sooner, the better. The rule for icing is to apply ice no more than twenty minutes per hour. Do not place the ice directly against the skin, especially if you are using a gel pack style.  A bag of frozen peas can be ideal.  Individuals with poor circulation or impaired sensation should take particular care when icing.

Compression helps to prevent and decrease swelling. Swelling can cause increased pain and slow the healing response, so limit it as much as possible.  You can utilize a common ACE wrap.  If you have a friend who is medically trained, many different taping techniques can also assist in decreasing swelling.  You may also consider a compression sleeve or garment.

Elevation. If there is swelling, then elevating the leg may be helpful.

If it hurts, don’t do it!

Modify the activity or discontinue it completely. If your knee is hurting when performing your sport or activity whether you are running, jumping or even weight lifting, then discontinue the activity temporarily.  If you are able to modify and perform the exercise or activity pain free, it would be okay to continue in most cases.

Improve your range of motion (ROM).

The primary goal of a rehabilitation program is to regain full pain free ROM for knee flexion (bending) and extension (straightening). This can be accomplished in many ways.  Perform heel slides by lying on your back and sliding your heel toward your buttocks.  Consider using a pole to assist in performing deeps squats.  Another stretch would be to hang onto a pole or a doorframe, and bring your heel toward your buttocks as you perform a quadriceps stretch.

These exercises should only be performed within a mild to moderate amount of discomfort in order to regain full pain free ROM. If you experience muscle tightness and soreness, I recommend using a foam roller to assist with any myofascial symptoms.  To learn how to use a foam roller, please refer to Foam Rolling for Rehabilitation.

Work on strengthening.

The primary goal of a strengthening program is to work on the quadriceps and glutes medius (hip abduction). Weight lifting is an appropriate choice, but you may have to initially limit your range of motion (ROM).  Most of my clients begin on a non-weight bearing program, then progress to partial weight bearing, and eventually, full weight bearing.  The more severe the symptoms, the longer it will take for an individual to progress to more difficult exercises or to increase the resistance (load).

To initiate a physical therapy program, please refer to Osgood-Schlatter Disease Rehabilitation Exercises.  This exercise guide is designed to address the muscles that I find to be the weakest in most individuals.  The exercises are listed from easiest to most challenging and are designed to primarily improve quadriceps and hip strengthening.  Initially, focus on full ROM.

Weight training exercises (with machine weights or free weights) should be geared toward general leg strengthening and may include: squats; leg press; hip abduction machine; step ups; dead lifts; and straight leg dead lifts. If further instruction is needed, search YouTube to watch the proper technique for a specific exercise.  Do not perform any seated knee extension exercises.

Kinesiological taping.

Besides pain relief, the purpose of Kinesiological tape is to provide compression over the Tibial tuberosity and to facilitate additional blood flow to the area. It also provides proprioceptive input which can help the knee during activity.  I have had luck using Kinesio Tape, Rock Tape, and Mummy Tape brands. There are many other useful taping techniques which utilize different forms of tape.  (You could also utilize Spider tape or KT TAPE.) To visually learn how to apply the tape, please refer to Kinesiological Taping for Osgood-Schlatter Disease.  For application and removal tips, please refer to Skin Care with Taping.

How to Prevent Osgood-Schlatter Disease:

Be sure to schedule rest between athletic seasons, athletic events, and higher volume training periods. Rest is a critical factor as an adolescent’s body undergoes physical changes.  OS is typically associated with overtraining/overuse in combination with a rapidly growing skeletal system.  There are times when an adolescent needs to rest.  It’s important not to encourage an adolescent to play sports through the pain without adequate recovery, rest, and if necessary, an evaluation by a qualified physical therapist or physician.

As part of a prevention and cross training strategy, implement the exercises demonstrated in the Osgood-Schlatter Disease Rehabilitation Exercises.  A proper warm up and cool down is critical when performing in an athletic event or a significant training session.

  • Warm up prior to exercise. I recommend that you increase your normal warm up time by at least 10 minutes in order to increase blood flow to the area. This allows better mobility and also promotes healing as movement is necessary to bring in the nutrients. Use a stationary bike or the rower machine initially to get the muscles warm and the knee joint more lubricated. Then work on moving into a deep squat position multiple times as part of the warm up. You may need to hang onto a beam or a pole to take some pressure off of your knee as you move in and out of the squat.
  • Cool down. After performing your exercises, take extra time to cool down and stretch. Use either a stationary bike (at a causal/slower pace) or the rower machine. Both are reduced weight bearing exercises that promote movement and circulation to the knee as well as increasing ROM. This is the perfect time to work through my recommended rehabilitation exercises.

Thank you, Chandra, for your question! I hope these tips will help you assist your son in his recovery and get him back to playing sports as quickly as he is able to without pain!  If the pain continues, please seek additional assistance from a qualified physical therapist or physician.  The American Physical Therapy Association offers a wonderful resource to help find a physical therapist in your area.

Do you know an adolescent who may be suffering from Osgood-Schlatter disease? If so, please share my recommendations on how to address this common and treatable condition.

If you have a question that you would like featured in an upcoming blog post, please comment below or submit your question to contact@thePhysicalTherapyAdvisor.com. Be sure to join our growing community on Facebook by liking The Physical Therapy Advisor!

Disclaimer:  The Physical Therapy Advisor blog is for general informational purposes only and does not constitute the practice of medicine or other professional health care services, including the giving of medical advice. No health care provider/patient relationship is formed.  The use of information on this blog or materials linked from this blog is at your own risk.  The content of this blog is not intended to be a substitute for professional medical advice, diagnosis, or treatment.  Do not disregard, or delay in obtaining, medical advice for any medical condition you may have.  Please seek the assistance of your health care professionals for any such conditions.

Exercise is an Effective Treatment for Knee Arthritis Pain

Knee osteoarthritis (OA) causes chronic pain, reduces physical function, and diminishes quality of life. Obesity, prior injury, and increasing age are among the risk factors for knee OA, which is more common in women. Typical treatments for knee OA include total joint replacement and exercise. Medication management may include oral anti-inflammatory use, cortisone injection, and supplementation with glucosamine and chondroitin.

A recent meta-analysis of 54 randomized control studies, published in Cochrane Database (January 2015), concluded that therapeutic exercise provides a 2-6 month benefit even after cessation of the exercise program. This benefit is comparable to the use of non-steroidal anti-inflammatory drugs without the side effect risk from drugs. The study concluded that exercise is just as effective in treating knee OA pain as anti-inflammatory medication.

This most recent study looked at 2-6 month benefit when performing exercise. It is reasonable to conclude that long term therapeutic exercise continues to have a positive effect in pain management and functional loss well beyond the 2-6 month time frame. Performing therapeutic exercises improves physical function and alleviates pain levels with little risk. When properly performed, exercise doesn’t significantly increase the risk of further damage or deterioration in OA (or in most other forms of arthritis).

The study also indicated that individually tailored exercise programs tend to result in a greater reduction in pain as well as improvement in physical function. If you suffer from knee OA, initiating a therapeutic exercise program could be the best long term solution in managing the condition while maintaining function and quality of life.  A thorough therapeutic exercise program should include cardiovascular exercise, flexibility training, balance activities, and strength training. Seek guidance from a physical therapist, who can design an individually tailored exercise program to meet your specific needs.

Possible options for cardiovascular exercise include bicycling, rowing, and the elliptical machine. Less impact options include swimming and pool-based exercise programs. Exercise studies indicate the effectiveness of aquatic-based programs in reducing knee pain while improving general functional mobility. Performing a long term aquatic exercise program can be highly effective for managing knee OA symptoms. To insure maximal strength gains and carry over in functional mobility tasks (such as going up and down stairs, up and down curbs, and navigating uneven terrain), also incorporate a land-based program.Image courtesy of Pond5Flexibility is an important component in managing knee OA pain. The goal should be to maintain full knee range of motion (ROM) with both extension (straightening) and flexion (bending). A joint should be moved through its full available ROM daily to remain healthy. Activities such as aquatic exercise, cycling, yoga, and flexibility classes are ideal for maintaining ROM.

Balance is an important component to maintaining functional mobility and limiting pain in the knee. Performing therapeutic exercises and weight training will help you to maintain your balance. Additional balancing activities should be performed to insure safe mobility and to reduce the risk of falling. Activities, such as yoga and Tai Chi, have excellent research demonstrating their effectiveness. Practice standing on one foot (near a counter top for support, if needed). It is an easy and effective method to maintain single leg balance which is critical for going up or down stairs and sidewalk curbs.

IMG_4793_RGB_4x6

Strength training programs should include closed chain exercises. Closed chain exercises are closely related to functional movements and tend to cause less strain on your body tissues and joint surfaces. Squats, lunges, and bridging are examples of closed chain exercises. The bridge exercise involves lying flat on your back and raising your pelvis up into the air.

There are many variations of the squat. Perform sit to stands from a chair. If this is difficult, start with using your hands, but eventually you shouldn’t need to use them. Use a standard height chair and see how many sit to stands you can perform in 30 seconds.

For another squat variation, perform wall squats.  Stand with your pelvis, back, and head touching a wall.  Your feet will be approximately hip width apart and far enough out from the wall.  When you slide down, your knees will make a 90 degree angle.  From your starting position, slowly lower your body down and hold for time.  As you improve, lengthen the amount of time you hold the wall squat.  (Another variation is to place an exercise band around your thighs above your knees.  It will help to increase the activation of the hip muscles.)

Wall Squat

To maintain physical function and quality of life, a therapeutic exercise program (including cardiovascular, flexibility, balance, and strength training) may be the best long term solution for managing knee OA pain. Be certain to perform a thorough warm up and cool down before and after each exercise session. Focus on maintaining your ROM. If it hurts, modify or discontinue the activity, and refer to your physical therapist.

How do you incorporate cardiovascular exercise, flexibility training, balance activities, and strength training into your therapeutic exercise program? Please leave your comments below.

If you have a question that you would like featured in an upcoming blog post, please comment below or submit your question to contact@thePhysicalTherapyAdvisor.com.  Be sure to join our growing community on Facebook by liking The Physical Therapy Advisor!

(This article first appeared in the Seniors Blue Book, April-September 2015, pages 106 and 107).

Q & A: Is Weight Training Safe for Children?

Q.  My son is 11 years old and wants to start lifting weights with me. Is it safe for him to do this at such a young age?  -Matt

A.  Great question, Matt! I believe weight training and activity in general should be encouraged in whatever form the child prefers.  Research regarding the effects of heavy weight training or high intensity training in younger children continues to evolve.  The long standing belief that weight lifting will stunt a child’s growth has never been proven.  In fact, current research indicates that weight lifting may actual help to increase a child’s growth rate.  This may be due to hormonal improvements or actual physical stress (in response to the training) on the child’s body.  Most likely, the positive effect on growth rate is due to a combination of both factors.

When addressing weight training, keep in mind that children’s physical, mental, and emotional development will vary widely and is not necessarily correlated to their chronological age.  Most children will have varying degrees of muscle strength and asymmetry in that strength as they grow and develop.  Encouraging activity and exercise is a critical component to how the child will ultimately develop.  When choosing which type of activity and exercise is appropriate for a child, his/her physical, mental, and emotional development need to be considered.

Physiological considerations include:

  • Growth Plates. The epiphyseal plate (growth plate), which is a cartilaginous plate at each end of a long bone, in children typically closes between 18-25 years old. It is most active when the child is younger. There is no evidence that weight lifting will negatively affect the growth plates. The question that research has failed to answer is: How much stress and strain is too much? A child’s boney structure is not the same as that of an adult. Lifting excessively heavy loads with poor technique could cause damage to these growth plates. In order to insure your child’s safety and limit the risk of injury, his/her weight lifting schedule or program should not be the same as that of an adult.
  • Muscle Strength. Adolescent muscle development will vary widely. It’s highly dependent on proper hormonal balance. Most children don’t have the proper hormonal balance to develop muscle like an adult. Therefore, a child should not be trained as an adult.

Weight training can be appropriate at a young age.  Focus on learning the techniques while developing proper motor patterns and motor control (particularly, if he/she is performing advanced activities such as Olympic weight lifting).  Children’s growth and development tends to occur in spurts.  They often have evolving issues with muscle tightness and asymmetric muscle development.  A weight lifting program that stresses proper movement patterns and full range of motion (ROM) is an excellent method to help insure proper muscle development.  Weight lifting is just one of many training activities for a child.  I highly encourage children to participate in many different activities in order to develop a wide physiological and neurological baseline.

Alexis_Squat

Consider the following when designing a training program for your child:

  • Keep it fun! This is your child’s time to learn and have fun. There is no need to push heavy weights on his/her young body. However, it’s perfectly acceptable to progress strength gains when he/she is able.
  • Develop proper motor programs. Focus on optimizing patterns and mobility. A weight lifting program that stresses proper movement patterns and full range of motion (ROM) is an excellent method to help insure proper muscle development.
  • Encourage variety. For other strength development and motor program development options, encourage body weight exercises such as the TRX system. A CrossFit class, designed specifically for kids, may also be fun option.
  • Proper programming. A child should not be trained as an adult. The exercise programming should be tailored to your child. I recommend an emphasis on technique and a slower progression of resistance and load compared to that of an adult. For young children, double the time it takes for an adult to progress the load. Physical ability will widely vary in the teenage years. Focus on form and technique while developing proper movement patterns. Encourage participation in many different activities in order to develop a wide physiological and neurological baseline. Training volume should be less than an adult.

If your child is experiencing pain or you suspect a developing problem, consult your pediatric physician or a qualified physical therapist about your concerns.  I would also caution you that many pediatric physicians may not be too keen on the idea of weight training in pre-teen children.  Seek a physician who is open to the idea and can work with you and your child to insure optimal health.

As parents, we want to encourage activity and exercise while instilling a life time love of exercise in all of its many forms.  When weight training at a young age, focus on proper ROM and symmetrical strength development.  Thanks, Matt, for the question!

Does your child lift weights and/or participate in sports such as CrossFit?  Why or why not?  Please share your thoughts below.

If you have a question that you would like featured in an upcoming blog post, please comment below or submit your question to contact@thePhysicalTherapyAdvisor.com. Be sure to join our growing community on Facebook by liking The Physical Therapy Advisor!

Disclaimer:  The Physical Therapy Advisor blog is for general informational purposes only and does not constitute the practice of medicine or other professional health care services, including the giving of medical advice.  No health care provider/patient relationship is formed.  The use of information on this blog or materials linked from this blog is at your own risk.  The content of this blog is not intended to be a substitute for professional medical advice, diagnosis, or treatment.  Do not disregard, or delay in obtaining, medical advice for any medical condition you may have.  Please seek the assistance of your health care professionals for any such conditions.

14 Tips and Strategies to Self-Treat Muscle Pain

Muscle pain is common and often occurs after exercise or activity.  Although the pain is uncomfortable, most types of muscle pain are benign and quickly pass.  Muscle aches and pains can affect your ability to compete or train at a high level.  It also can affect your sleep and mood.  Discover the possible causes of muscle pain as well as prevention and treatment strategies.

Possible Causes of Muscle Pain include:

  • Delayed Onset Muscle Soreness (DOMS). This soreness typically occurs 24-48 hours after an exercise session due to micro trauma within the muscle tissue. It tends to be worse after eccentric biased exercise where the muscle is lengthened.
  • Muscle Strain. If you strain your muscle either by over lengthening or over exerting the muscle capacity, muscle tearing may occur. Depending on the size and location of the tear, it may range from minor to severe (potentially needing surgical intervention).
  • Myofascial Issues. Layers of the myofascia (the dense, tough tissue which surrounds and covers all of your muscles and bones) may become bunched or knotted up and result in pain. This is typically due to poor posture, repetitive motion injuries or over exertion.
  • Neurological Issues. Many neurological disorders, including pinched nerves, can cause pain. Other medical conditions, such as muscular dystrophy, cause muscle dystonia.
  • Illness. Muscle pain can occur as a symptom in colds, flu, Rocky Mountain Spotted Fever, and other viral or bacterial infections.
  • Disease. Many diseases, such as Polio, Lupus, and Lyme’s Disease, cause muscle pain.
  • Medications. Certain medications, such as statin drugs for cholesterol, have been strongly associated with muscle pain.
  • Fibromyalgia. This condition causes muscle pain, joint pain, and extreme fatigue.
  • Rhabdomyolysis. A serious condition, due to either direct or indirect muscle trauma, which causes pain. It can be life threating due to the potential for kidney failure. Common causes include extreme exercise, statin medication, severe injury or illicit drug use.
  • Compartment Syndrome. A serious condition in which excessive swelling and pressure build up in a confined space. It leads to extreme muscle pain and eventually, numbness and tissue death.

This list highlights some of the many potential causes of muscle pain.  Many are benign while others are true medical emergencies.  The most common reasons include: delayed onset muscle soreness (DOMS); muscle strains; myofascial related issues due to posture and/or repetitive motion injuries; and fibromyalgia.

In order to properly treat muscle pain, first identify the cause of your muscle pain.  Can you correlate the symptoms with a certain activity or exercise?  Are you suffering from a cold or flu like symptoms?  If you are unable to correlate a reason for the pain, then you may consider consulting with your medical physician to rule out other possible causes for muscle pain.

Young man experiencing neck pain against a white background

The following tips and strategies to treat muscle soreness specifically address mechanical causes related to DOMS, minor muscle strains, and myofascial issues.  Many of these strategies are also appropriate in helping to manage fibromyalgia symptoms.

14 Tips and Strategies to Self-Treat Muscle Pain: 

  1. Fix Your Posture. Poor posture is one of the most common causes of muscle spasming and pain. This is particularly true if you spend a good portion of your day sitting. Sign up to receive my weekly blog posts via e-mail, and I will share with you My Top 8 Stretches to Eliminate Neck, Upper Back, and Shoulder Pain. These simple exercises, with complete instructions and photos, will help you to improve poor posture and can be performed at home.
  2. Massage. Contact a masseuse, physical therapist, athletic trainer or friend who is skillful in body work and massage to relieve the area in spasm. The specific massage technique to use will vary according to your preference. Massage techniques range from a light relaxing massage to a deep tissue massage or utilization of acupressure points.
  3. Foam Roller. The foam roller allows you to perform self-massage and tissue mobilization. The foam roller is a wonderful tool to prevent muscle cramping and spasms. Please refer to the following posts for more information: Foam Rolling For Rehabilitation and 5 Ways to Improve Range-Of-Motion. I highly recommend a High Density Foam Roller to help aid in your recovery.
  4. Other Self-Mobilization Tools. Many times, a friend or masseuse isn’t available to assist when you need the help the most. A foam roller cannot effective reach places in the upper back or arms, so other self-mobilization tools may be necessary. You can get creative and use a tennis ball or golf ball, but I like a specific tool called a Thera Cane Massager. This tool allows you to apply direct pressure to a spasming muscle. When held for a long enough period of time, the Thera Cane Massager will usually cause the muscle spasms to release and provide much needed pain relief! I am also a big fan of the Thera-Band Standard Roller Massager. I particularly like that its firmness allows for a deep amount of pressure. If you prefer something similar, but more flexible for the boney regions of the thigh or lower leg, I recommend The Stick Self Roller Massager.
  5. Topical Agents. Many topical agents can help to decrease and eliminate muscle spasms. The method of action varies greatly according to the product used. You may find that one product works better than another. Some of my favorite products in my medicine cabinet include: Biofreeze Pain Relieving Gel; Arnica Rub (Arnica Montana, an herbal rub); and topical magnesium.
  6. Magnesium Bath. The combination of warm water with magnesium is very soothing and relaxing. Magnesium is known to help decrease muscle pain and soreness. Options include: Epsoak Epson Salt or Ancient Minerals Magnesium Bath Flakes. I find that the magnesium flakes work better, but they are significantly more expensive than Epson salt.
  7. Oral Magnesium. You can take Mag Glycinate in pill form or by eating foods higher in magnesium such as spinach, artichokes, and dates. Taking additional magnesium (particularly at night) can help to reduce muscle cramps and spasming. It is also very helpful in reducing overall muscle soreness and aiding in a better night’s rest. Most people are deficient in the amount of magnesium they consume on a regular basis. I recommend beginning with a dose of 200 mg (before bedtime) and increasing the dose as needed. I would caution you that taking too much magnesium can lead to diarrhea. Mag Glycinate in its oral form is the most highly absorbable. Although not as absorbable, Thorne Research Magnesium Citrate and magnesium oxide can also be beneficial.
  8. Stay Hydrated. The human body is primarily made of water, which is critical for all body functions. Your muscles are approximately 80% water. Dehydrated tissues are prone to injury and pain as they struggle to gain needed nutrients to heal and repair. Dehydrated tissues are less flexible and tend to accumulate waste products. Stay hydrated by drinking water. Try to avoid beverages that contain artificial sweeteners or chemicals with names you can’t spell or pronounce.
  9. Eat Healthy. A healthy diet is critical to avoid injury, illness, and pain. Your body tissue needs nutrients to be able to perform at a high level. Avoid processed food as much as possible. Limit sugary food and add more protein and healthy fat in your diet. Maintaining a diet with adequate healthy fats is essential in providing the nutrients to support all hormone function in the body as well as support the brain and nervous system. Adequate protein intake is necessary to support muscle health and development. Give your body the needed nutrients to combat illness and function at a high level.
  10. Move More! Not only has research proven that sitting for more than two hours at a time decreases your expected life span, but extended sitting also leads to increased muscle tension, cramping, and pain. If you sit most of the day, get up and walk. If you stand most of the day, frequently change your standing posture. To optimize health and joint function, you should take each joint in your body through a least one full range of motion (ROM) every day. If you are experiencing pain, I recommend performing more frequent ROM (every 1-2 hours).
  11. Stretch. Stretching is a wonderful way to help eliminate a muscle spasm. We instinctively stretch when we feel a spasm begin. Try gently stretching (lengthening) the muscle affected by the spasm. I recommend beginning with a short 30-60 seconds stretch, then repeating as needed. If the spasm or cramp is severe, you will likely need to continue stretching several times in a row, multiple times throughout the day. Stretching should always be part of a general fitness and lifestyle program. As we age, muscle and tendons tend to lose elasticity so stretching becomes even more important. I highly recommend a daily stretching routine or participation in a group class, such as yoga, which incorporates full body stretching.
  12. Acupuncture. I am personally a big fan of acupuncture. It is very useful in treating all kinds of medical conditions. It can be particularly effective in treating muscle cramps, spasms, and pain as it addresses the issues on multiple layers. Acupuncture directly stimulates the muscle by affecting the nervous system response to the muscle while producing a general sense of well-being and relaxation.
  13. Sleep and Rest More. Most people are not sleeping long enough or often enough to optimize health. Take a nap or go to bed earlier. Your body requires time to repair and heal as you sleep. Your body must rest in order to grow and develop. Training every day is not the best way to improve. It can lead to injury and burn out. Take a rest day and have fun. Participate in a Tai Chi or yoga class, take a leisurely bike ride or take a walk in the park.
  14. Speak with your Physical Therapist (PT) or Physician (MD). If your muscle pain cannot be correlated to a specific mechanical cause, please speak to your medical provider to determine if other causes are contributing to the problem. The American Physical Therapy Association (APTA) offers a wonderful resource to help find a physical therapist in your area. In most states, you can seek physical therapy advice without a medical doctor’s referral (although it may be a good idea to hear your physician’s opinion as well).

Most muscle pain and soreness can be self-managed and self-treated if you are proactive.  These tips and strategies are highly effective in managing muscle pain.  A healthy lifestyle is a lifelong pursuit.  If you are injured or not enjoying an activity, you will not stay engaged or motivated in the long term.  Seeking advice specifically from a running coach, physical therapist or physician can be beneficial.

How do you manage your aches and pains?  Which tip or strategy will you incorporate into your treatment?  Please leave your comments below.

If you have a question that you would like featured in an upcoming blog post, please comment below or submit your question to contact@thePhysicalTherapyAdvisor.com. Be sure to join our growing community on Facebook by liking The Physical Therapy Advisor!

Disclaimer:  The Physical Therapy Advisor blog is for general informational purposes only and does not constitute the practice of medicine or other professional health care services, including the giving of medical advice.  No health care provider/patient relationship is formed.  The use of information on this blog or materials linked from this blog is at your own risk.  The content of this blog is not intended to be a substitute for professional medical advice, diagnosis, or treatment.  Do not disregard, or delay in obtaining, medical advice for any medical condition you may have.  Please seek the assistance of your health care professionals for any such conditions.

Q & A: How to Self-Treat a Baker’s Cyst

Q.  My knee started hurting about two weeks ago. I have noticed swelling in the back of my knee.  It’s painful when I bend or straighten the knee.  I looked up the symptoms on WebMD.  I think I might have a Baker’s cyst, but I’m not sure what to do now.  Your insight would be appreciated, thanks!  –Patti

A.  Great question, Patti! The symptoms you are describing sound like they may be caused by a Baker’s cyst.  Another common diagnosis with similar symptoms would be a meniscus injury.  I recommend that you read my previous post on meniscus pain, Q & A: 7 Tips to Get Rid of Knee Pain.  Much of the advice will carry over to either condition.

A Baker’s cyst, also known as a popliteal cyst, is a fluid-filled sack that forms in the back of the knee.  Synovial fluid from inside of the knee pushes out into a fluid-filled sack in the back of the knee.  Sizes of the cysts can wildly vary as do the symptoms.  The cyst can typically best be seen when a person is standing.  It may or may not be tender to the touch.  In fact, you may or may not have any symptoms at all.

BakersCyst_Arrows

Baker’s cyst symptoms include:

  • Stiffness or tightness in the back of the knee, thigh, or upper calf.
  • Swelling noted behind the knee. If the cyst ruptures, then the swelling may be also be in the lower leg and calf area.
  • Pain is most typically described behind the knee, particularly with full flexion (bending) or extension (straightening). A person may also experience pain in the upper calf or back of the thigh.
  • Another common complaint is pain when sitting due to the chair touching or rubbing the area behind the knee (known as the popliteal space).

It is not always entirely known why a Baker’s cyst will develop.  In my clinical experience, I have seen them form for the following reasons:

  • Rheumatoid arthritis (RA)
  • Osteoarthritis (OA)
  • Recent knee injury or post knee surgery
  • Poor lower leg biomechanics, which can lead to other forms of knee pain in addition to a Baker’s cyst.

Baker’s cysts should be diagnosed by a medical doctor.  Medical treatment of the cysts usually involves a course of anti-inflammatory medication (orally), a cortisone injection, aspiration of the fluid by utilizing a needle, and/or surgical removal.  The good news is that often a Baker’s cyst will typically resolve on its own if you just give it time.  Rest and treat any symptoms you may be experiencing.

Physical therapy may also be indicated, particularly if the cyst formed due to osteoarthritis pain, recent knee injury/trauma/surgery, or due to poor lower extremity biomechanics.  In most cases, I have witnessed Baker’s cysts successfully and conservatively treated by both a physical therapist and a medical physician who are working together to address the issue.

The rehabilitation for a Baker’s cyst is very similar process to treating meniscus pain.  The following 10 tips will help you to rehabilitate your knee.  You should experience improvement of your symptoms within in a few of weeks or less when initiating this program.  Depending on the severity, it could take longer for a full recovery.  If your pain continues or worsens, then additional assessment and follow up is likely needed.

10 Tips on How to Self-Treat a Baker’s Cyst:

1.  Rest. Initially, take extra time to rest the painful area. The pain and swelling has likely worsened due to a change in activity level.  If the pain is more severe, you may choose to use a cane or a crutch initially to take weight off of the knee.

2.  Ice. Apply ice to the knee and behind the knee in particular. The rule of thumb is to ice no more than 20 minutes per hour.  Do not place the ice directly against the skin especially if you are using a gel pack style Cold Pack.  Individuals with poor circulation or impaired sensation should take particular care when icing.  A bag of frozen peas can be ideal in this situation.

3.  Compression. Compression helps to prevent and decrease swelling. Swelling can cause increased pain and slow the healing response.  Limit it as much as possible.  You could utilize a common ACE bandage wrap or you could purchase a pair of mild over-the-counter compression socks.  If you utilize a compression sock, it will need to be at least thigh high like these Jobst Relief Therapeutic Thigh High StockingsDo not use a knee high version–you may make the swelling and pain worse.  Do not apply any compression too tightly as it could cause numbness or tingling in the leg, foot, or toes.

4.  Taping Techniques. Kinesiological style taping has been proven to be effective in reducing inflammation. Due to the location of the swelling, you will need help from someone trained in the specific style of kinesiological taping.  Many physical therapists (PTs), athletic trainers (ATCs), or chiropractors have training in these techniques.  Learn How to apply Kinesiology Tape for a swollen (edema) Knee Joint by watching this YouTube video that demonstrates the proper technique.  (However, the taping would be on the back side of the knee, not on the front as shown.)  I have had luck using the KT TAPE, RockTape Kinesiology Tape, and Mummy Tape brands.  The technique is fairly basic, so your spouse or a friend may be able to apply it for you.

5.  If it hurts, don’t do it! Modify the activity or discontinue it completely. If your knee is hurting when performing a squat, then initially don’t move as deep into the exercise.  This would also be true for a lunge position or step up.  Modify any exercise as you need to, and don’t compromise technique to complete an exercise.  Poor technique will only increase your risk of injury elsewhere or make the knee more painful and irritated.

6.  Warm up prior to exercise. I recommend that you increase your normal warm up time by at least 10 minutes in order to increase blood flow to the area. This allows for better mobility and also promotes healing as movement is necessary to bring in the nutrients.  Use a stationary bike or the rower machine initially to get the muscles warm and the knee joint more lubricated.

7.  Improve your Range of Motion (ROM). The goal of the rehabilitation program is to regain full pain free ROM. This can be accomplished many ways.  Perform heel slides by lying on your back and sliding your heel toward your buttocks.  Riding the stationary bicycle can be helpful, too.  Remember, the major goal is to regain full pain free ROM.  If you experience muscle tightness and soreness, I recommend using a foam roller to assist with any myofascial symptoms.  To learn how to use a foam roller, please refer to Foam Rolling for Rehabilitation. Do not use the foam roller directly behind the knee.

8.  Work on strengthening. The primary goal of a strengthening program is to work on quadriceps and glut medius (hip abduction) strengthening. These areas are commonly weak which can lead to poor knee biomechanics and cause pain and instability.  Weight lifting is an appropriate choice, but you may have to initially limit your range of motion (ROM).  Most of my clients begin on a non-weight bearing program, then progress to partial weight bearing, and eventually, full weight bearing.  The more severe the symptoms, the longer it will take for an individual to progress to more difficult exercises.

To initiate a physical therapy program, please refer to Baker’s Cyst Rehabilitation Exercises.  This exercise guide is designed to address the muscles that I find to be the weakest in most individuals.  The exercises are listed from easiest to most challenging and are designed to primarily improve quadriceps and hip strengthening.  Start with exercises like a straight leg raise (possibly with an ankle weight) and bridging (either one or both legs).  Wall squats holding for time also works well.  A Thera-Band Exercise Band can be tied around the thighs above your knees to make your hips more engaged.

Weight training exercises (with machine weights or free weights) should be geared toward general leg strengthening and may include: squats; leg press; hip abduction machine; step ups; dead lifts; and straight leg dead lifts.  If further instruction is needed, search YouTube to watch the proper technique for a specific exercise.  If full ROM is causing an increase in your pain, then you need to stay within your pain free limit as you work on the ROM separately from weight training.

Initially, you will likely need to taper down your activities.  The speed at which exercise is performed while in group exercise classes is typically too fast for an individual who is properly and safely exercising his/her knee during a rehabilitation and recovery phase.  You can still participate in group exercise classes or CrossFit WODs (Work out of the Day), but your specific knee program should be separate from any group structured activity.  You will need to modify some of the activities performed in your structured class to avoid further pain.

9.  Cool down. After performing your exercises, take extra time to cool down and stretch. Use either a stationary bike (at a causal/slower pace) or the rower machine.  Both are reduced weight bearing exercises that promote movement and circulation to the knee as well as increasing ROM.

10.  Add a joint supplement. If you are experiencing osteoarthritis pain, you may want to consider adding a glucosamine and chondroitin supplement. CapraFlex is my preferred supplement for knee related injuries.  I have recommended this supplement for years as my clients have had successful outcomes with use.  It has also assisted me in recovery from my many injuries.  Essentially, it combines an organic glucosamine and chondroitin supplement with other natural herbs which are designed to reduce inflammation.  CapraFlex can be taken long term or intermittently to help heal from an injury.  I recommend that you try it for 30 days to see if it improves your knee pain, but do not use it in combination with other traditional anti-inflammatory medications.  If you are under the care of your physician, please inform him/her that you are taking this medication.  (If you are taking blood thinners, please consult with your physician prior to use as the herbs could interact with some medications.)

In most cases, you should expect a complete resolution of your symptoms upon completion of the rehabilitation process. To prevent the condition from re-occurring, address any ROM or mobility restrictions as well as any weak areas that are causing altered lower leg biomechanics.

If your symptoms and pain continues or worsens after two to three weeks of rehabilitation, please seek additional assistance from your physician or a qualified physical therapist.  The American Physical Therapy Association offers a wonderful resource to help find a physical therapist in your area.  In most states, you can seek physical therapy advice without a medical doctor’s referral (although it would be a good idea to seek your physician’s opinion as well).

Thank you, Patti, for your question.  I hope these 10 tips will help you to rehabilitate your knee and recover quickly!

Which treatments for knee pain are the most effective for you?  Please share any recommendations that you may have by leaving your comments below.

If you have a question that you would like featured in an upcoming blog post, please comment below or submit your question to contact@thePhysicalTherapyAdvisor.com. Be sure to join our growing community on Facebook by liking The Physical Therapy Advisor!

Disclaimer:  The Physical Therapy Advisor blog is for general informational purposes only and does not constitute the practice of medicine or other professional health care services, including the giving of medical advice.  No health care provider/patient relationship is formed.  The use of information on this blog or materials linked from this blog is at your own risk.  The content of this blog is not intended to be a substitute for professional medical advice, diagnosis, or treatment.  Do not disregard, or delay in obtaining, medical advice for any medical condition you may have.  Please seek the assistance of your health care professionals for any such conditions.

My Top 5 Most Popular Posts of 2014!

Top5Posts_Collage

For many of us, the healthcare system is too expensive or unapproachable as we try to improve our health and live life to its fullest. My desire is to provide you with useful information to achieve both objectives.  Thank you for supporting The Physical Therapy Advisor website since its launch in April. I appreciate your questions and feedback, and I look forward to serving you in 2015!

My Top 5 Most Popular Posts of 2014:

  1. My Top 7 Tips to Prevent Low Back Pain While Traveling – Low back pain is one of the most prevalent and pervasive problems in the western world. Whether you’re traveling or working in an office, review these 7 tips to prevent low back pain.
  2. 7 Reasons Why the Squat is Fundamental to Life – When was the last time you moved into a full squat? Why does it even matter? Find out 7 reasons why we should continue squatting as a lifelong pursuit.
  3. How to Self-Treat Plantar Fasciitis – Plantar fasciitis is a very painful and potentially very debilitating condition. Don’t let foot pain stop you from reaching your goals in 2015! Learn how to self-treat plantar fasciitis and prevent it from slowing you down.
  4. Q & A: How to Prevent My Mom From Falling Out of Bed – Falling is the number one cause for fracture in the elderly.  Many times, a fracture will lead to a cascading decline in mobility and function.  Finding methods to limit falling, without restraining or inhibiting important functional mobility, is critical. Discover tips to keep your loved ones safe.
  5. 5 Ways to Improve Range-Of-Motion (ROM) – As we age, we naturally lose elastin, an important component to our skin, muscles, and tendons. Elastin is responsible for the elasticity in the body’s tissues. Maintaining Range of Motion (ROM) is critical to maintaining our mobility and for injury prevention and sport performance. Poor ROM can also lead to pain and dysfunction as the body’s ability to move freely is impaired. Discover different methods to maintain your ROM and prevent injury.

2014 was a wonderful start for the blog. I look forward to empowering you to reach your optimal health in 2015! Don’t forget subscribe to my e-mail newsletter!  I will send you weekly posts on how to maximize your health, self-treat those annoying orthopaedic injuries, and gracefully age.  To thank you for subscribing, you will automatically gain access to my FREE resource, My Top 8 Stretches to Eliminate Neck, Upper Back, and Shoulder Pain.

If you have a question that you would like featured in an upcoming blog post, please comment below or submit your question to contact@thePhysicalTherapyAdvisor.com. Be sure to join our growing community on Facebook by liking The Physical Therapy Advisor!

How to Self-Treat Patellar Femoral Pain Syndrome (Runner’s Knee)

Patellar Femoral Pain Syndrome (PFPS), also known as runner’s knee, is a common running related issue.  The sooner you can manage this condition, the easier it will be to recover and eliminate future problems.  Many of my recommended exercises can be adopted as part of a cross training program to prevent PFPS.  I will address the many potential causative factors for PFPS and offer advice on how to self-treat this condition.

PFPS can be quite painful and significantly affect a person’s ability to run or move properly.  The cause of the pain is often associated with a patellar or knee cap that is tracking in the femoral groove improperly.  This can occur for many reasons, but the most common causes are:

  1. Poor quadriceps strength (particularly the inner or medial quadriceps).
  2. Poor hip abductor and/or hip external rotator strength.
  3. Improper foot biomechanics during the single leg stance phase of the gait cycle or the mid foot strike during running. The most common issue within the foot is usually overpronation (when the feet excessively roll inward and cause the knee to roll inward as well during each step). Overpronation is more common among females although males experience it as well. Women may experience overpronation due to the angle of their hips in relation to the knee. A woman’s pelvis is typically a different shape to allow for child bearing. The larger “Q-angle” associated with the hip and knee can cause increased strain on the knee.

PFPS symptoms include:

  • The pain will typically increase when going downstairs. In more severe cases, going upstairs is also very painful.
  • Pain with squats, lunges, knee extensions, or other plyometric activity.
  • Pain typically worsens with prolonged sitting. The longer you sit in one position, the worse the pain becomes.
  • Grinding, popping, and cracking are often associated symptoms.
  • Pain can be anywhere along the patella (knee cap), but it’s typically associated with anterior knee pain or medial patellar pain.

In many cases, a very thorough warm up may allow you to participate in activity.  However, the pain may worsen again later that day or the next day.  Seek help or guidance quickly when your pain worsens with activity.  For the best result, the treatment plan should be multifactorial.

How to Self-Treat PFPS:

  • Improve your quad and your hip strength. Please refer to Patellar Femoral Pain Syndrome Rehabilitation Exercises for my recommended exercise program which is designed to improve quad and hip strength. To improve your quad strength, the emphasis should be on the inner quad known as the vastus medialis oblique (VMO). Weak hip abduction and hip external (lateral) rotation muscles significantly contribute to PFPS. The purpose of the lateral and external rotators of the hip is to prevent internal rotation (rolling inward) of the hip and knee. My recommended exercise program will help to improve your strength.
  • Warm up prior to exercise. I recommend that you increase your normal warm up time by at least 10 minutes in order to increase blood flow to the area. This allows for better mobility and also promotes healing as movement is necessary to bring in the nutrients. Use a stationary bike or the rower machine initially to get the muscles warm and the knee joint more lubricated. Then work on moving into a deep squat position multiple times as part of the warm up. You may need to hang onto a beam or a pole to take some pressure off of your knee as you move in and out of the squat.
  • Cool down. After performing your exercises, take extra time to cool down and stretch. Use either a stationary bike (at a causal/slower pace) or the rower machine. Both are reduced weight bearing exercises that promote movement and circulation to the knee as well as increasing range of motion (ROM).
  • Self-Mobilize the Tissue. Myofascial release of the quadriceps muscle is an important component in order to relieve the pain and reduce the pressure and tension through the patellar femoral tendon and joint. I tend to use the foam roller for the larger part of the quadriceps. I also use a tennis or lacrosse ball to aggressively work the tissue above the patella. You can use your hand to press the ball in and work it around the tissue. To use the weight of your leg for a more aggressive mobilization, place the ball on the ground and mobilize the tissue with your leg on top of the ball.

LacrosseBallForQuad

  • Kinesiological Taping. The purpose of the tape is to assist the patella in its tracking. I have had luck using Kinesio Tape and Mummy Tape brands. There are many other useful taping techniques which utilize different forms of tape. When treating PFPS, I recommend that you apply the tape in a medial direction across the patella approximately 30 minutes prior to exercise or activity. To utilize Mummy Tape, first measure how much of the tape you intend to use. Start from the outside of the knee cap to half way around the leg minus about an inch. Cut the strip, then round the corners on the edge of the tape. This helps the tape to not catch onto clothing. Apply the tape without extra stretch to the first half of the knee cap, then apply between a 50-75% stretch for half of the tape medially toward the inside of the leg. With the last of the tape, apply without a stretch to the inner side of the leg. (You could also utilize Spider tape or KT TAPE.) To visually learn how to apply the tape, please refer to Kinesiological Taping for Patellar Femoral Pain Syndrome. For application and removal tips, please refer to Skin Care with Taping.
  • If it hurts, don’t do it! Modify the activity or discontinue it completely. If your knee is hurting when performing a squat, then initially don’t move as deep into the exercise. This would also be true for a lunge position or step up. Modify any exercise as you need to, and don’t compromise technique to complete an exercise. Poor technique will only increase your risk of injury elsewhere.
  • Have your gait analyzed while running. Check with your local running store or a physical therapy clinic for a monthly gait analysis clinic. If you’re not a runner, but you’re experiencing pain during other forms of exercise (group aerobics or CrossFit), ask your teacher or coach to analyze your movements during an exercise session. How is your foot striking the ground? Is it rolling in (landing flat footed)? Does your knee rotate inward or stay tracking in line with the foot? Ideally, the knee tracks in line with your second toe. This is important for running as well as squats, step ups, and lunges. If your foot isn’t maintaining a good position during its mid foot strike, a new pair of shoes may be indicated specifically to control pronation. Over-the-counter orthotics can help as well. Superfeet Blue Premium Insoles are available in varying models to help support the arch and heel. They are color coded by model. I wear the blue insoles which are for moderately flat feet. These insoles are very durable. In the past, these insoles have lasted for 1,000 miles through the life cycles of two different pairs of shoes.
  • Start a supplement. Many herbs help to reduce inflammation and pain. CapraFlex is one of my favorite supplements. Essentially, it combines an organic glucosamine and chondroitin supplement with other natural herbs which are designed to reduce inflammation. CapraFlex can be taken long term or intermittently to help heal from an injury. I recommend that you try it for 30 days to see if it improves your pain. Another option is Phenocane Natural Pain Management. It combines the following: Curcumin, an herb that reduces pain and inflammation; boswellia, a natural COX2 inhibitor that also reduces pain and inflammation; DLPA, an amino acid that helps to increase and uphold serotonin levels in the brain; and nattokinase, an enzyme that assists with blood clotting and reduces pain and inflammation. (If you are taking blood thinners, please consult with your physician prior to use as the herbs could interact with some medications.)

Patellar Femoral Pain Syndrome can be very painful, but it can be easily self-treated if you handle your pain and symptoms quickly.  If you’re not experiencing relief after aggressively managing the symptoms, contact your local physical therapist for an assessment and help in managing PFPS.  The American Physical Therapy Association offers a wonderful resource to help find a physical therapist in your area.

Has a specific treatment for PFPS helped you? Which treatments haven’t worked for you? Additional discussion can help others to manage this condition more effectively.  Please leave your comments below.

Don’t forget to subscribe to my e-mail list to gain immediate access to My Top 8 Stretches to Eliminate Neck, Upper Back, and Shoulder Pain for step by step exercise instructions and photos!

If you have a question that you would like featured in an upcoming blog post, please comment below or submit your question to contact@thePhysicalTherapyAdvisor.com. Be sure to join our growing community on Facebook by liking The Physical Therapy Advisor!

Top 10 Strategies to Avoid Injury

An ounce of prevention is worth a pound of cure.  –Benjamin Franklin

As a physical therapist, I help people who have suffered from an injury through the process of rehabilitation.  Accidents will happen, but certain activities can help you to avoid and limit the chance of an injury.  Nothing will derail a perfectly designed training program like an injury.  Optimize your health and lessen your risk of injury by being proactive upfront.

Top 10 Strategies to Avoid Injury:

1.  Warm up prior to exercise. I recommend that you increase your normal warm up time by at least 10 minutes in order to increase blood flow to the area.  This allows for better mobility and also promotes healing as movement is necessary to bring in the nutrients and remove any cellular waste products.  I like to use a stationary bike or the rower machine initially to get the muscles warm and the knee joint more lubricated.

2.  Cool down. After performing your exercises, take extra time to cool down and stretch.  Use either a stationary bike (at a causal/slower pace) or the rower machine.  Both are reduced weight bearing exercises that promote movement and circulation to the knee as well as provide range of motion (ROM).  The perfect time to perform static stretching is after exercising.  Work on those tight and restricted areas.  Keep moving throughout the day and avoid sitting for extended periods of time.

CoolDownStretch

3.  Eat healthy. A healthy diet is critical to avoid injury.  Your body tissue needs nutrients to be able to perform at a high level.  Avoid processed food as much as possible.  Limit sugary food and add more protein and healthy fat in your diet.  Maintaining a diet with adequate healthy fats is essential in providing the nutrients to support all hormone function in the body as well as support the brain and nervous system.  Adequate protein intake is necessary to support muscle health and development.

4.  Stay hydrated. The human body is primarily made of water, which is critical for all body functions.  Adequate water intake is critical to avoid dehydration which can negatively affect your training.  Dehydrated tissues are prone to injury as they struggle to gain needed nutrients to heal and repair.  Dehydrated tissues are less flexible and tend to accumulate waste products.  Stay hydrated by drinking water.  Try to avoid beverages that contain artificial sweeteners or chemicals with names you can’t spell or pronounce.

5.  Supplement. I take certain supplements during times of heavy training volume or when I am in a phase of overreaching.  I also take them intermittently to help prevent injury or heal from one.

My most recommended supplement is CapraFlex by Mt. Capra.  Essentially, it combines an organic glucosamine and chondroitin supplement with other natural herbs which are designed to reduce inflammation.  CapraFlex can be taken long term or intermittently to help heal from an injury.

I also recommend a colostrum supplement called CapraColostrum by Mt. Capra.  Colostrum is the first milk produced by female mammals after giving birth.  It contains a host of immunoglobulins, anti-microbial peptides, and other growth factors.  It is especially good at strengthening the intestinal lining which prevents and heals conditions associated with a leaky gut.  Colostrum can also help a person more effectively exercise in hotter conditions.  Over all, it can boost the immune system, assist with intestinal issues, and help the body to recover faster.

Like CapraFlex, Tissue Rejuvenator by Hammer Nutrition contains glucosamine and chondroitin as well as a host of herbs, spices, and enzymes to help support tissues and limit inflammation.  I recommend taking either CapraFlex OR Tissue Rejuvenator.  You can take CapraColostrum independently or in conjunction with either CapraFlex or Tissue Rejuvenator.

I recommend taking these supplements for injury prevention or as a recovery strategy.  I recommend trying a 14-30 day protocol.  (Please consult with your pharmacist and/or physician prior to starting any new supplementation protocol.)

6.  Take cross training seriously. Performing the same activity day after day without variation can lead to overuse injuries or muscle imbalances.  You may spend a majority of your time specifically training for a particular sport or activity, but it is important to vary the training load and/or stimulus.  Not only can cross training limit your risk of injury, it makes training fun by keeping the body stimulated and ready to improve.

7.  Actively manage your aches and pains. Spot train your weak areas and work on whole body mobility and fitness.  Don’t neglect the small stuff as it will catch up with you sooner or later.  Consider seeing a masseuse for regular body work.  To learn how to use a foam roller for self-treatment, please refer to Foam Rolling for Rehabilitation.

8.  If it hurts, don’t do it! Modify the activity or discontinue it completely. Modify any exercise as you need to, and don’t compromise technique to complete an exercise.  Poor technique will only increase your risk of injury elsewhere.  Work with your coach or athletic trainer to determine if poor form and technique is causing the pain.  With instruction, you may avoid pain and injury while taking your training to the next level.

9.  Adequate rest is important. Your body must rest in order to grow and develop.  Training every day is not the best way to improve.  It can lead to injury and burn out.  Take a rest day and have fun.  Participate in a yoga class, take a leisurely bike ride, or take a walk in the park.   If you are participating in a yearly training cycle, be sure to incorporate an off season which involves a change of pace from your regular training and some active rest.  Proper programming includes mini cycles with an off season as well as active rest cycles in between heavy load and heavy volume training cycles.

10.  Seek help early. If you are experiencing chronic aches or pain or are struggling with an aspect of your training, seek help immediately.  A healthy lifestyle is a lifelong pursuit.  If you are injured or not enjoying an activity, you will not stay engaged or motivated in the long term.  Seeking advice specifically from a running coach, physical therapist, or physician can be beneficial.

Unfortunately, injuries will occur.  However, incorporating these strategies will reduce your risk of injury while likely taking your training and exercise program to the next level.  If and when an injury occurs, take it seriously and manage it quickly.

How do you avoid injury?  Which particular strategy has aided in your recovery?  Please leave your comments below.

If you have a question that you would like featured in an upcoming blog post, please comment below or submit your question to contact@thePhysicalTherapyAdvisor.com. Be sure to join our growing community on Facebook by liking The Physical Therapy Advisor!

Disclaimer:  The Physical Therapy Advisor blog is for general informational purposes only and does not constitute the practice of medicine or other professional health care services, including the giving of medical advice.  No health care provider/patient relationship is formed.  The use of information on this blog or materials linked from this blog is at your own risk.  The content of this blog is not intended to be a substitute for professional medical advice, diagnosis, or treatment.  Do not disregard, or delay in obtaining, medical advice for any medical condition you may have.  Please seek the assistance of your health care professionals for any such conditions.